
Let Me Tell You Why I Can't Stop Making This Salad
If you're anything like me, your best memories are half about the food you were eating at the time (the other half is probably bad karaoke, but let's not go there). This dill pickle bacon pasta salad made its debut at our annual family BBQ after I'd accidentally bought way too many pickles. You know when you just crave the crunch and zing of a perfectly sour pickle? Well, that day I had about 3 jars begging to be used. My cousin Lou said it was dangerously addictive. I think he was right. At least nobody left hungry, right?


Why You’ll Love Making (and Eating) This
I pull this recipe out whenever I need a dish that people actually talk about after the meal is over ("what was in that pasta salad?!"). My family goes absolutely wild for it, even those folks who swear they don't like pickles (they're lying to themselves). Also – the salty bacon, creamy sauce, and pickle tang just work. It’s the dish I make if I’ve got leftover bacon or, honestly, if I’m just in a pickle. Ha. (I know, groan…)
Confession time: I used to hate prepping pasta salad because it always came out clumpy and sad—until I realized the trick to the sauce. More on that in a bit.
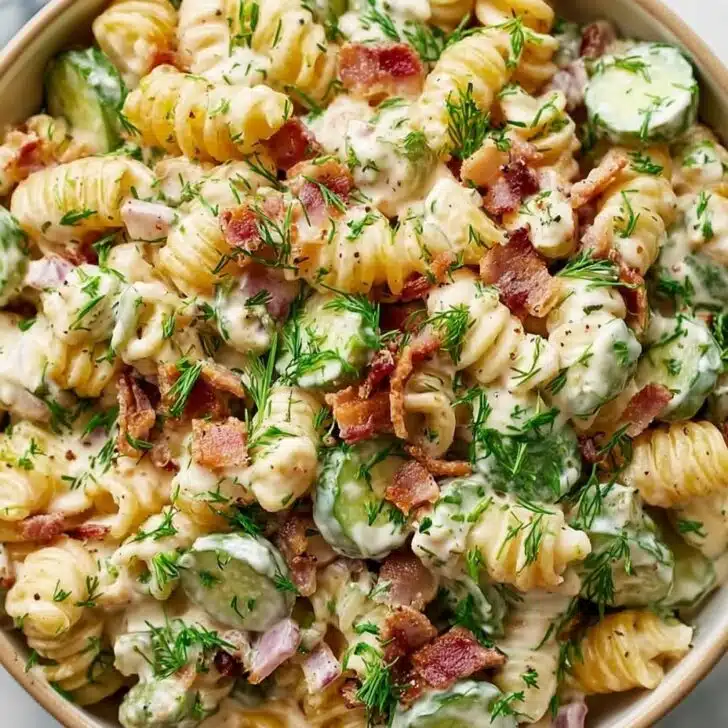
What You’ll Need (Substitutions Are Your Friend)
- 300g (about 10 oz) pasta shells or rotini – sometimes I use elbows; my neighbor swears by bowties
- 6 strips bacon, cooked crispy and crumbled – turkey bacon works fine in a pinch (but won’t fool my brother-in-law)
- 1 cup chopped dill pickles – any kinda works, but I secretly love the extra garlicky ones
- ½ cup finely diced red onion – yellow onion if you’re out; or leave it out if you must
- ½ cup real mayo (or more if you want it extra creamy) – I’ve used Greek yogurt once when the fridge was bare
- ½ cup sour cream – swapped in plain yogurt before and, eh, it was fine
- 2 tablespoon pickle juice (from the jar) – more if you’re feeling bold
- ½ cup finely shredded sharp cheddar (my cousin says “extra cheese, please”)
- ¼ cup chopped fresh dill, or a good shake of dried dill if that’s what’s on hand
- Salt and freshly ground black pepper, to taste (I almost always go heavier on pepper)
How To Throw It Together (My No-Fuss Way)
- Boil the pasta in generously salted water until just barely al dente – you kinda want some bite. Rinse under cold water. I know, real Italians would faint, but it stops the cooking and keeps it from turning mushy.
- While the pasta’s doing its thing, cook your bacon. I usually just whack it in the oven on a rack over a baking sheet at 400 F for about 15 minutes. Less mess. Crumble when cool enough.
- In a big bowl (seriously, pick a big one or you'll regret it when everything starts flying out), mix together the mayo, sour cream, pickle juice, fresh or dried dill, salt, and pepper. This is where I tend to sneak a taste and adjust the peppper.
- Toss in the chopped pickles, onions, bacon, shredded cheddar, and (finally) cooled pasta. Give it a good mix. Don’t worry if it’s looking a bit too saucy now—it’ll firm up in the fridge later (promise).
- Cover and refrigerate for at least an hour. Or longer, honestly. I think this tastes even better the second day, though it’s rarely left that long. Give it a gentle stir just before serving to wake it up.


Some Notes (Learned The Hard Way, You’re Welcome)
- You truly need to rinse the pasta. I tried skipping it once—bad move, the texture gets weird. Don’t be a hero.
- If the salad seems a little stiff after chilling, just add another spoonful of sour cream or a splash more pickle juice and toss.
- Hot tip: Don’t use sweet pickles. I did once and got the side-eye from my whole family.
The Ways We’ve Improvised
- Once I tossed in blanched broccoli, and it was amazing—super fresh tasting.
- I tried with ranch seasoning mixed into the sauce instead of dill. Not bad, but not this.
- Swapping in ham for bacon… honestly, it just wasn’t the same, but more power to you if you’re outta bacon.


What If I Don’t Have Fancy Kitchen Gadgets?
You don’t need a salad spinner or anything special. Even a big old mixing bowl from under your sink will do. And if you don’t have a cheese grater? Tear the cheese into small bits by hand (I’ve done it, you won’t die, maybe just get a bit messy).
How Long Does It Actually Keep?
Supposedly, this’ll last 3 days in the fridge if you cover it up (airtight is best), but honestly, in my house it never makes it more than a day—two, max. I once found the bowl scraped clean except for a rogue pickle chunk hiding behind the tupperware lid.
What Goes Well With This? (Besides Just a Spoon)
Our tradition: serve it with smoky grilled sausages or burgers, and a big pitcher of lemonade. Makes a killer lunch next to rotisserie chicken—or, honestly, I’ve eaten it standing in front of the fridge, fork in hand, in my pajamas. (No shame.)
Some Pro Tips I’ve Learned (The Hard/Stubborn Way)
- Don’t rush the chilling step—I tried once and it tasted a bit off. Give it time. Your future self will thank you.
- Add the bacon last if you want it extra crispy. Or make extra and snack on a strip. You earned it.
- If you let it sit out too long at a BBQ, it gets kind of gluey. Keep it on ice if it’s hot out.
FAQ: Stuff Folks Actually Ask Me (And Sometimes, I Don’t Have a Perfect Answer)
- Can I make this ahead of time?
Absolutely. Just keep a bit of extra sauce back to freshen it up before serving. If you forget—just hit it with a splash of pickle juice and stir. - Is it gluten-free?
Not as written, but if you use gluten-free pasta, it works fine. Actually, I find it works better if you slightly undercook GF pasta—it stays together better. - What’s the best type of pickle?
For me, classic dill or those whole garlic dills from the local deli. But even regular supermarket pickles do the job—you don’t have to go artisan. - Can I use turkey bacon?
Sure! It won't be quite the same, but it'll get you pretty close. - What if I hate onions?
Just skip 'em. Maybe add some chopped celery for crunch instead. Or don't. You're the boss of your salad.
Did I forget anything? Oh well, just send a message. Let's be honest, the best recipes are never written down perfectly anyway.
Ingredients
- 300g (about 10 oz) pasta shells or rotini
- 6 strips bacon, cooked crispy and crumbled
- 1 cup chopped dill pickles
- ½ cup finely diced red onion
- ½ cup real mayo (or more if you want it extra creamy)
- ½ cup sour cream
- 2 tablespoon pickle juice (from the jar)
- ½ cup finely shredded sharp cheddar
- ¼ cup chopped fresh dill, or a good shake of dried dill
- Salt and freshly ground black pepper, to taste
Instructions
-
1Boil the pasta in generously salted water until just barely al dente – you kinda want some bite. Rinse under cold water. I know, real Italians would faint, but it stops the cooking and keeps it from turning mushy.
-
2While the pasta’s doing its thing, cook your bacon. I usually just whack it in the oven on a rack over a baking sheet at 400 F for about 15 minutes. Less mess. Crumble when cool enough.
-
3In a big bowl (seriously, pick a big one or you'll regret it when everything starts flying out), mix together the mayo, sour cream, pickle juice, fresh or dried dill, salt, and pepper. This is where I tend to sneak a taste and adjust the peppper.
-
4Toss in the chopped pickles, onions, bacon, shredded cheddar, and (finally) cooled pasta. Give it a good mix. Don’t worry if it’s looking a bit too saucy now—it’ll firm up in the fridge later (promise).
-
5Cover and refrigerate for at least an hour. Or longer, honestly. I think this tastes even better the second day, though it’s rarely left that long. Give it a gentle stir just before serving to wake it up.
Approximate Information for One Serving
Nutrition Disclaimers
Number of total servings shown is approximate. Actual number of servings will depend on your preferred portion sizes.
Nutritional values shown are general guidelines and reflect information for 1 serving using the ingredients listed, not including any optional ingredients. Actual macros may vary slightly depending on specific brands and types of ingredients used.
To determine the weight of one serving, prepare the recipe as instructed. Weigh the finished recipe, then divide the weight of the finished recipe (not including the weight of the container the food is in) by the desired number of servings. Result will be the weight of one serving.
Did you make this recipe?
Please consider Pinning it!