
Why This Stuffing Means So Much (And Why You'll Love It)
Okay, let me set the scene—every Thanksgiving from when I was knee-high to a turkey drumstick, my grandma’s house would fill with the scent of roasting herbs and buttery bread at least a day before dinner. I still remember the sound her old wooden spoon made clanging around the mixing bowl (she never measured a thing except maybe her patience with us kids). I’ll be honest—plenty of years I wanted to sneak a second helping of just the stuffing before I looked twice at the turkey.
I make this when I really want to feel that familiar, cozy, kind-of-chaotic holiday feeling. My family goes crazy for it because it’s not all soggy or bland—there’s crunch, oozy butter, and little surprise bites of celery and onion (don’t panic, picky eaters, they nearly melt away). Sometimes, if I'm feeling adventurous—or lazy, depends on the year—I’ll swap out a thing or two, but the bones of this recipe never change.
(Fun fact: Last year, Aunt Marge tried to bring her "gourmet" stuffing with cranberries and... nobody touched it. Not my circus, not my monkeys, but just saying... Grandma’s wins by a country mile.)
So, What Exactly Goes In This Magic Bowl?
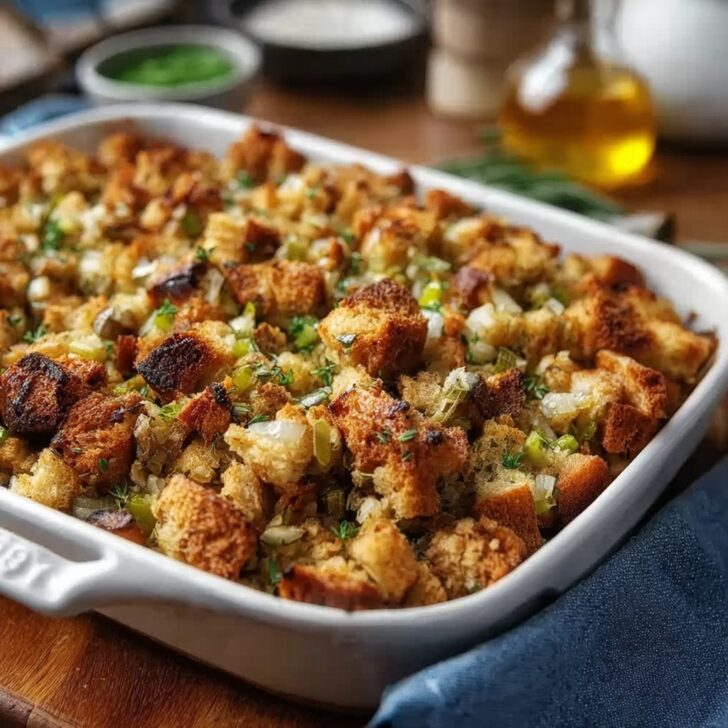
- Day-old white bread, torn up (about a loaf, or, let's be real, whatever's left in your bread box—multigrain works too, if you like a nuttier thing. Grandma swore by Wonder Bread, but I'm not above using sourdough if that's all I've got.)
- ¾ cup salted butter (though unsalted works; just add a pinch more salt)
- 1 large onion, chopped (once or twice I’ve used shallots when I ran out at the last minute, don’t tell Grandma!)
- 3-4 stalks celery, diced
- 2 cloves garlic, minced (optional but highly recommended, unless you’re in no-kiss mode)
- 1 to 1.5 cups chicken broth—start with 1 cup and see if it needs more; you could use veggie broth too if that’s your jam
- 2 eggs, beaten (sometimes I leave these out when I'm cooking for a vegan cousin, honestly it turns out a little less rich but still great)
- 1 tablespoon fresh sage, chopped (dried is fine in a pinch, only use about a teaspoon though)
- 1 tablespoon fresh parsley, chopped
- 1 teaspoon thyme (fresh or dried, I almost always eyeball this)
- Salt and black pepper to taste—at least half a teaspoon of salt for me
Optional extras: I’ve tossed in a handful of chopped walnuts, diced apples, or even a handful of sausage. But honestly—it can get outta hand pretty fast!
How I Bring It All Together (Imperfectly, But Hey)
- Heat the oven to 350°F (or roughly 180°C). Butter a big baking dish—I use something like a 9x13, but, uh, use what you’ve got. I once used a roasting pan when every Pyrex was in the dishwasher. It worked. Sort of.
- Spread your bread bits over a baking sheet. Toast 'em in the oven for about 10 minutes until they're dry-ish, but not brown. (Actually, sometimes I just let them sit out overnight. This step is more for show if you already have stale bread.)
- Melt the butter in a giant pan—like, bigger than you think you’ll need, because celery gets all ambitious and puffs up. Add onion and celery. Cook until it all softens up and the kitchen smells like you’re doing something right, about 8-10 minutes. Add garlic for the last minute. Stir so nothing sticks (I get distracted and burn things sometimes, so, set a timer?)
- Throw in the herbs, salt, and pepper. Let them get cozy for a minute or two. Take it off the heat.
- Mix the toasted bread with the buttery veggie-herb mix in a great big bowl—I mean, use a clean laundry basket if you have to, no shame. Drizzle in the broth and beaten eggs. Use your hands if you’re not squeamish; that’s the magic trick for getting it all moistened (messy, but worth it). If it looks kind of gloopy—don’t worry. It’ll firm up in the oven. This is where I usually sneak a taste, just for quality control, you know?
- Spoon the whole works into your buttered baking dish. Cover with foil. (Sometimes I forget, and then the top gets too crunchy, so don’t skip it unless you like that.)
- Bake 30 minutes. Take off foil. Bake another 15 minutes, or until the top is golden and you can't resist poking it with a fork.
- Let it sit a bit before serving (if you can—my brother always tries to steal a bite straight from the pan and burns his tongue every year, like clockwork).
Some Notes (Mostly Learned the Hard Way)
- If you use fresh bread, reduce the broth or else it’ll get soggy—think spongy, not soupy.
- Don’t leave out the butter. I’ve tried less and it’s just…sad.
- I think it tastes better made a day ahead, but if you do that, reheat with a splash of broth and cover tightly so it doesn’t dry out. (Goes doubly for leftovers.)
Stuff I’ve Tried That (Mostly) Worked
- One year, I added cooked sausage and my uncle practically licked the bowl.
- Dried cranberries once—eh, it was fine, but I'd skip it unless you’re into sweet stuffings.
- I tried gluten-free bread one year. It did the job but needed way less broth than I thought. Little crumbly, though.


Gear You Kinda Need (But Improvise If You Don’t)
- Big nonstick skillet—cast iron is amazing but not a deal-breaker
- Mixing bowl (honestly, even a soup pot if all your nice bowls are in use)
- 9x13 baking dish… or just anything oven-safe and roomy
- Bread knife, but tearing by hand “like a barbarian” totally works
Don’t have foil for covering? I’ve used a baking sheet perched on top before. It’s oddly effective.
Keeping the Leftovers (If You Get Any)
In an airtight container in the fridge, you’ll get 2-3 days, tops. Though honestly, in my house it never lasts more than a day! If you want to freeze it, go ahead, just wrap tight and reheat gently with a splash more broth. Still… fresh is best.
How I Love to Serve It
Obviously, it’s perfect beside turkey and gravy (I urge extra gravy, always). Sometimes, we go rogue and have leftovers fried up with breakfast eggs the next day—stuffing hash, if you will. Once, we crumbled it onto soup—what a cozy lunch.
And here’s our slightly odd family tradition: a Tablespoon of this stuffing mashed together with cranberry sauce and a chunk of turkey, all on one fork. Odd but oddly perfect.
Lil’ Lessons I Learned the Hard Way
- I once tried rushing the toasting/breadcrumb step and regretted it because the stuffing turned out clumpy and weirdly chewy.
- Chopping celery too big means it’ll never really soften in time. Dice it up small—unless you like surprise crunches.
- Oh, and if you double the batch, don’t skimp on herbs—trust me on this!
Honestly Asked Questions (And My Actual Answers)
- Can I make this vegetarian? Totally! Just use veggie broth and skip sausage if you were adding any. Still super tasty.
- Help! My stuffing’s dry—what can I do? Happens to all of us. Just drizzle a bit more broth before reheating and cover tightly. If it’s really dry, maybe try a pat of butter too, for morale.
- Can I stuff this into a turkey? You could, but honestly, I never do. It sometimes dries out. Much easier in a baking dish. But if you must, make sure it's not too wet before stuffing.
- What goes best with this stuffing? Turkey’s the classic, sure—but I’ve served this with roast chicken and even as a side for beef stew. Why not? It's only food!
By the way, for truly brilliant (and fun) bread techniques, King Arthur Baking is my go-to site. And if you want to get really deep into Thanksgiving science, Serious Eats has more nerdy detail than you’ll ever need—but it’s an entertaining rabbit hole, if that’s your thing.
One more wandering thought—every now and then, a squirrel will try to pillage the bread I leave out to stale on the porch ledge. So if you hear odd scrabbling noises, it might just be me shooing them off mid-batch. Cooking’s never predictable, right?
Happy feasting, and may your stuffing come out gold and glorious!


Ingredients
- 12 cups cubed day-old white bread
- 1 cup unsalted butter
- 2 cups chopped celery
- 2 cups chopped yellow onion
- ¼ cup chopped fresh parsley
- 1 tablespoon chopped fresh sage
- 1 tablespoon chopped fresh thyme
- 1 tablespoon chopped fresh rosemary
- 2 teaspoons salt
- 1 teaspoon black pepper
- 2 ½ cups chicken broth
Instructions
-
1Preheat oven to 350°F (175°C). Lightly grease a large baking dish and set aside.
-
2Melt butter in a large skillet over medium heat. Add chopped onion and celery; cook for about 7-8 minutes until vegetables are soft and translucent.
-
3Add parsley, sage, thyme, and rosemary; cook for another 1-2 minutes until fragrant.
-
4In a large mixing bowl, combine cubed bread, cooked vegetables with herbs, salt, and black pepper. Slowly pour chicken broth over the mixture, tossing gently until bread is evenly moistened but not soggy.
-
5Transfer stuffing mixture to the prepared baking dish. Cover with foil and bake for 30 minutes. Remove foil and bake an additional 30 minutes, until the top is golden and crisp.
-
6Let stuffing cool for 10 minutes before serving. Enjoy this traditional holiday favorite!
Approximate Information for One Serving
Nutrition Disclaimers
Number of total servings shown is approximate. Actual number of servings will depend on your preferred portion sizes.
Nutritional values shown are general guidelines and reflect information for 1 serving using the ingredients listed, not including any optional ingredients. Actual macros may vary slightly depending on specific brands and types of ingredients used.
To determine the weight of one serving, prepare the recipe as instructed. Weigh the finished recipe, then divide the weight of the finished recipe (not including the weight of the container the food is in) by the desired number of servings. Result will be the weight of one serving.
Did you make this recipe?
Please consider Pinning it!!