
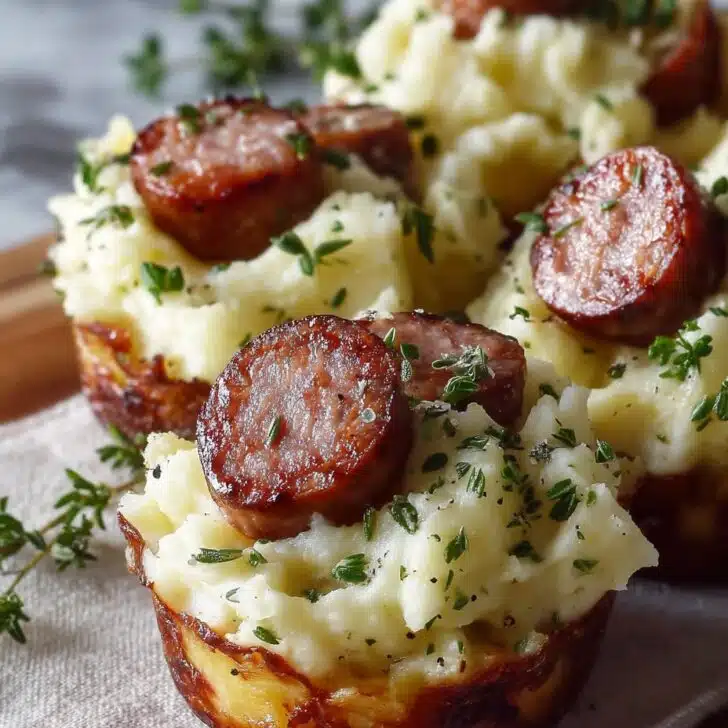
Let Me Tell You About These Crispy Irish Cups...
So, St. Patrick’s Day lands somewhere between my favorite excuse to wear green socks and the time I try (again) to impress my mother-in-law with something vaguely Irish in name and robust in flavor. Honestly, these Crispy St. Patrick’s Irish Sausages and Mashed Potatoes Cups are the only thing that comes out of my oven looking both adorable and like I actually planned ahead. I still remember the first time I made these for a semi-chaotic family get-together — the potatoes ended up everywhere. My cousin Patrick (yes, seriously) declared them “better than pub food,” which I took as a badge of honor. Don’t ask what the dog thought, though.


Why You'll Love This Recipe (Seriously)
I make this when I want everyone at the table to feel a little special, and also when I can’t be bothered doing a million dishes. My family goes a bit wild for the crispy edges (the way the mashed potato goes golden is properly magic) and, sometimes, I just want something fun that’s neither a stew nor corned beef. These cups have pulled me out of last-minute dinner chaos more than once. And listen, sometimes the sausage doesn’t brown just right—but a little extra cheese fixes most kitchen ‘oops’.
Ingredients You’ll Need (and a Few Swaps)
- 8 Irish pork sausages (or 8 thick bangers—honestly, bratwurst works fine in a pinch)
- 3 large russet potatoes, peeled and chopped (or just use Yukon Gold if I can’t be bothered peeling)
- 2 tablespoons unsalted butter (my grandmother says you must use Kerrygold, but I just grab what’s in the fridge)
- ¼ cup whole milk (I sometimes use cream or even oat milk if dairy is low—tastes just as lush)
- ½ cup sharp cheddar, grated (or any strong cheese you’ve got, really)
- 2 spring onions, finely sliced (optional, or maybe swap for chives if you fancy)
- 1 teaspoon salt
- ½ teaspoon black pepper
- Olive oil spray or a dab of butter, for greasing
How To Make Crispy St. Patrick’s Sausage & Mash Cups
- Preheat your oven to 400°F (that’s about 200°C, for anyone outside the US). Grease a 12-cup muffin pan generously — trust me on the “generous” bit.
- Boil the potatoes in salty water (like the ocean, as my old housemate used to say) until they're soft—around 15-18 minutes. Don’t stress if you over-boil; just drain them well.
- As the potatoes do their thing, toss the sausages in a frying pan with a drizzle of oil. Brown gently for about 8 minutes, rolling them around until they look appetizing (or at least edible).
- Mash the drained potatoes with butter and milk until creamy but not soup. Add salt and pepper, plus ¼ cup cheese and half the spring onions (this is usually where I sneak a taste… you know, quality control).
- Cut each sausage in half, and yes, eat the scraggly ends if you’re feeling peckish. I won’t tell.
- Spoon a heaping tablespoon of mash into each muffin cup and use your fingers to make a little nest shape (don’t worry if it looks weird at first – it’ll crisp up nicely).
- Press a sausage half into each potato nest. Top with the rest of the cheese and a sprinkle of spring onions.
- Bake for 20-25 minutes till you see golden, crispy edges and bubbling cheese. Sometimes I go a bit longer – I just like the edges extra crunchy.
- Let them cool for 5 minutes before (attempting to) pry them out of the tin. A butter knife helps, but if they stick a bit, just pretend it’s rustic.


Random Notes That Might Actually Help
- Don’t panic if your mashed potatoes seem dry—add a splash more milk. If they’re wet, bake a few extra minutes.
- If the cups collapse when unmolding, call it a “deconstructed Irish cup” and serve with a wink!
- I think these taste even better when reheated, but that might just be me (and my midnight snack habits).
Variations I’ve Dabbled With
- Mini smoked sausages work, but they’re not as satisfying. Just being honest.
- Sometimes I stir in caramelized onions with the mash—definitely not traditional, but oh so good.
- I tried a veggie sausage once; it tasted fine but got a bit mushy. Maybe skip that unless you have a firm favorite.


Got None of the Right Equipment?
If you don’t have a muffin tin, squish little piles on a parchment-lined tray. They’ll spread out more and be a bit uglier, but still taste fantastic. Also, I once mashed spuds with a fork—takes ages and works your arm, but it’ll do in a pinch.
What About Leftovers?
Store any leftovers in the fridge for up to 3 days in an airtight box, though honestly, in my house it never lasts more than a day! You can reheat them in the oven or a microwave—still tasty, but the oven is better for reviving that crunch.
Here’s How I Like to Serve ‘Em
These are dead easy to serve straight out of the pan. I love adding a dab of tangy mustard on top, or a bit of brown sauce (HP, if you’re feeling proper British). Pair with a pile of peas or a simple salad. My brother dunks them in ketchup; can’t win ‘em all.
Lessons Learned (“Pro” Tips, If You Will)
- Don’t rush the mashing—lumpy potatoes make for lumpy cups, and not in a good way. I tried skipping this in a hurry once, and, well, we’ll leave it at that.
- If you overfill the pan, the cheese will stick and burn. On second thought, some people fight over the crispy cheese bits, so maybe that’s not so bad.
FAQ From Friends, Family, and Nosy Neighbors
- Can I make these with chicken sausages? Yep! Use whatever you have. Find your own flavor adventure, I say.
- Do I have to peel the potatoes? Honestly, no. The skins add texture, but make sure you scrub ‘em clean. Sometimes I just can’t be bothered.
- What’s the best way to reheat? Oven at 350°F for about 10 minutes gets them nice and crisp again. Microwave works if you’re in a rush—it’s just not as crispy.
- I don’t eat dairy. What’s the swap? Use dairy-free butter and milk; vegan cheese works too. The flavor varies, but it’ll all bake up fine.
- Why did my cups stick? I’ve had this one a lot—grease the tin like your life depends on it. Or line with paper muffin cups; bit less crispy, but saves your nerves.
And that’s it, mate! Enjoy and let me know if you accidentally invent a new version—my cousin Patrick is always looking for something new to “improve.”
Ingredients
- 8 Irish pork sausages (or 8 thick bangers—honestly, bratwurst works fine in a pinch)
- 3 large russet potatoes, peeled and chopped (or just use Yukon Gold if I can’t be bothered peeling)
- 2 tablespoons unsalted butter (my grandmother says you must use Kerrygold, but I just grab what’s in the fridge)
- ¼ cup whole milk (I sometimes use cream or even oat milk if dairy is low—tastes just as lush)
- ½ cup sharp cheddar, grated (or any strong cheese you’ve got, really)
- 2 spring onions, finely sliced (optional, or maybe swap for chives if you fancy)
- 1 teaspoon salt
- ½ teaspoon black pepper
- Olive oil spray or a dab of butter, for greasing
Instructions
-
1Preheat your oven to 400°F (that’s about 200°C, for anyone outside the US). Grease a 12-cup muffin pan generously — trust me on the “generous” bit.
-
2Boil the potatoes in salty water (like the ocean, as my old housemate used to say) until they're soft—around 15-18 minutes. Don’t stress if you over-boil; just drain them well.
-
3As the potatoes do their thing, toss the sausages in a frying pan with a drizzle of oil. Brown gently for about 8 minutes, rolling them around until they look appetizing (or at least edible).
-
4Mash the drained potatoes with butter and milk until creamy but not soup. Add salt and pepper, plus ¼ cup cheese and half the spring onions (this is usually where I sneak a taste… you know, quality control).
-
5Cut each sausage in half, and yes, eat the scraggly ends if you’re feeling peckish. I won’t tell.
-
6Spoon a heaping tablespoon of mash into each muffin cup and use your fingers to make a little nest shape (don’t worry if it looks weird at first – it’ll crisp up nicely).
-
7Press a sausage half into each potato nest. Top with the rest of the cheese and a sprinkle of spring onions.
-
8Bake for 20-25 minutes till you see golden, crispy edges and bubbling cheese. Sometimes I go a bit longer – I just like the edges extra crunchy.
-
9Let them cool for 5 minutes before (attempting to) pry them out of the tin. A butter knife helps, but if they stick a bit, just pretend it’s rustic.
Approximate Information for One Serving
Nutrition Disclaimers
Number of total servings shown is approximate. Actual number of servings will depend on your preferred portion sizes.
Nutritional values shown are general guidelines and reflect information for 1 serving using the ingredients listed, not including any optional ingredients. Actual macros may vary slightly depending on specific brands and types of ingredients used.
To determine the weight of one serving, prepare the recipe as instructed. Weigh the finished recipe, then divide the weight of the finished recipe (not including the weight of the container the food is in) by the desired number of servings. Result will be the weight of one serving.
Did you make this recipe?
Please consider Pinning it!