Let Me Tell You About These Crispy Philly Cheesesteak Grilled Wraps...
Okay, full honesty—this is the one wrap my little brother actually requests by name, which is wild given he claims he "doesn't like steak." (Yeah, sure, buddy.) The first time I made these grilled wraps, it was during one of those Wednesday nights when you kind of want takeout, but your wallet votes no. I had half a pack of tortillas, some leftover steak (the fancy deli kind, not the gold-plated stuff), and way too much cheese—yep, you know where this is headed. Somewhere between burning the first batch and learning that you absolutely need to let these things get really golden, we discovered a new favorite. I might not be from Philly, but these wraps are basically the next best thing to being there with a cheesesteak in hand, minus the train ticket. Oh, and if you catch me eating the filling straight from the pan, mind your business.

Why You’ll Love These (Or, Why I Keep Making Them)
I make these whenever I’m craving something super cheesy and crunchy, but I don’t feel like fussing over hoagie rolls (who has those lying around, right?). My family goes nuts for these because honestly, they’re way less messy than the classic cheesesteak. Plus, if you’re cookin’ for picky eaters, you can sneak in mushrooms, skip the onions, whatever. I once tried to make these in the oven instead of a pan—spoiler: it doesn’t get nearly as crispy. Lesson learned.
What You’ll Need (And What I Sometimes Sub In)
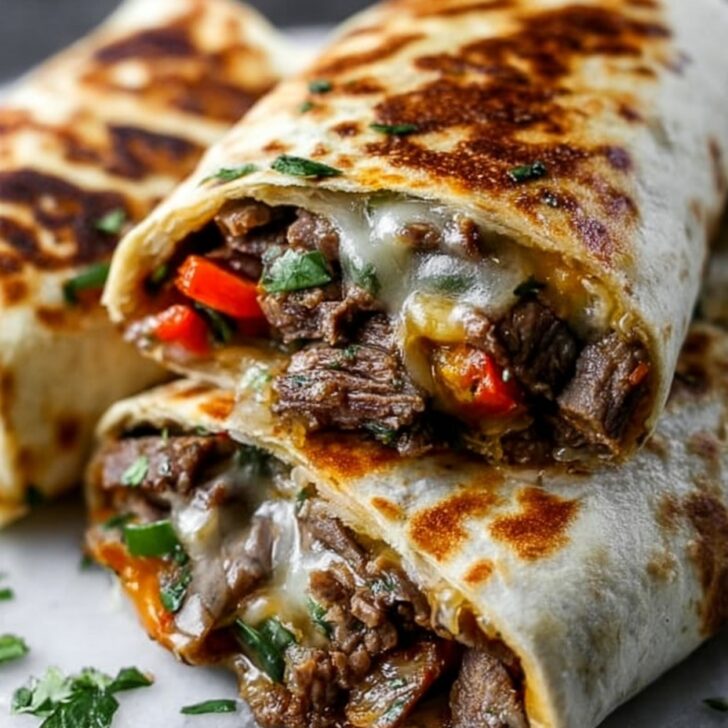
- 3 large flour tortillas (10-inch or so)—I’ve used smaller ones in a pinch, just cram less filling in!
- 8 oz thinly sliced steak (ribeye is classic, but honestly, shaved roast beef works too when I’m feeling lazy)
- 1 green bell pepper, sliced thin (my uncle swears by red ones; I can’t tell much difference)
- 1 small yellow onion, sliced thin
- ½ cup sliced mushrooms (totally optional, but I love the flavor!)
- 1 ½ cups shredded provolone cheese (or mozzarella—sometimes I throw in a bit of cheddar if it’s lurking in the fridge)
- 2 tablespoon mayonnaise (I know, it sounds odd, but just trust me—it makes them creamy!)
- 1 tablespoon olive oil (sometimes I just use butter if I’m feeling indulgent)
- Salt and black pepper, to taste
How To Actually Throw These Together
- Start by heating up a big-ish skillet over medium-high (if you forget to preheat, join the club; it’ll just take your onions longer to soften).
- Add the olive oil. Toss in the onions and bell pepper. Sauté for about 5-6 minutes until they start to soften. Mushrooms go in now if you’re using them—don't worry if they seem too crowded, they’ll cook down.
- Push the veggies over to one side. Drop in your steak slices and let them brown quickly—should just take 2-3 minutes. If using pre-cooked roast beef, heat it just until it’s warmed through. Season with salt and pepper—this is where I usually sneak a taste… uh, for quality control.
- Turn the heat to low. Stir in the mayo so everything gets a little creamy. (If it looks a bit weird right now, don’t panic—it’ll look glorious when you add the cheese.)
- Sprinkle in the shredded cheese and fold it all together until the cheese starts melting and you’re fighting the urge to eat the whole skillet mix as is.
- Lay out your tortillas. Spoon a third of the steak mixture onto the bottom third of each tortilla, then roll up like a burrito—sides in, nice and snug. (Yes, a bit will probably leak out. I, for one, just call that the chef’s snack.)
- Wipe out your skillet (or just use a clean one if you’re fancy), and set it over medium heat. Add a smidge of butter or oil—either works.
- Place the wraps seam-side down and press gently. Cook for 2-3 minutes per side until they’re golden and crispy—flip with care. I once tried to rush this… let’s just say, pale wraps aren’t nearly as satisfying.
- Let them rest a minute so molten cheese doesn’t burn your mouth (ask me how I know). Cut in half and dig in.

My Notes From a Couple Dozen Batches
- If you overfill the wraps, they’ll bust open and leave you with a pan full of sadness and cheese lava. Less is more here, weirdly enough.
- The mayo is optional, but I think it ties it all together. Yogurt didn’t work quite as well—just too tangy, in my humble opinion.
- I once tried this with leftover chicken—good, but not quite the same “oomph.” Still, not a bad way to stretch leftovers when steak is a splurge.
If You Want to Mix Things Up...
- I’ve swapped in pickled jalapeños for some kick. Good decision, but if you’re heat-shy, start small. My cousin once put hot sauce inside the wrap… let’s just say, some things are better on the side.
- Trying to make it “healthier,” I went with whole wheat tortillas and skim cheese. They were… fine. If you love the texture of cardboard, go for it. (No offense, whole wheat fans.)
- Sautéed spinach? Actually, sneaky fantastic if you want a green boost.

Handy Gear (and What to Try If You’re Missing Stuff)
- Big skillet or frying pan—you can use a panini press if you’re all posh (I rarely bother dragging mine out).
- Sharp knife or kitchen scissors for slicing the wraps—the scissors thing is a weird habit, but it works.
- I guess a spatula is key for flipping, but I’ve literally used two forks when everything else was "in the wash."
Storing and (Re)Heating—But Honestly They Never Last
Technically, you can wrap any leftovers in foil and keep them in the fridge for up to 2 days. Reheat them in the skillet (the microwave makes them sad and soggy). But, real talk—these vanish the same day around here, so best of luck getting to the fridge stage!
How I Love to Serve These
Personally, I like mine with a little bowl of potato chips and a pickle spear, diner-style. My sister dunks hers in spicy ketchup (not traditional, but delicious). If you’re feeling fancy, throw together a salad—it’s all about balance, right?
Pro Tips (From My Glorious Failures)
- Don’t try to speed up the pan-grilling with high heat. All you’ll get is dark spots outside and cold cheese inside—found that out the hard way.
- Not letting the wraps rest after grilling? Your mouth will regret it. Patience pays off with gooey, not scalding, cheese.
- If you use too much mayo, the filling gets sloppy. Just a dab’ll do ya (old commercial reference—let’s move on).
FAQ (Because Apparently I’ve Become the Go-To Cheesesteak Wrap Person)
Q: Can I use chicken or turkey instead of steak?
Yeah, you can—but it won’t taste like a proper Philly cheesesteak, just more like a fancy grilled chicken wrap. Still hits the spot though.
Q: Is it okay to make these ahead?
Sure, but wrap ‘em tightly and re-toast to bring back the crunch, or they end up weirdly floppy. Also, maybe add the cheese just before grilling for max gooeyness.
Q: What if I don’t have mayo?
No sweat, just skip it. I tried ranch dressing once for science… ehhh, wouldn’t recommend it, but hey, your kitchen, your rules.
Q: Are these freezer friendly?
Probably, but if I’m honest, mine have never survived long enough to freeze. If you do it, wrap them well and toast from frozen—all bets are off on the texture though.
Now, if you’re still here, thanks for reading—and if you discover an accidental new favorite filling, you have to let me know. Happy cooking!
Ingredients
- 3 large flour tortillas (10-inch or so)—I’ve used smaller ones in a pinch, just cram less filling in!
- 8 oz thinly sliced steak (ribeye is classic, but honestly, shaved roast beef works too when I’m feeling lazy)
- 1 green bell pepper, sliced thin (my uncle swears by red ones; I can’t tell much difference)
- 1 small yellow onion, sliced thin
- ½ cup sliced mushrooms (totally optional, but I love the flavor!)
- 1 ½ cups shredded provolone cheese (or mozzarella—sometimes I throw in a bit of cheddar if it’s lurking in the fridge)
- 2 tablespoon mayonnaise (I know, it sounds odd, but just trust me—it makes them creamy!)
- 1 tablespoon olive oil (sometimes I just use butter if I’m feeling indulgent)
- Salt and black pepper, to taste
Instructions
-
1Start by heating up a big-ish skillet over medium-high (if you forget to preheat, join the club; it’ll just take your onions longer to soften).
-
2Add the olive oil. Toss in the onions and bell pepper. Sauté for about 5-6 minutes until they start to soften. Mushrooms go in now if you’re using them—don't worry if they seem too crowded, they’ll cook down.
-
3Push the veggies over to one side. Drop in your steak slices and let them brown quickly—should just take 2-3 minutes. If using pre-cooked roast beef, heat it just until it’s warmed through. Season with salt and pepper—this is where I usually sneak a taste… uh, for quality control.
-
4Turn the heat to low. Stir in the mayo so everything gets a little creamy. (If it looks a bit weird right now, don’t panic—it’ll look glorious when you add the cheese.)
-
5Sprinkle in the shredded cheese and fold it all together until the cheese starts melting and you’re fighting the urge to eat the whole skillet mix as is.
-
6Lay out your tortillas. Spoon a third of the steak mixture onto the bottom third of each tortilla, then roll up like a burrito—sides in, nice and snug. (Yes, a bit will probably leak out. I, for one, just call that the chef’s snack.)
-
7Wipe out your skillet (or just use a clean one if you’re fancy), and set it over medium heat. Add a smidge of butter or oil—either works.
-
8Place the wraps seam-side down and press gently. Cook for 2-3 minutes per side until they’re golden and crispy—flip with care. I once tried to rush this… let’s just say, pale wraps aren’t nearly as satisfying.
-
9Let them rest a minute so molten cheese doesn’t burn your mouth (ask me how I know). Cut in half and dig in.
Approximate Information for One Serving
Nutrition Disclaimers
Number of total servings shown is approximate. Actual number of servings will depend on your preferred portion sizes.
Nutritional values shown are general guidelines and reflect information for 1 serving using the ingredients listed, not including any optional ingredients. Actual macros may vary slightly depending on specific brands and types of ingredients used.
To determine the weight of one serving, prepare the recipe as instructed. Weigh the finished recipe, then divide the weight of the finished recipe (not including the weight of the container the food is in) by the desired number of servings. Result will be the weight of one serving.
Did you make this recipe?
Please consider Pinning it!