
So, Here’s How I Fell for Crispy Korean Baked Cauliflower
You know those days when you’re wandering your kitchen, kinda hungry but also a bit lazy? That’s exactly how I stumbled into the world of crispy Korean baked cauliflower. My first attempt was a happy accident—I'd meant to make wings, but the cauliflower was giving me the side-eye in the fridge. (Honestly, vegetables can be judgy.) Fast-forward: now it’s my not-so-secret, crunchy, spicy, weirdly addictive snack for movie nights. My sister actually said, “If you made two trays, I wouldn’t judge.” Little does she know, I already do.
Why You’ll Love This (Or At Least Why I Do!)
I make this when I want something bold but not, you know, ‘call-the-fire-department’ spicy. My family goes wild for it—mainly because it gives off big ‘takeout’ vibes but is way less greasy. Plus, the leftovers (if there are any) actually taste better the next day. I used to struggle with getting things crispy in the oven (seriously, soggy veggies are my nemesis), but this one nails it pretty much every time. Oh, and it's a sneaky way to eat more veggies, which my mom won't let me forget.
What You’ll Need (And What You Can Totally Swap)
- 1 medium head cauliflower (about 750g)—I’ve used frozen florets in a pinch, just thaw and pat dry first
- ¾ cup plain flour (all-purpose, but rice flour makes it crispier, honest)
- ½ cup water (or unsweetened oat milk if you’re feeling fancy)
- ½ teaspoon garlic powder (my gran swears by fresh, but I’m lazy, so...powder!)
- ½ teaspoon salt
- ¼ teaspoon black pepper (I just eyeball it sometimes. No regrets yet.)
- 1 cup panko breadcrumbs (or regular, but panko’s crunchier—if you can’t find ‘em, crushed cornflakes work, too!)
- For the sauce:
- ¼ cup gochujang (Korean chili paste—sriracha works in a pinch, but it’s different)
- 2 tablespoons soy sauce (I use low sodium, but again, you do you)
- 1 tablespoon sesame oil
- 2 tablespoons maple syrup (honey or agave...or just plain sugar, if you must)
- 1 tablespoon rice vinegar (apple cider vinegar works, but it’s sharper)
- 2 cloves garlic, minced
- 1 teaspoon grated ginger (honestly, I sometimes skip it if I can’t be bothered)
- To serve: Chopped green onions, sesame seeds, and maybe a squeeze of lime—totally optional, but I like the look.
How I Actually Make Crispy Korean Baked Cauliflower
- First, preheat your oven to 220°C / 425°F. Line a baking tray with parchment or foil. (If you forget to preheat, no biggie, but the first batch might not crisp up as much.)
- Chop the cauliflower into bite-sized florets. Don’t stress if they aren’t uniform—it’s all rustic charm. I sometimes leave the little stems on (less waste, right?).
- In a big bowl, whisk flour, water, garlic powder, salt, and pepper until it’s smooth-ish. If it looks lumpy, just keep going; lumps are friendly here.
- Toss the cauliflower in the batter. Use your hands; it’s messy but works best. This is when I usually sneak a taste—not raw, just a bit of batter to check the salt.
- Dump the panko into another bowl. Roll each battered floret in the panko until well coated. Yes, it’s fiddly, but trust me, that crunch is worth it.
- Arrange the coated cauliflower on the tray in a single layer. Crowding them makes them steam, not crisp (learned that the hard way—don’t do it).
- Bake for 25 minutes. Flip halfway if you remember. If not, they’ll still be fine. Meanwhile, make the sauce: throw all the sauce ingredients in a small pan, simmer for about 2–3 minutes until glossy. Smells amazing, right?
- When the cauliflower’s golden and crunchy, toss it (gently!) with the sauce in a big bowl. Or just drizzle the sauce over if you’re feeling lazy. Return them to the tray and bake for 5 more minutes, just to set the sauce. Or eat them as is—I’m not judging.
Stuff I’ve Learned (Sometimes the Hard Way)
- If the batter seems too thick, add a splash more water. Too runny? Chuck in a bit more flour.
- Panko really is crunchier but if you only have regular crumbs, it’ll still work; don’t overthink it.
- Don’t skip the final bake with the sauce. I did once and ended up with soggy bits—sad times.
Variations I’ve Tried (And One I Regret!)
- Sometimes I swap out gochujang for Thai sweet chili sauce (it’s sweeter, less heat, totally different vibe but still good).
- Adding shredded coconut to the panko? Actually, not bad, but a little weird with the Korean flavors. Worth trying once.
- Once I tried using BBQ sauce instead of the Korean sauce—nope. Tasted like a confused picnic. Lesson learned.
What If You Don’t Have a Whisk (Or Other Gear)?
If you’re missing a whisk, just use a fork or even a chopstick. I’ve mixed batters with a spoon before—works fine. No parchment? A well-oiled tray will do. No fancy bowl? Clean pot is fine. Improvisation is king (or queen).


Storing the Leftovers (If You Even Have Any)
Technically, you can keep leftovers in an airtight container in the fridge for up to 3 days. Reheat in the oven for 10 minutes at 200°C/400°F to get the crunch back. But honestly, in my house it never lasts past midnight snack raids. Cold, it’s not bad either (like leftover pizza—controversial, but I’m a fan).
How I Serve It (And Why My Family Thinks I’m Extra)
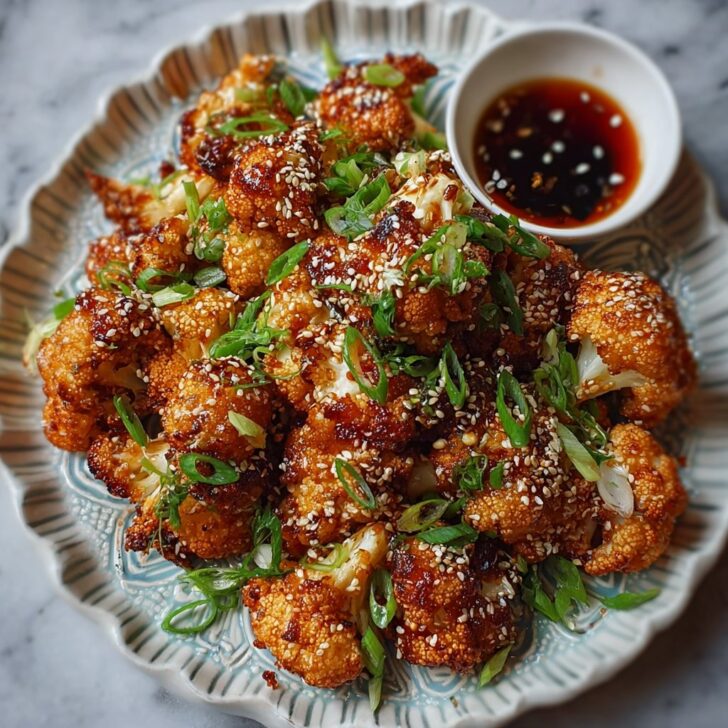
I pile it onto a platter, sprinkle with sesame seeds and green onions, and sometimes drizzle a little extra sauce. We eat it with toothpicks while watching reruns of old cooking shows. My cousin dips hers in ranch—go figure. I say serve with some pickled radish or alongside a big salad for dinner.
If I Could Offer Just One Pro Tip…
I once tried to rush the batter step—just dunked the cauliflower and threw it in the oven. Ended up with a pile of sad, pale florets. Take the time to coat them properly; it’s worth it, promise. Oh, and taste your sauce before tossing! Too spicy? Add a bit more maple.
Your Questions, Answered (Well, as Best I Can)
- Can I make this gluten-free? Yep! Use rice flour and gluten-free panko. Works a treat.
- How spicy is it, really? It’s got a kick, but not knockout. Start with less gochujang if you’re nervous.
- Do I have to use cauliflower? Nah, I tried broccoli once—wasn’t bad, but I prefer the cauliflower. Or maybe mushrooms? Haven’t tried yet but sounds good.
- Where do you buy gochujang? I order mine from H Mart (no, they're not paying me), or sometimes grab it at the local Asian market. Serious Eats has a good explanation if you’re curious what it is.
Quick Digression—Why I Love a Crispy Snack
Sidebar, but does anyone else think crunchy snacks are basically a food group? I mean, I’d happily eat chips with every meal, but this cauliflower gives me that fix without the guilt (or the orange fingers).
So there you go—my rambling, slightly chaotic guide to crispy Korean baked cauliflower. Let me know if you end up making it, or if you find a new twist that actually works. Just don’t serve it with BBQ sauce, trust me on that one.


Ingredients
- 1 large head cauliflower, cut into florets
- ¾ cup all-purpose flour
- ½ cup water
- 1 teaspoon garlic powder
- ½ teaspoon salt
- 1 cup panko breadcrumbs
- ⅓ cup Korean gochujang sauce
- 2 tablespoons soy sauce
- 1 tablespoon maple syrup
- 1 tablespoon sesame oil
- 1 tablespoon rice vinegar
- 1 tablespoon sesame seeds (for garnish)
- 2 green onions, sliced (for garnish)
Instructions
-
1Preheat the oven to 425°F (220°C) and line a baking sheet with parchment paper.
-
2In a large bowl, whisk together the flour, water, garlic powder, and salt to form a smooth batter.
-
3Dip each cauliflower floret into the batter, then coat with panko breadcrumbs. Arrange the coated florets on the prepared baking sheet.
-
4Bake for 25-30 minutes, flipping halfway, until the cauliflower is golden and crispy.
-
5Meanwhile, in a small bowl, mix together gochujang sauce, soy sauce, maple syrup, sesame oil, and rice vinegar.
-
6Remove the baked cauliflower from the oven, toss with the Korean sauce, and return to the oven for 5 minutes. Garnish with sesame seeds and green onions before serving.
Approximate Information for One Serving
Nutrition Disclaimers
Number of total servings shown is approximate. Actual number of servings will depend on your preferred portion sizes.
Nutritional values shown are general guidelines and reflect information for 1 serving using the ingredients listed, not including any optional ingredients. Actual macros may vary slightly depending on specific brands and types of ingredients used.
To determine the weight of one serving, prepare the recipe as instructed. Weigh the finished recipe, then divide the weight of the finished recipe (not including the weight of the container the food is in) by the desired number of servings. Result will be the weight of one serving.
Did you make this recipe?
Please consider Pinning it!!