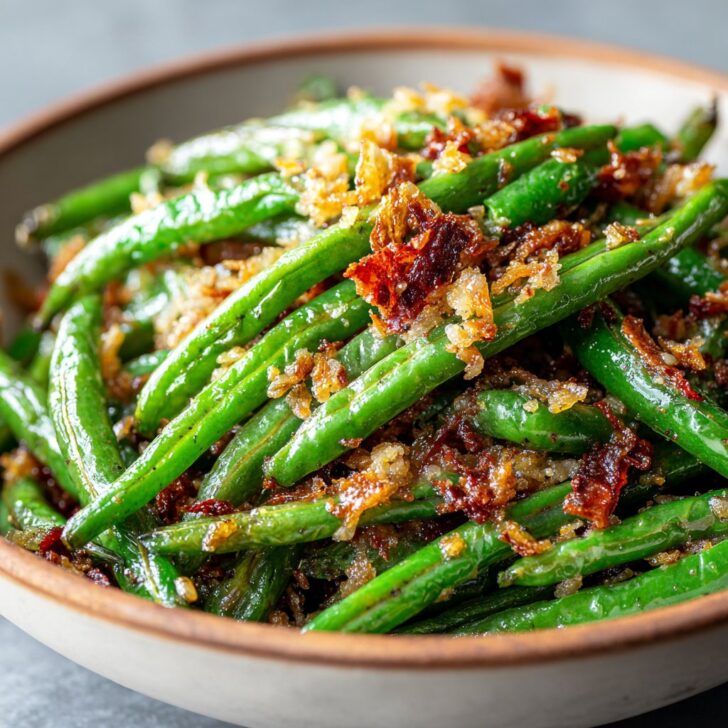
Let Me Tell You About These Green Beans...
Okay, so I never thought I'd be "that person" raving about green beans—like, really? But hear me out! One time, I made these crispy green beans for a family BBQ (mostly because I forgot to buy chips and had a pile of green beans glaring at me in the fridge) and, no joke, they vanished before the burgers were even off the grill. My cousin tried to hide the last handful behind the ketchup bottle. True story! And now, whenever I make them, the kitchen smells like summer and I feel a bit smug.
Why I Keep Coming Back to This Recipe
I make this for every get-together when I want to look like I've got my act together (even if I'm still in my slippers). My nieces go wild for them—probably because, let’s admit it, anything crunchy is an instant kid magnet. Plus, I can whip these up in less time than it takes to untangle my dog's leash (don't ask). On the rare occasion I end up with leftovers, they taste pretty darn good cold—though, if I'm being honest, my husband usually polishes them off right out of the pan. Oh, and if you've ever struggled with soggy beans... same! But I figured out a fix (see below—because nobody likes limp beans, am I right?).
What You’ll Need (Plus a Few Swaps)
- About 300g (a good handful) fresh green beans, ends trimmed (frozen works in a pinch, but pat them dry—trust me, I learned the hard way)
- ¾ cup panko breadcrumbs (my gran swore by crushed saltines—totally legit if that's all you've got)
- ½ cup all-purpose flour (honestly, gluten-free flour works too—I tried it when my neighbor couldn’t have regular)
- 2 eggs, beaten (sometimes I use a splash of milk if I’m low on eggs—it's not the same but it’ll work)
- ½ teaspoon garlic powder
- ½ teaspoon smoked paprika (or regular paprika, but the smoky kind's my fave)
- Salt & pepper, to taste (I rarely measure)
- ⅓ cup grated parmesan (optional, but I always add it—because: cheese)
- Oil for frying (I usually use canola, but sunflower or peanut oil are grand too)
How I Make Crispy Green Beans (With a Few Tangents)
- First things first, get your green beans washed and dried. Seriously, don’t skip drying them—if they’re wet, the coating won’t stick and you’ll end up with sad, naked beans. I learned this the hard way.
- Set up your stations: flour in one bowl, eggs in another, and mix the panko, parmesan, garlic powder, paprika, salt, and pepper in a third. I always make a mess doing this, but hey, that's what aprons are for.
- Now, coat each bean in flour, dunk in the egg, then roll in the panko mix. I usually do a few at a time, and yes, your fingers will get clumpy. That’s half the fun.
- Heat your oil in a large skillet—medium-high does the trick (if you toss in a breadcrumb and it sizzles, you’re golden). Don’t crowd the pan; give 'em space to crisp up.
- Fry the beans for about 2-3 minutes per batch, turning them so they’re evenly golden. Sometimes, if I’m feeling rebellious, I just shake the pan instead of flipping each bean. Works fine.
- Scoop ‘em out onto a plate lined with paper towels. This is where I usually sneak a taste and burn my tongue because I never learn.
- Serve hot! (Or, honestly, room temp—I've even packed these for a picnic and they were still delicious.)
Notes from My Many Attempts
- If you coat the beans and leave them sitting too long before frying, the breading gets soggy. Fry them straight away for max crunch.
- Panko really does make the difference—regular breadcrumbs just don’t have the same bite. But if that’s all you’ve got, go for it.
- One time I tried air-frying them on a hot day. They came out decently crispy, but honestly, the skillet method tastes better to me. (Still, if you want to skip the oil, it’s an option!)
Tinkering—Variations I’ve Tried (and a Flop!)
- Spicy: Add a pinch of cayenne or chili flakes to the breadcrumb mix. My brother likes them "face-melting," but I keep it mild for the kids.
- Asian-ish: Swap parmesan for a bit of sesame seeds and toss the hot beans with a drizzle of soy sauce. Actually, I find it works better if you skip the cheese for this one.
- Lemon zest: Not my favorite, but my neighbor swears by it. Adds a zing, but I prefer them cheesy.
- Tried using almond flour instead of regular—texture was weird, didn’t crisp as nice. Wouldn’t recommend unless you’re desperate!
Don’t Have a Skillet? Here’s What I Do
No skillet? No problem. I’ve baked these on a tray at 220°C (about 425F) with a good spray of oil. Different crunch, still tasty. Or if you've got an air fryer collecting dust, now's its time to shine. Frying pan is best, but honestly, I've used a wok in a pinch too. (Once tried a saucepan... not my brightest move, but it worked. Sort of.)


How Long They Actually Last (Not That You’ll Need This Info)
Supposedly, you can store leftovers in an airtight container in the fridge for up to two days. But, honestly, in my house? They’re gone within twenty-four hours. If you do want to revive them, a quick blast in the oven gets them back to their crunchy selves. Or just eat them straight from the fridge like my partner does—no judgment.
How I Like to Serve Them (And a Weird Family Tradition)
I love piling these up with a big bowl of garlicky yogurt dip or, if I’m feeling lazy, just good old ketchup. My aunt insists on serving them as a side with steak—she calls it "fancy fries"— and I have to agree, it’s a winner. Sometimes, when we’re watching a movie, I just put them out with other snacks and they disappear faster than the popcorn.
Lessons I’ve Learned the Hard Way (Pro Tips)
- Don’t rush the drying step. I once tried skipping it, and the breading slid right off. Slippery little things.
- Let the oil get hot enough, or the beans just soak it up and go limp (not in a good way). Better to wait a minute than deal with soggy beans.
- Oh, and don’t walk away while frying—these go from golden to "oops, charcoal" in seconds. Ask me how I know.
Out-of-the-Blue FAQ (Because People Actually Ask These!)
- Can I use frozen green beans? Yup, just thaw and dry them first or you'll get a splatter party. Learned that the messy way.
- Can I make them in advance? Kind of... They're best fresh, but if you have to, reheat in the oven—not the microwave (unless you like soggy breading, in which case, go wild).
- Is there a vegan version? Sure! Skip the cheese and use plant milk or aquafaba instead of egg. (I did this for a vegan pal, and they were gobbled up.)
- What's the best dip? I’m partial to this garlicky yogurt sauce (here’s a good recipe). Or go wild with spicy mayo—no rules here.
- Do you have to trim both ends? I just do the stem end if I’m in a rush. Haven’t noticed a difference in taste—just looks a bit more rustic.
- Can I use regular breadcrumbs? Absolutely. Texture’s a bit different, but it still works. I actually did this when I ran out of panko and was too lazy to run to the shops.
- Why are mine soggy? Could be a few things! Wet beans, oil not hot enough, or maybe you let them sit too long before frying. Happens to the best of us.
- Where do you get panko? Pretty much any grocery store nowadays—sometimes I get mine from this online shop if I’m lazy.
One last thing—if you want to geek out on frying temperatures, I found this guide to frying really helpful when I first started experimenting.
So, that's my crispy green beans recipe, warts and all. If you try it, let me know what you think—unless you hate it, in which case, blame my cousin for eating the original batch and forcing me to keep experimenting. Cheers!


Ingredients
- 300g fresh green beans, trimmed
- 1 cup all-purpose flour
- ½ cup cornmeal
- 2 large eggs
- ½ cup milk
- 1 teaspoon garlic powder
- ½ teaspoon salt
- ½ teaspoon black pepper
- Vegetable oil, for frying
Instructions
-
1Wash and trim the green beans, pat them dry with a paper towel.
-
2In a shallow bowl, whisk together the eggs and milk. In another bowl, combine the flour, cornmeal, garlic powder, salt, and black pepper.
-
3Dip each green bean into the egg mixture, then dredge in the flour mixture, ensuring an even coating.
-
4Heat about 2 inches of vegetable oil in a deep skillet or pot to 180°C (350°F).
-
5Fry the coated green beans in batches for 2-3 minutes, or until golden and crispy. Remove with a slotted spoon and drain on paper towels.
-
6Serve hot with your favorite dipping sauce.
Approximate Information for One Serving
Nutrition Disclaimers
Number of total servings shown is approximate. Actual number of servings will depend on your preferred portion sizes.
Nutritional values shown are general guidelines and reflect information for 1 serving using the ingredients listed, not including any optional ingredients. Actual macros may vary slightly depending on specific brands and types of ingredients used.
To determine the weight of one serving, prepare the recipe as instructed. Weigh the finished recipe, then divide the weight of the finished recipe (not including the weight of the container the food is in) by the desired number of servings. Result will be the weight of one serving.
Did you make this recipe?
Please consider Pinning it!!