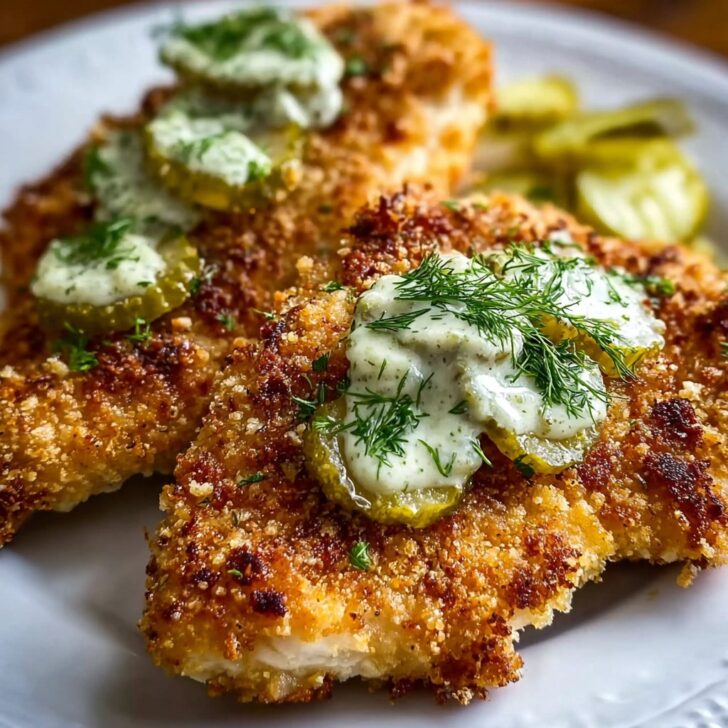
Alright, So Here’s the Story Behind This Chicken
I remember the first time I made this Crispy Dill Pickle Parmesan Chicken—it was, frankly, a complete mess. My kitchen looked like a tornado had swept through (there may or may not have been flour in my hair for hours). But my kids still ask about “the pickle chicken night”—so, chaos be damned, it was a hit. I love how making stuff like this makes the ordinary feel special—even if everyone’s just wearing pyjamas and side-eyeing each other about who’s taking the biggest piece. Oh, and if you aren’t a fan of dill pickles... well, this *probably* isn’t your dish, but you never know until you try (or maybe just have a backup dinner ready, which is what I did for my youngest... a bowl of mac and cheese just in case, you know?).
Why I Keep Coming Back to This Chicken
I make this mostly when I want chicken to not be boring. My family goes sort of bonkers for anything crunchy, plus it’s one of those dinners where nobody complains—except the time I overdid the pickle juice marinade (don’t do that—seriously). The crust is super crispy, you get that weirdly addictive tang from the pickles, and the cheese, well, it does what cheese always does: makes everything smell amazing. And if the weather’s crummy, it somehow tastes even better. Weird, right?
Here’s the Stuff You’ll Need (With Some Swaps)
- 4 boneless, skinless chicken breasts (or sometimes I just use thighs—juicier and cheaper. Don’t stress about size.)
- 1 cup dill pickle juice (any brand works, but my grandmother used only Claussen; I’m not that picky)
- 2 eggs (if you forget 'em, a splash of milk does the trick in a pinch)
- 1 ½ cups breadcrumbs (panko is ideal, but I’ve crushed up Ritz crackers more than once when the store let me down)
- ¾ cup grated parmesan (fresh is best, but the green canister one works okay, honest)
- Salt and black pepper (just a few good pinches—unless you’re a ‘taster like me’ and sneak more)
- ½ teaspoon garlic powder (or if you’re a big garlic fan, go for fresh grated – it’s more work but tastes fab)
- 1 teaspoon dried dill (or fresh if you’ve got it—sometimes I skip this because, well, laziness)
- Oil for frying (I just use whatever is handy—usually canola, sometimes olive oil, nobody noticed)
So, Here’s How I Usually Make It
1. Marinate the Chicken: Toss those chicken breasts in a big bowl or zip-top bag with the dill pickle juice. Let them hang out for at least 45 minutes, or up to 4 hours if you actually planned ahead. (Any longer and it gets a bit mushy. I learned that the hard way.)
2. Breading Set-Up: Crack the eggs in a shallow bowl and whisk 'em up—this is where I always get shell bits if I’m rushing, so slow down. In another bowl, stir together the breadcrumbs, parmesan, garlic powder, dill, salt, and pepper.
3. Dredge and Coat: Pull the chicken out of the pickle juice (let the extra drip off—soggy breading is the pits). Dip each piece in the egg, then give it a tumble in the cheesy breadcrumb mix. Press it on a bit. If your hands aren’t a mess, you’re not doing it right.
4. Frying Time: Get a big skillet good and hot over medium-high, splash in a decent glug of oil, and when a breadcrumb sizzles, lay in the chicken. Don’t crowd the pan (I did this once—regretted it, trust me). Cook about 4–5 minutes a side, until golden brown. If they’re thick pieces, I shove them in a 350°F oven for 10 more minutes to finish cooking. This is usually when the first piece mysteriously "disappears" and nobody owns up.
Actually, you can bake the whole thing at 425°F for about 20–25 minutes on a rack over a baking sheet if you don't want the mess (tastes different, but pretty good for less flipping and fuss).
Little Notes So You Don’t Repeat My Mistakes
- If your chicken is super thick, I’d definitely butterfly it or pound it so it cooks evenly—otherwise you might have crispy outsides and, uh, pink insides. Gross.
- Parchment on the baking pan keeps the cheese from burning if you go the oven route (though sometimes the edges still get real brown—that’s the best part, actually)
- Don’t overdo the pickle soak! Once I did an overnight—tasted like a briny science experiment.
- I always think it’ll be enough breading, then I run out for the last piece—so, maybe have a bit extra ready, just in case.
Stuff I’ve Tried (Not Always Successfully)
- I once swapped breadcrumbs for crushed tortilla chips—tasted strange but kind of fun for a one-off.
- Tried cheddar instead of parmesan. Nope, just nope. Too greasy, and honestly, it kind of slid off. Lesson learned.
- Added smoked paprika once and was surprised how much it changed the vibe (in a good way!).
Gear I Usually Use (and How to Make Do Without)
- A big skillet or frying pan (I say big, but really, I’ve squeezed the chicken into the small one and just done extra batches. Works fine.)
- Shallow bowls for dredging—though, let’s be real, plates with high edges work too, or even a pie plate if you have one of those around
- Tongs are handy for flipping, but I’ve used a spatula in a pinch
- An oven thermometer if you’re *very* cautious, but I usually wing it and cut the fattest piece to peek inside


How I Store It (But Let’s Be Honest...)
Pop leftovers in an airtight container in the fridge. It’s actually pretty good cold (is that weird?), but if you want it crispy again, reheat in the oven at 350°F for about 10 minutes. In my house, though, leftovers vanish—sometimes before I even finish dinner. Oh, and it’s not great microwaved as the coating softens, but I mean, it still gets eaten.
How I Like to Serve It (Your Mileage May Vary)
I really like this chicken with a big old pile of roasted potatoes and a simple green salad. Or, as my oldest insists, sandwiched into a soft bun with extra pickles and just a smear of special sauce. We’ve also tried it sliced up on top of mac & cheese for what my husband calls “comfort food squared.” Serve however makes you happy. Or... don’t serve it at all, just eat it over the sink—I won’t judge.
Lessons Learned (But You Might Still Ignore)
- I once rushed the frying step, cranked the heat, and burned the outside to a crisp while the middle was practically raw—don’t do that. Medium-high is your friend.
- Don’t skip the marinade step, but also don’t be a hero and soak it overnight—you want tangy, not puckery.
- Actually, I find it works better if you let the breaded chicken rest 10 minutes before frying; not sure why but it seems extra crispy that way.
FAQs: Real Questions People Actually Ask Me
- What if I can’t stand pickles?
- Honestly, this one’s probably not for you... but you could try buttermilk as the marinade instead, and add a pinch of dried dill to fake it. Or, HEB has a dill pickle juice I’ve heard isn’t too sharp.
- Can I air-fry this?
- Yep! Set your air-fryer to about 375°F, spray the breaded chicken lightly with oil, and cook for 12–16 mins (flip halfway). Gets pretty crispy—almost addictively so. Now I want to go make it again.
- Is this gluten-free?
- Not as written, but you could totally use gluten-free breadcrumbs or rice crackers. I’ve done it once, and my neighbor swore she couldn’t tell the difference.
- Can I prep it ahead?
- Absolutely—bread the chicken up to a day ahead and keep it covered in the fridge. Fry or bake right before you want to eat. I think it tastes better the next day, but maybe I’m just weird that way.
- What side dishes go best?
- I double down on the pickle flavor and serve it with potato salad sometimes, or green beans for, you know, balance. Honestly whatever you feel like—I've even served cold watermelon alongside on a hot day.
And to totally change the subject for a second: if you love all things crunchy AND tangy, you’ve got to check out Smitten Kitchen's dill pickle chips. Not chicken, but holy smokes, so good. Anyway, if you try my chicken, let me know what goes sideways (or right!).


Ingredients
- 4 boneless, skinless chicken breasts
- 1 cup dill pickle juice
- 1 cup panko breadcrumbs
- ½ cup grated Parmesan cheese
- ½ cup all-purpose flour
- 2 large eggs
- 1 teaspoon garlic powder
- ½ teaspoon paprika
- Salt and black pepper to taste
- 2 tablespoons olive oil or melted butter
Instructions
-
1Place the chicken breasts in a large bowl or resealable bag and pour dill pickle juice over them. Cover and refrigerate for at least 1 hour.
-
2Preheat the oven to 425°F (220°C). Line a baking sheet with parchment paper or lightly grease it.
-
3In one bowl, combine panko breadcrumbs, grated Parmesan cheese, garlic powder, paprika, salt, and black pepper. Place flour in a second bowl and whisk eggs in a third bowl.
-
4Remove marinated chicken from the pickle juice and pat dry. Dredge each piece first in flour, then dip into eggs, and finally coat evenly with the parmesan-breadcrumb mixture.
-
5Arrange breaded chicken breasts on the prepared baking sheet. Drizzle with olive oil or melted butter for extra crispiness.
-
6Bake for 22–25 minutes or until the chicken is golden brown and cooked through (internal temperature should reach 165°F/74°C). Serve hot.
Approximate Information for One Serving
Nutrition Disclaimers
Number of total servings shown is approximate. Actual number of servings will depend on your preferred portion sizes.
Nutritional values shown are general guidelines and reflect information for 1 serving using the ingredients listed, not including any optional ingredients. Actual macros may vary slightly depending on specific brands and types of ingredients used.
To determine the weight of one serving, prepare the recipe as instructed. Weigh the finished recipe, then divide the weight of the finished recipe (not including the weight of the container the food is in) by the desired number of servings. Result will be the weight of one serving.
Did you make this recipe?
Please consider Pinning it!!