
Okay, Story Time: Why I Started Making These Stuffing Balls
You know how everyone claims they have that one dish their family asks for every single year? Well, for me, it's these Cranberry Turkey Stuffing Balls. The first time I tried making 'em was because I royally flubbed cutting the Thanksgiving turkey (totally hacked it apart). I needed a way to repurpose the mess—plus, I'm not about to let perfectly good stuffing go to waste. Now it's like, if I don't make them, I get serious (but loving) grief. My nephew once hid the last one behind a lamp to save for himself; true story. Anyway, these are a real party pleaser, and honestly, rolling them feels a bit like making edible snowballs, which is fun even if you're not terribly skilled with a scoop.
Why You'll Love This (Or At Least, Why My Family Does)
I break these out every time we've got leftover turkey and are kinda tired of sandwiches (and whoever says they never tire of turkey sandwiches is either lying or blessed with better bread; just saying). They're bite-sized and go down easy at awkward family gatherings. And they're one of those recipes where you get to squish everything together—kind of therapeutic, really. My family goes a bit wild for that crispy-crunchy outside. If you've ever wrestled with stodgy stuffing, trust me, I've been there; these don't turn out like a doorstop... usually. Oh, and if you're as impatient as I am, you'll enjoy sneaking a taste before they even hit the oven.
Alright, Here's What You'll Need (And What You Can Swap)
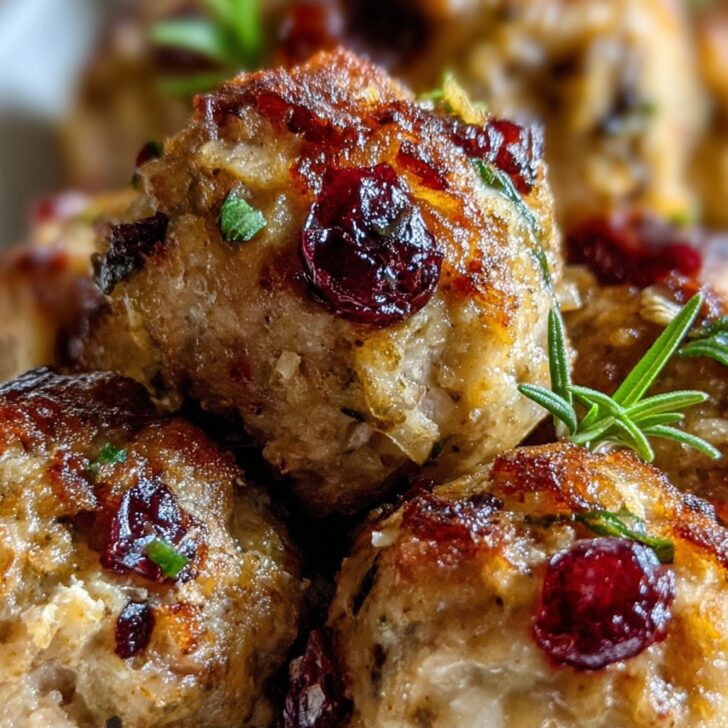
- 2 cups cooked turkey (shredded or diced—sometimes I'll even use rotisserie chicken if I'm in a rush and nobody has noticed yet)
- 3 cups leftover or store-bought stuffing (My gran swore by Peppridge Farm, but, honestly, any stuffing works fine. Some folks use cornbread, too, which is nice.)
- ½ cup dried cranberries (Craisins are my go-to, but fresh cranberries will work in a pinch—just chop them small and maybe add a pinch of sugar.)
- 2 eggs, beaten (Don't stress if you only have one; just go a bit heavier with broth.)
- ½ cup turkey broth (chicken broth is OK; water works if you’re desperate, but it’s not the same, to be frank)
- ¼ cup chopped parsley (some days I grab a handful of whatever herb isn't wilting in the fridge)
- ¼ teaspoon each: salt & pepper (give or take—taste your stuffing first, though, since some are already salty)
- 2 tablespoon melted butter (sometimes I forget this and it's fine, just less rich)
- Extra: ½ cup shredded cheese (totally optional, but I think white cheddar works wonders. My partner says it's blasphemy, but what does he know?)
How I Throw These Together (Give or Take a Step)
- Preheat your oven to 400°F (200°C). Grease a baking sheet or just line it with parchment, whatever you fancy (less washing up if you use parchment).
- In a big bowl (the bigger the better, honestly), chuck in your turkey, stuffing, and cranberries. Mix it up. I use my hands, but if you’re squeamish, a spoon works—even if it’s just not as satisfying.
- Stir in the eggs, broth, parsley, salt, pepper, and most of the cheese if you're using it. The mix will look a bit weird, soggy almost. Don’t panic—stuffing absorbs it all. Give it a minute, then stir again.
- This is where I always grab a tiny bite. (You can too, unless you're worried about eggs.)
- Add the melted butter, which gives 'em that nice golden edge. If things are too dry, splash in a little more broth. Too wet? Add some breadcrumbs or even crushed crackers. Really, just wing it.
- Roll the mixture into balls, about golf ball-sized. Wet hands help stop the stickiness. If the shapes are wonky, so be it—rustic is the word.
- Space them out on your tray and, for extra crispiness, you can spray or dab a little olive oil on top. Bake for 20 to 25 minutes till golden and slightly crunchy. Try not to eat them all before serving.
Stuff I Learned the Hard Way
- If your stuffing is mega salty from the get-go, ease up on any extra seasoning (or just ignore me and prepare for puffy fingers, your call).
- I found that rolling the mixture when it’s slightly chilled helps them not fall apart—totally worth a wee wait.
- Tossing in too much broth leaves you with mush, so add it bit by bit instead of all at once. Learned this after a few unfortunate “stuffing puddles.”
Things I’ve Tried (And Some That Flopped)
- Once swapped out turkey for duck—honestly, it was a bit rich, but hey, not bad.
- Added crushed walnuts for crunch (folks with braces in the family did not thank me, but it tasted good!).
- Tried an all-veggie version with mushrooms and butternut squash—tasted great but the texture was too gloopy for balls. Maybe better as a casserole?
Equipment: Don’t Panic If You’re Missing Something
While a big mixing bowl makes life easier, I’ve used a clean soup pot in an emergency. Ice cream scoops help with perfectly shaped balls, but my mate just uses two big spoons and a lot of hope. Oh, and parchment is nice but not essential.


How I Keep Leftovers (If There Are Any)
Seal 'em in an airtight container and pop in the fridge, they’ll do alright for 2–3 days. TBH, at my place, they’re usually gone by the next morning—midnight snacks are real. They reheat fine in the oven for 10 min at 350°F, or zap in the microwave if you’re less fussy (sometimes they turn a bit soggy, but who cares if you’re hungry?).
Serving: My Go-To Traditions
We usually pass these around with a cuppa turkey gravy or, if I'm feeling brave, this homemade Cranberry-orange relish I learned about here. My Gran swears by having a few pickles on the side (don't knock it till you've tried it). Sometimes we serve them right out of the baking tray—rustic, again—but if guests are over, a platter looks fancy.
The "Pro Tips" I Wish Someone Had Told Me
- I once tried to make these with scalding hot stuffing—bad move. It cooked the egg too early and made a right mess. Let your ingredients cool a bit.
- If you’re rushing and skip greasing the tray, you’ll probably lose half your crunchy bottoms (not the end of the world, but slightly tragic).
- Actually, I find refrigerating the mixture for 20 minutes is worth it, even though I forget half the time.
FAQ: Stuff People Actually Ask Me
Can I freeze these?
Yep! Freeze before or after baking. I like freezing them after—they just need a quick reheat (check Bon Appetit’s freezer guide for more on stuffing tricks).
What’s the best kind of stuffing for this?
Whatever you’ve got, honestly. I usually use herby classic, but cornbread makes it a bit sweet. Don’t stress too much—this is forgiving.
Can I make these ahead?
Absolutely. Assemble, chill, and then bake when ready. If they seem a bit dry, just brush with a little butter before reheating—and if they're too wet, next time try less broth. Live and learn, right?
Why do my balls fall apart?
Usually too much liquid or not enough squishing. Or maybe your stuffing is extra chunky—try chopping things a little finer.
So, that’s the (not so) secret recipe. If you end up making these, I’d love to know how they went down, or if your family is as “spirited” about side dishes as mine is. Oh—and if you find a way to keep leftovers for more than a day, send help and your method.


Ingredients
- 1 lb ground turkey
- 2 cups prepared stuffing
- ½ cup dried cranberries
- 1 large egg
- 2 tablespoons fresh parsley, chopped
- ½ teaspoon ground black pepper
- ½ teaspoon salt
- ¼ cup chicken broth
Instructions
-
1Preheat the oven to 375°F (190°C). Line a baking sheet with parchment paper.
-
2In a large bowl, combine ground turkey, prepared stuffing, dried cranberries, egg, parsley, salt, and black pepper.
-
3Mix ingredients gently until just combined. If mixture seems dry, add a little chicken broth.
-
4Form the mixture into golf ball-sized balls and place them evenly on the prepared baking sheet.
-
5Bake for 25 minutes or until the stuffing balls are golden and the turkey is cooked through.
-
6Let cool slightly before serving. Garnish with extra parsley if desired.
Approximate Information for One Serving
Nutrition Disclaimers
Number of total servings shown is approximate. Actual number of servings will depend on your preferred portion sizes.
Nutritional values shown are general guidelines and reflect information for 1 serving using the ingredients listed, not including any optional ingredients. Actual macros may vary slightly depending on specific brands and types of ingredients used.
To determine the weight of one serving, prepare the recipe as instructed. Weigh the finished recipe, then divide the weight of the finished recipe (not including the weight of the container the food is in) by the desired number of servings. Result will be the weight of one serving.
Did you make this recipe?
Please consider Pinning it!!