
Let Me Tell You About My Cheesy Chalupa Obsession
Okay, so you know that feeling when you're driving home late and suddenly the only thing you can think about is Taco Bell? Yeah, that's me basically every Friday night. (One time I even drove across town during a thunderstorm just to get a chalupa. I wish I was joking.) The first time I tried to make my own copycat Taco Bell cheesy chalupas at home, I totally overcooked the shells and nearly set off the smoke alarm. But I promise, after a few tries—and like four different spatulas—I've pretty much nailed it. I even got my skeptical little brother to admit mine are better than the real deal. Not that I'm trying to brag. Well, maybe just a little.
Why You’ll Love Making These at Home
I make this when I'm craving something gooey, cheesy, and a little over the top (in a good way). My family goes crazy for these because, honestly, who can resist a crispy, fluffy shell packed with beef, cheese, and all the stuff you sneak extra scoops of at Taco Bell? Plus, making them at home means I can use extra cheese (which is sort of a requirement in my kitchen). Oh, and if you’ve ever fumbled with making the shell, just know: I messed up the first three times, but now it’s kind of my party trick. Heads up: flour all over your counter is basically a given.
Gathering the Ingredients (or What I Actually Use)
- 2 cups all-purpose flour (sometimes I swap half for whole wheat if I’m feeling fancy, but don’t tell my kids)
- 1 teaspoon baking powder
- ½ teaspoon salt (my grandmother always insisted on sea salt, but table salt works just fine)
- 2 tablespoon plain Greek yogurt or sour cream (I’ve even used mayo once in a pinch—don’t ask)
- 2 tablespoon vegetable oil (or olive oil, but it does taste a bit different)
- ½ cup milk (I’ve used oat milk; actually, I find it works better if you warm it a bit first)
- 1 lb ground beef (or turkey, or the veggie crumbles when feeding my “flexitarian” cousin)
- 1 packet taco seasoning—homemade if you’re feeling energetic; otherwise, Old El Paso all the way
- 2 cups shredded cheddar-jack cheese (more or less, depending on your cheese philosophy)
- 1 cup shredded lettuce
- Diced tomatoes, chopped onions, and sour cream for topping
How I Actually Make Cheesy Chalupas
- Mixing the Dough: Combine flour, baking powder, and salt in a big bowl (big enough to get your hands messy). Stir in the yogurt, oil, and milk. It’ll look a bit weird at this stage—sort of like a shaggy mess. That’s normal. Just keep going until it forms a soft dough. If it’s too sticky, add a spoonful of flour. Too dry? Splash in a bit more milk.
- Rest and Roll: Let the dough sit for 15 minutes under a towel. I usually take this time to clean up the flour mountain I just created. Then, split into 6-8 balls and roll each one into a circle, kind of like a thick tortilla. (Mine are never perfectly round. Oh well.)
- Fry the Shells: Heat about an inch of oil in a skillet—medium-high works. Carefully fry each chalupa shell one at a time, about 1-2 minutes per side. They’ll puff up and get golden. If they look a bit odd, don’t stress! I sometimes use tongs to gently bend them in half so they're taco-shaped, but honestly, they're delicious even if they look like a canoe.
- Cook the Beef: Brown the ground beef in another pan, drain the fat, then stir in the taco seasoning and a splash of water. I let it simmer while I sneak a few bites of cheese.
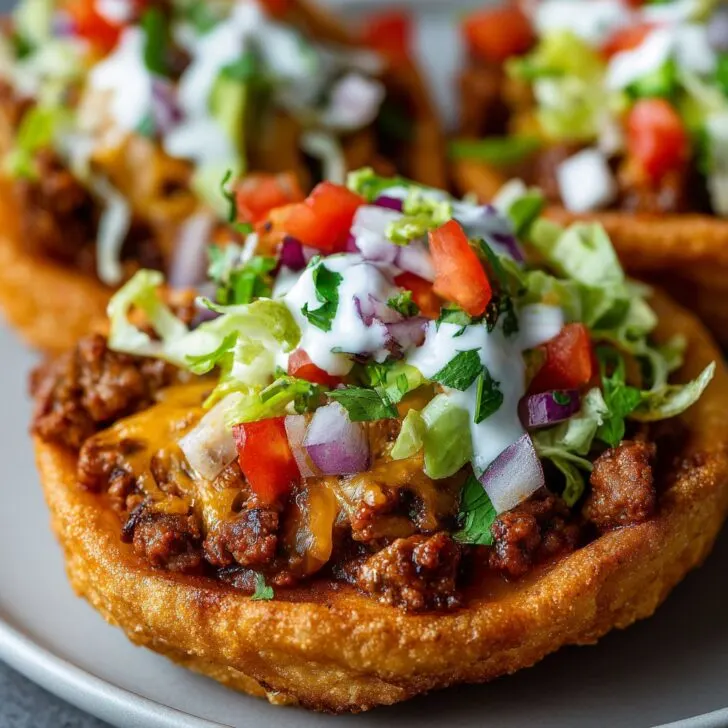
- Assemble & Cheese It Up: Pile beef into each shell, then go wild with cheese, lettuce, tomatoes, onions, and whatever else you love. I always add an extra dollop of sour cream because, why not?
Notes from My Kitchen (AKA My Laboratory)
- I thought using whole wheat flour would be a good idea—turns out, it makes them a bit chewy, so go easy.
- If the chalupa shells turn out a little too crunchy, just wrap them in a damp towel for a few minutes; they’ll soften up.
- Oh, and if you run out of taco seasoning, a quick mix of chili powder, cumin, garlic powder, and a pinch of sugar does the trick.
Variations That (Mostly) Worked
- I once tried stuffing the shell with cheese before frying—let’s just say cleaning my pan took longer than making dinner.
- Chicken instead of beef is great, especially with spicy salsa.
- I’ve added jalapeños into the dough, which was a hit; my youngest did not agree though.
What You Need (And My Workarounds)
- Mixing bowl (but I’ve used a giant salad bowl in a pinch)
- Rolling pin (a wine bottle works perfectly fine, don’t ask how I know)
- Large skillet for frying
- Tongs (or two forks if you’re dexterous!)
- Paper towels for draining oil
And if you’re missing a rolling pin, check out this guide from Serious Eats—it’s saved me more than once.


Keeping Leftovers (If That Ever Happens)
Store shells and fillings separately in airtight containers in the fridge—good for 2 days. But honestly, in my house, it never lasts more than a day! I think the shells taste even better the next morning with eggs, if you’re into breakfast experiments.
How I Love to Serve These
We usually do a big platter and let everyone build their own; it gets messy but that’s part of the fun. Sometimes I set out bowls of salsa, guac, and even that neon-green Taco Bell sauce (I buy it online here if you want to go all-out). My cousin insists on crumbling tortilla chips over hers—who am I to argue?
Things I’ve Learned (The Hard Way)
- Don’t rush the dough rest time. I once tried skipping it and the shells turned out dense, kind of like hockey pucks. Not recommended.
- Use enough oil for frying or you’ll get spotty, weirdly half-cooked shells. Learned that on a rainy Tuesday.
Questions I Get All the Time
- Can I bake the shells instead of frying?
Yeah, I’ve tried, and they’re okay (not amazing). If you do, brush with a bit of oil and bake at 400°F for about 8-10 minutes. But the crunch just isn’t quite the same. - Is there a gluten-free version?
Honestly, I’ve had mixed results. Using gluten-free flour blend works, but the shells might crack. If you get it perfect, let me know your trick! - Can I freeze the cooked shells?
Technically, yes, but they get a bit soggy when reheated. I’d rather make them fresh or save the dough—freezes really well. - What if I don’t have taco seasoning?
Just wing it! Mix chili powder, cumin, bit of garlic and onion powder, salt, pepper, and a pinch of sugar. Sometimes I even add oregano because why not?
For more homemade taco inspiration, this Delish recipe is fun for comparison, but I still like mine better (no offense, Delish).
If you give these a go, let me know how your adventure turns out—bonus points if your kitchen survives without a flour explosion. And if you’ve got a dog, be careful; mine now expects every kitchen disaster to end with a dropped chalupa shell on the floor!


Ingredients
- 2 cups all-purpose flour
- 1 teaspoon baking powder
- ½ teaspoon salt
- ⅔ cup milk
- 2 tablespoons sour cream
- 1 pound ground beef
- 1 packet taco seasoning
- 1 cup shredded cheddar cheese
- 1 cup shredded lettuce
- ½ cup diced tomatoes
- Vegetable oil for frying
Instructions
-
1In a large bowl, combine flour, baking powder, and salt. Stir in milk and sour cream until a soft dough forms.
-
2Divide dough into 4 portions and roll each into a flat oval shape about ¼ inch thick.
-
3Heat about 1 inch of vegetable oil in a skillet over medium heat. Fry each dough oval for 1-2 minutes per side until golden and puffed. Drain on paper towels.
-
4In a separate skillet, cook ground beef over medium heat until browned. Drain excess fat, add taco seasoning and cook according to package instructions.
-
5Fill each fried chalupa shell with seasoned beef, top with shredded cheddar cheese, lettuce, and diced tomatoes. Serve immediately.
Approximate Information for One Serving
Nutrition Disclaimers
Number of total servings shown is approximate. Actual number of servings will depend on your preferred portion sizes.
Nutritional values shown are general guidelines and reflect information for 1 serving using the ingredients listed, not including any optional ingredients. Actual macros may vary slightly depending on specific brands and types of ingredients used.
To determine the weight of one serving, prepare the recipe as instructed. Weigh the finished recipe, then divide the weight of the finished recipe (not including the weight of the container the food is in) by the desired number of servings. Result will be the weight of one serving.
Did you make this recipe?
Please consider Pinning it!!