
So, Cookie Cutter Sprinkle Chocolate Bars, Eh?
Alright, friend, let me tell you about the time I tried making these Cookie Cutter Sprinkle Chocolate Bars on a rainy Sunday because, honestly, we were out of biscuits and buying anything just seemed—a bit much? My nephew was over, so I figured, why not make something together and let him create a massive chocolatey mess (cleaning up with a nine-year-old involved deserves its own strategy guide)? These bars have become our low-pressure, maximum-fun solution for days that just need a shot of color and sweetness. And OK, the first time our dog tried to eat half a sprinkle, she regretted it. Lesson learned.
Why You'll Love This One (If You're Like Me)
I make this when I'm feeling a bit lazy but still want something homemade that looks like I've tried, you know? My family goes bonkers for it because it's basically chocolate, sprinkles, and whatever else I feel like chucking in the bowl. (And when I run out of sprinkles—don't ask—the kids think colored cereal works fine. Madness!) The best part: no one really expects these to look fancy, so the pressure's off. That said, my chocolate always sets a bit unevenly unless I'm careful. Not that anyone has ever complained... except my own inner perfectionist, who I usually have to shush.
Here’s What You’ll Need (and Some Stuff You Can Swap)
- 200g good quality chocolate – I sometimes use milk, sometimes dark; once I even mixed what was left in three half-eaten bars. Still worked. My grandmother really did insist on Cadbury, but honestly, store brand’s fine.
- 2 tablespoon butter or coconut oil (honestly, either is fine, I just use whatever I grab first)
- Handful of rainbow sprinkles (I measure this with my heart actually...)
- Optional: A handful of mini marshmallows, crushed biscuits (digestive, graham, whatever’s lurking in the tin), or chopped nuts
- Pinch of salt – I skip this if I use salted butter, but up to you
Let’s Get Messy: How I Make These (Mostly)
- Line a flat tray or baking sheet with parchment paper. If you’re out, tin foil greased a bit will sorta do. I’ve tried straight on the tray before, don’t.
- Break up your chocolate and pop it in a heatproof bowl with the butter. Microwave in short busts (I do 30 secs, then stir, repeat) until it’s smooth. Or do the fancy double boiler thing if you’re in a show-off mood.
- Stir in most of your sprinkles—keep a few back for decorating, if you remember. Now’s also when I throw in extras like marshmallows or biscuit bits. Honestly, just go wild. This is also where I'm usually tempted to lick the spoon—fight the urge if you're sharing!
- Pour the mixture onto your lined tray and smooth it out to maybe 1cm-ish thick. It’ll look like a bit of a mess right now; don’t stress, it always comes together.
- Scatter the rest of the sprinkles over the top. Gently press them in so they don’t just roll off. Or, if you’re distracted, just sort of shake them everywhere and call it confetti.
- Pop the tray in the fridge for at least an hour until the chocolate sets (confession: I’ve tried the freezer to hurry things along but sometimes the chocolate blooms a bit. Not the end of the world, just looks a tad odd).
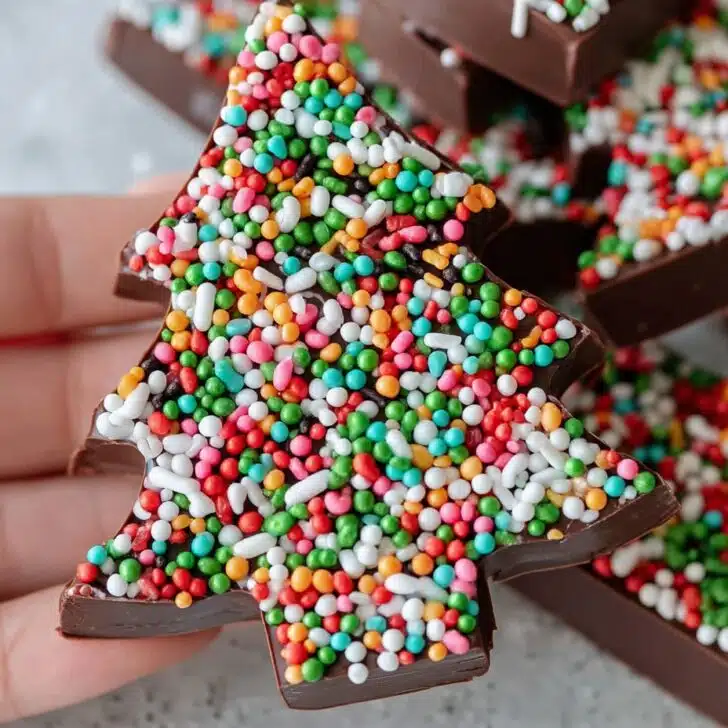
- Once it’s nice and hard, grab your cookie cutters and start stamping out shapes. If all you have is a knife, just cut rough bars—they taste the same. Maybe even better.
A Few Notes (From a Fair Share of Mishaps)
- If you use too many marshmallows, the bars set weirdly soft. Good for wobbly teeth, maybe not for neat shapes.
- Using really thin chocolate makes sharper shapes but does break easier. I try for just under a pinky-finger thickness.
- I once thought ‘oh, more sprinkles = more fun’ but, yeah, then it’s just crunch. Less is sometimes more (except with chocolate, obviously).
Variations I've Experimented With (Some Winners, One Dud)
- White chocolate and freeze-dried raspberries: Big hit, looks classy (for once).
- Throw in some chopped-up peanut butter cups: Actually, maybe too sweet even for me. But the kids hoovered them up.
- Once I tried gummy bears: Just don’t. Chewy, but not in a good way.
Do You Really Need a Cookie Cutter?
Honestly, cookie cutters make it look more fun. But I’ve used shot glasses, egg rings, and a really ancient dinosaur toy to get shapes. No fancy gear? Just slice with a regular kitchen knife and pretend they’re ‘rustic’ (which is chef speak for uneven at my house).


What About Storage? (If They Last That Long)
Keep these in an airtight box in the fridge. They’ll last a week. At least, the internet says so—I wouldn’t know, honestly, because they’re usually gone by day two. If you keep them out on a hot day, expect hand-melting chocolate. Which, to be fair, is half the fun. More on storage science at Food Network's chocolate storage tips.
Serving These (We Have a Few Traditions)
We eat them straight from the fridge, but dipping them in hot coffee is my secret pleasure. For kids’ parties, I balance a few on a big plate and then—if I'm in a good mood!—drizzle with a bit of melted white chocolate. Or just pile high and let the colors do their thing. My sister insists on adding extra sprinkles at the table. Each to their own.
Lessons Learned and Accidental Wisdom (Pro Tips, Sorta)
- Don't rush the setting time. I once tried to shape them after just 20 minutes—ended up with chocolate goo everywhere, and only one vaguely star-shaped bar that looked like a squashed hedgehog.
- Actually, I find it works better if you press the sprinkles in right after pouring the chocolate out, not after chilling. They stick better and don’t roll all over your kitchen floor (I mean, probably fewer will anyway).
FAQ—Stuff Friends Actually Ask Me
- Can I make these vegan?
- Totally! Use dairy-free chocolate and coconut oil or vegan butter. Marshmallows, watch out—most aren’t vegan unless labeled. Check the brands—I found a great vegan marshmallow list over at The Edgy Veg.
- Can I freeze these bars?
- Technically yes, but sometimes the chocolate blooms weirdly or the texture feels off. For last-minute emergencies, sure—it works. But I like the fridge better.
- What if my shapes won’t come out clean?
- Oh, that happens to me too. Try dipping your cookie cutter or knife in hot water and drying it before each cut. Or just call the odd ones ‘abstract art’. No judgment here!
- How do you make chocolate melt without burning it?
- Low and slow, and stir between bursts. I burned a batch once on full power and it was... let’s say memorable, but not in a good way. Go easy, it’s not a race.
- Can I use white chocolate chips?
- Yep, and actually they melt way faster. Sometimes they’re a bit sweeter, but sprinkle-heavy bars can balance that. Just don’t overheat them—they love to seize!
Oh, brief aside: last time I made these, I caught our neighbor peering through the kitchen window. Next thing I know, I've got a knock at the door asking for 'your magic sprinkle bars.' So now I make double batches. Neighbors are officially converted.
If you want to get really creative with your sprinkle choices, there’s a wild selection at Sweetapolita—not sponsored, just a fan.
That’s about it. Seriously, try this with whatever mix-ins you love, or have at the bottom of your treat jar. And if you make a mess? Well, isn’t that what aprons (and curious pets) are for?


Ingredients
- 2 cups semi-sweet chocolate chips
- 2 tablespoons unsalted butter
- ½ cup sweetened condensed milk
- 1 teaspoon vanilla extract
- ½ cup rainbow sprinkles
- ½ cup mini marshmallows
- ¼ cup chopped nuts (optional)
- Pinch of salt
Instructions
-
1Line a baking sheet with parchment paper and set out various shaped cookie cutters on top.
-
2In a microwave-safe bowl, combine chocolate chips, butter, and sweetened condensed milk. Microwave in 30-second intervals, stirring until smooth and fully melted.
-
3Stir in vanilla extract and a pinch of salt. Fold in mini marshmallows and chopped nuts if using.
-
4Spoon the chocolate mixture evenly into each cookie cutter, pressing down gently. Sprinkle the tops generously with rainbow sprinkles.
-
5Refrigerate the filled cookie cutters for at least 30 minutes, or until fully set. Carefully remove the bars from the cutters and serve.
Approximate Information for One Serving
Nutrition Disclaimers
Number of total servings shown is approximate. Actual number of servings will depend on your preferred portion sizes.
Nutritional values shown are general guidelines and reflect information for 1 serving using the ingredients listed, not including any optional ingredients. Actual macros may vary slightly depending on specific brands and types of ingredients used.
To determine the weight of one serving, prepare the recipe as instructed. Weigh the finished recipe, then divide the weight of the finished recipe (not including the weight of the container the food is in) by the desired number of servings. Result will be the weight of one serving.
Did you make this recipe?
Please consider Pinning it!!