Why I Keep Coming Back to These Wraps
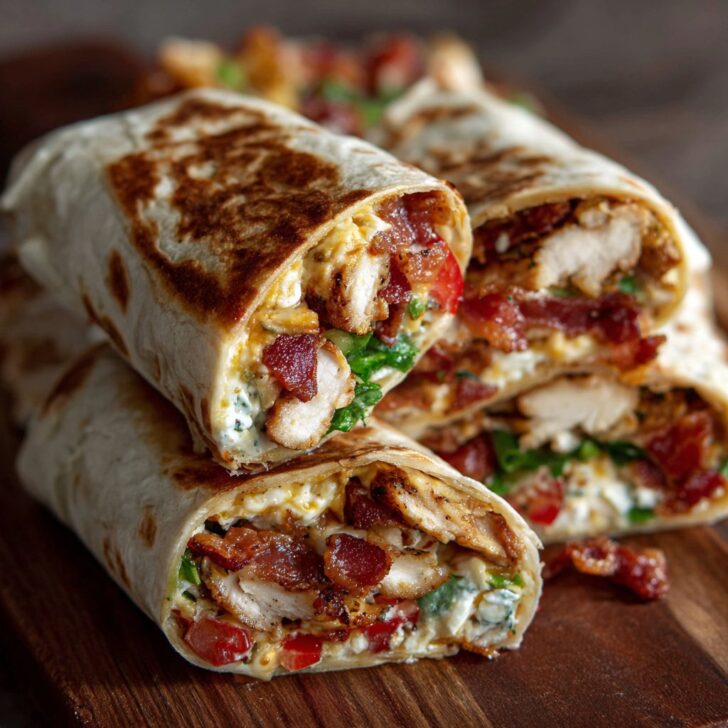
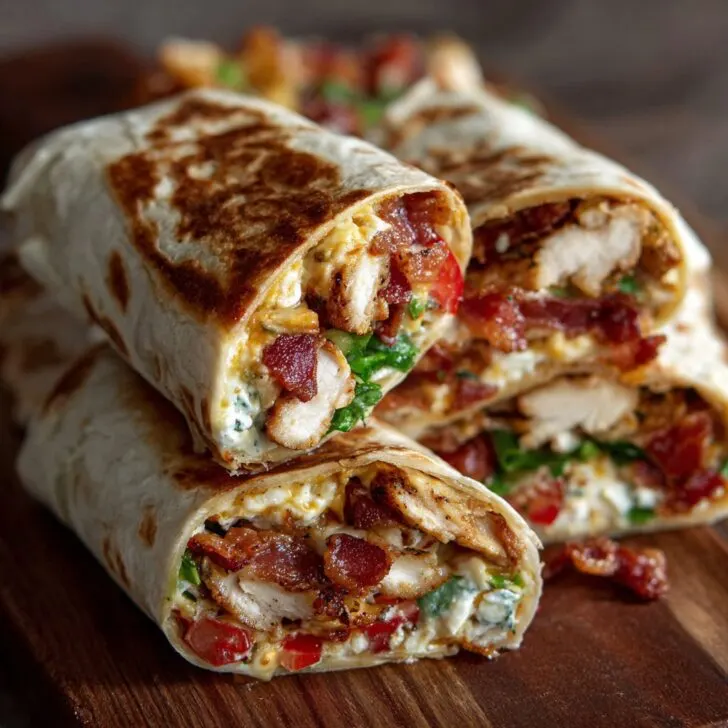
Okay, so let me paint a picture: It’s Thursday, I’ve got half a leftover roast chook in the fridge, and the energy of a sleepy cat. That’s when these Cheesy Garlic Chicken Wraps with Bacon come to the rescue. The first time I made them, it was mostly out of desperation—my kids were in full hangry mode, and I just wanted dinner on the table before someone started eating cereal straight from the box (again, sigh). But you know what? Everyone actually loved them, myself included. There’s something just so right about gooey cheese, garlic, and salty bacon all snuggled up in a toasty wrap. Plus, who doesn’t love a meal you can eat with one hand while scrolling through your phone with the other? I mean, that’s modern living, right?
Why You'll Love This (Or At Least I Do!)
I make these wraps when I’m short on time, don’t want to fuss with a million pots, and especially when I’m craving something that feels a bit naughty (but isn’t too heavy). My family goes crazy for these because they taste sort of like the love child of a quesadilla and a chicken club sandwich. Also, you get to skip the cutlery—just hands and napkins (so many napkins). I used to worry the wraps would fall apart, but honestly, they hold together better than my last attempt at lasagna, so that’s a win. One small thing: I used to always burn the wraps the first few times because I got a bit distracted, but now, I just set a timer. Actually, that’s a lie—I usually remember to set a timer, but if I forget, the smell reminds me. Oops.
What You’ll Need (And a Few Swaps I’ve Tried)
- 2 cups cooked chicken (shredded or chopped—rotisserie is a lifesaver, but I’ve used leftover roast turkey in a pinch and it’s great)
- 1 to 1.5 cups shredded cheese (cheddar is my standby, but mozzarella or Monterey Jack works; my gran swore by Red Leicester, but honestly, use whatever’s in your fridge)
- 4 large tortillas or wraps (plain flour or whole wheat—sometimes I use those spinach ones if I’m feeling virtuous)
- 4-6 strips cooked bacon (crispy, always crispy—I’ve used turkey bacon when my cousin visits, and it’s…fine?)
- 2 tablespoons butter (for the garlicky goodness)
- 2 garlic cloves, minced (I sometimes cheat and use garlic powder, don’t tell anyone)
- Handful fresh parsley, chopped (totally optional—I forget it half the time and nobody complains)
- Salt and pepper (but go easy, because bacon’s salty already)
How I Put These Together (Real Talk)
- Melt the butter in a small pan and toss in the garlic—don’t walk away here, it burns faster than my toast on a school morning. Give it about a minute. If it gets a bit brown, don’t panic, just carry on.
- Mix the chicken, half the cheese, the garlic butter (scrape out those garlicky bits!), crumbled bacon, parsley, a pinch of salt (maybe skip it if your bacon is extra salty), and a good shake of black pepper in a bowl. This is where I usually sneak a taste, for research purposes obviously.
- Lay out your wraps. Spoon a hefty quarter of the mixture down the middle of each one, then sprinkle on the rest of the cheese. Fold up the bottom, then the sides, and roll it up tight—like you’re wrapping a slightly lumpy present you’re too tired to make pretty.
- Heat a large frying pan over medium heat. (Or a sandwich press if you’ve got one—makes everything fancy.) Place wraps seam side down and cook for 2-3 minutes, then flip and go another 2 minutes, until golden and melty. If they look a little wonky, join the club. They’ll taste great.
- Let them cool for a minute—they’re basically molten cheese bombs straight from the pan. Then slice in half, or just eat it whole if you’re feeling wild.
Notes from My Not-So-Perfect Kitchen
- If your wraps split open, I usually just press everything back in and pretend I meant to make open-faced wraps. Actually, sometimes it’s easier to eat that way.
- Don’t worry if your cheese leaks out and gets a bit crispy in the pan. That’s the best bit, honestly.
- I’ve tried making these in the oven. Works, but takes longer and doesn’t get that lovely crispiness on the outside. Frying pan is king here.
Variations I’ve Actually Tried (and a Fail)
- Swap in BBQ sauce for half the butter for a smoky twist—not bad, but a bit sticky.
- Vegetarian? Skip the bacon and add sautéed mushrooms. It’s pretty good but not as…well, bacon-y.
- Once, I tried adding pineapple chunks (don’t ask why)—too wet. Wouldn’t recommend it, unless you like mushy wraps.
- Going spicy? Chuck in some jalapeños or a sprinkle of chili flakes.
What If I Don’t Have a Frying Pan?
I always say you need a big enough non-stick frying pan, but honestly, I’ve toasted these under the grill (or broiler, for my friends across the pond) in a roasting tin when my pan was MIA. You might have to turn them a few times, but it does the trick.


How Long Do These Last? (Short Answer: Not Long)
Technically, you can store any leftovers in an airtight container in the fridge for up to 2 days. I think they taste even better the next day, but I should admit they’ve only lasted that long maybe once. Usually, someone sneaks the last wrap as a midnight snack. They reheat nicely in a dry pan or even the microwave (just don’t expect crunchiness after nuking it).
How We Like to Serve ‘Em
Most of the time we just eat these with some plain salted chips and maybe a handful of baby carrots if we’re pretending to be healthy. My son likes his with ketchup (which, I’m not sure is legal, but hey, if it gets him to eat dinner…). Sometimes, if it’s the weekend, I’ll make a quick green salad on the side but, full disclosure, most of us just go straight for the wraps.
Lessons I’ve Learned the Hard Way (Pro Tips, Sort Of)
- Don’t rush the cheese-melting step. I once tried cranking the heat to finish faster and ended up with burnt wraps and half-melted cheese. Patience is a virtue, or so my mum says.
- Let the wraps rest a minute before slicing, unless you enjoy being scalded by hot cheese lava.
- If you’re making a big batch, keep the cooked wraps warm in a low oven (like 100°C/210°F). They hold up surprisingly well.
Questions I’ve Actually Gotten About This Recipe
- Can I freeze these? Eh, you can, but the texture isn’t quite the same after thawing—kind of soggy. If you do, wrap them up tight in foil first.
- What cheese is best? It’s honestly up to you. I use cheddar for punchy flavor, but use whatever you’ve got. Go wild.
- Do I have to add garlic? No, but…why wouldn’t you? If you’re out, a dash of garlic powder is fine.
- Can I make these gluten-free? Sure thing—just grab gluten-free wraps. I like this recipe if you’re feeling ambitious, but store-bought is fine too.
- What goes with these wraps? Chips, salad, soup, or just on their own when you’re too tired to make sides. Or—hear me out—try them with this creamy tomato soup. It’s wicked good.
Right, I think that’s everything. Actually, no, one last thing—don’t stress too much if yours don’t look like the photos online (mine never do). The best bit is that melty, gooey, garlicky mess inside. And if you make too much filling, just chuck it in a toastie the next day. Waste not, want not, as my nan used to say (in a much thicker accent than mine).


Ingredients
- 2 large chicken breasts, cooked and sliced
- 8 slices bacon, cooked until crispy
- 1 cup shredded mozzarella cheese
- ½ cup shredded cheddar cheese
- 4 large flour tortillas
- 2 tablespoons unsalted butter
- 3 cloves garlic, minced
- 2 tablespoons chopped fresh parsley
- Salt and black pepper to taste
Instructions
-
1In a small skillet, melt the butter over medium heat. Add the minced garlic and cook for 1-2 minutes until fragrant. Remove from heat and stir in chopped parsley.
-
2Lay out the flour tortillas on a clean surface. Evenly distribute the sliced chicken, crispy bacon, mozzarella cheese, and cheddar cheese onto each tortilla.
-
3Drizzle the garlic butter mixture over the fillings. Season with salt and black pepper to taste.
-
4Fold in the sides of each tortilla and roll them up tightly to form wraps.
-
5Heat a large skillet or grill pan over medium heat. Place the wraps seam-side down and cook for 2-3 minutes per side, or until the tortillas are golden and the cheese is melted.
-
6Slice the wraps in half and serve warm.
Approximate Information for One Serving
Nutrition Disclaimers
Number of total servings shown is approximate. Actual number of servings will depend on your preferred portion sizes.
Nutritional values shown are general guidelines and reflect information for 1 serving using the ingredients listed, not including any optional ingredients. Actual macros may vary slightly depending on specific brands and types of ingredients used.
To determine the weight of one serving, prepare the recipe as instructed. Weigh the finished recipe, then divide the weight of the finished recipe (not including the weight of the container the food is in) by the desired number of servings. Result will be the weight of one serving.
Did you make this recipe?
Please consider Pinning it!!