
Let Me Tell You About These Cheesy Chicken Quesadillas…
You know those days when your brain is pancake-flat and you just want dinner to magically appear? That’s how I stumbled into my Cheesy Chicken Quesadilla routine. It started as a 'use up the leftovers' experiment after one too many lazy Sundays, and now here we are — this recipe makes a comeback practically every week in my kitchen. Actually, the first time I made these, I was so distracted by the dog doing zoomies in the living room that I burnt the first one, so if you smell a little toasty tortilla, well, it’s basically tradition at this point. And listen, if yours ooze cheese onto the pan? Just call those bits "bonus snacks." (My nephew calls them quesadilla fries, bless his heart.)


Why You'll Love This — Or At Least I Hope You Will
I make this Cheesy Chicken Quesadilla when I need something fast, filling, and—let’s be honest—something I know nobody will whine about. My family goes absolutely bonkers for these, especially since I started sneaking in a little smoked paprika (don’t tell the spice-averse ones). Is it the mountain of melty cheese? The crispy edges? Maybe it's the fact you can dip these in pretty much anything in the fridge. I've definitely tried to swap every type of cheese on a stormy night with no shopping options, and so far, my only real flop was goat cheese. Just too tangy for me, but hey, you live and learn.
What You’ll Need (and a Few Easy Swaps)
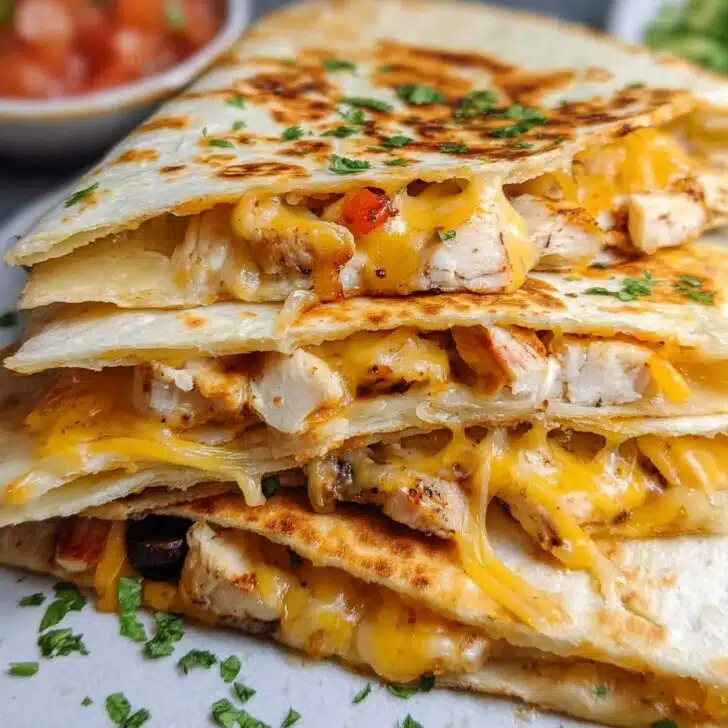
- 2 cups cooked chicken (about 250g) – shredded or chopped, whatever ya got. Rotisserie chicken is my last-minute hero, or sometimes I use leftover roast. My aunt insists on poaching and shredding fresh chicken breasts but honestly, any cooked chicken works fine as long as it’s not sweet chili flavor. (Did that once by accident. No thanks!)
- 1 ½ cups shredded cheese – cheddar, Monterey Jack, mozzarella; even the bagged "Mexican blend" works. If you only have a little of this and a little of that, just toss them together. Cream cheese? Add a tablespoon for goo factor.
- 4 large flour tortillas – or use corn if that’s what’s in the cupboard; I find flour gives the best crisp outside, but sometimes beggars can’t be choosers.
- 2 tablespoons butter or oil – I usually go with butter just for the flavor. Olive oil is fine, too; once I used bacon grease on a lark. Oof, so good.
- ½ red onion, diced – optional, but that little bite really wakes up the cheese.
- ½ bell pepper, chopped (honestly, any color works)
- A pinch of chili powder or smoked paprika – if you want a tiny kick.
- Salt & pepper, to taste (sometimes I skip salt if my cheese is already super salty)
- Optional add-ins: jalapeños (if you’re brave), chopped tomatoes, a spoon of corn. I once put pineapple in… regretted that, not gonna lie.
How To Pull It Together (And It’s Okay If You Get Messy)
- Heat up a medium-sized skillet on medium-low (patience is a virtue — otherwise you get burnt edges and cold cheese. Ask me how I know…)
- In a bowl, mix the chicken, onions, peppers, half your cheese, and the spices. Salt and pepper too. Sometimes I just throw it all directly onto the tortilla if I'm in a rush. On second thought, mixing first gets you nice even bites.
- Butter (or oil) one side of each tortilla. Lay it butter-side down in the pan. Spread your mixture over half the tortilla, sprinkle on the rest of the cheese, and fold the tortilla over to make a half-moon. If a few shreds escape, that’s okay; they'll crisp up into those little golden nuggets.
- Cook for 2–3 minutes until underneath gets that beautiful, golden brown and crispy thing happening. Flip carefully (I once flung half of mine across the stove — try using a wide spatula if you’ve got one). Cook another couple minutes. Don't worry if a little filling spills; this is where I usually sneak a taste anyway.
- Slide onto a board, let it cool a bit (seriously, burning your tongue is basically a rite of passage here). Slice into triangles, or odd shapes if you can't be bothered to make them look fancy.
Notes Only a Real Home Cook Will Tell You
- If the cheese oozes out, let it crisp before pulling it away. Those are my husband’s favorite bits!
- Some people pile all the filling in the center, but I find spreading it evenly works better—no one wants a quesadilla with just air and tortilla at the edge.
- I’ve tried both stovetop and microwave (out of desperation). Stovetop wins every time, hands down.
Variations I’ve Tried – And a Dud or Two
- Mushroom and spinach instead of chicken for a veggie hit. Love it, especially with pepper jack.
- Taco seasoned beef works – though honestly, chicken is less greasy and holds together better.
- One night I got ambitious and added a fried egg. Messy, but delicious. Careful not to let the yolk escape.
- Pineapple. Still not sold on that. Tasted like a pizza with an identity crisis. But you do you!


Do You Need Fancy Gadgets?
A non-stick skillet is perfect. Cast iron is even better if you've got forearms like Popeye, but I'm not above using the cheap pan from my college days. No panini press? No problem — just press the quesadilla down with your spatula or, honestly, whatever clean thing you have nearby (I've been known to use a plate if I'm in a mood).
What About Leftovers? — Though They Rarely Survive
Wrap any extra in foil; fridge is fine for a day or so, though honestly, in my house it never even makes it to breakfast the next morning. If you do reheat, a dry pan crisps it right back up — I don’t recommend the microwave unless you like your tortillas chewy. Maybe you do? Who am I to judge.
How I Like To Serve Mine
We do sour cream and salsa for dipping — sometimes guac if I'm not too lazy to smash an avocado. Once in a blue moon, we’ll put out a big salad but honestly, more often it’s just chips and maybe a few pickled jalapeños on the side (my grandad would ask for ketchup, but, well, some traditions aren’t worth repeating).
A Couple Pro Tips (Hard-Earned Lessons!)
- Don't rush the flip. I once tried to be clever and toss it in the air — spent the next ten minutes picking up cheese globs.
- Actually, I find it works better if you start with the pan a little lower heat than you think. Those slow, crispy edges are worth the wait.
- Don’t overfill. I always want more cheese but then regret when it all spills into the pan instead of staying where it should. Moderation, right?
FAQ — Because I Really Have Heard These Before
- Can I make these ahead? Yeah, you can assemble them in advance, just keep ‘em covered in the fridge. Cook when ready — they’ll actually crisp up better that way than if they sit cooked.
- What about gluten-free? Sure thing. Swap in your fave gluten-free tortillas. I once used lentil wraps; not bad, but a bit chewy.
- Can I freeze them? Technically, yes, but I find they go a bit mushy. But if you must, wrap tight, freeze, then re-crisp in a pan straight from the freezer (do not microwave unless you like limp sadness).
- Do you have to use chicken? Nah. Turkey, beef, or extra beans all work. Or just cheese for that matter — who am I to get in the way of progress?
- Why are mine soggy? Usually, the heat was too low or the filling too wet. Crank up the pan a bit next time, or drain the filling before stuffing. Soggy isn’t a deal-breaker, but it’s not ideal.
Anyway, now that you have all my Cheesy Chicken Quesadilla secrets (and a couple of unrelated stories), I say go forth and get gooey. And if all else fails, just remember: crispy cheese covers a multitude of sins.
Ingredients
- 2 cups cooked chicken breast, shredded
- 1 ½ cups shredded cheddar cheese
- 1 cup shredded Monterey Jack cheese
- 4 large flour tortillas
- ½ cup diced red bell pepper
- ¼ cup chopped fresh cilantro
- ¼ cup sliced green onions
- 1 tablespoon olive oil
- Salt and pepper to taste
Instructions
-
1In a medium bowl, combine the shredded chicken, cheddar cheese, Monterey Jack cheese, red bell pepper, cilantro, green onions, salt, and pepper. Mix until well blended.
-
2Place one-fourth of the filling on one half of each tortilla. Fold the tortillas over to cover the filling and press gently.
-
3Heat olive oil in a large skillet over medium heat. Cook each quesadilla for 2-3 minutes per side, or until golden brown and the cheese is melted.
-
4Remove from the skillet and let cool for one minute. Slice each quesadilla into wedges.
-
5Serve warm with your favorite salsa, sour cream, or guacamole.
Approximate Information for One Serving
Nutrition Disclaimers
Number of total servings shown is approximate. Actual number of servings will depend on your preferred portion sizes.
Nutritional values shown are general guidelines and reflect information for 1 serving using the ingredients listed, not including any optional ingredients. Actual macros may vary slightly depending on specific brands and types of ingredients used.
To determine the weight of one serving, prepare the recipe as instructed. Weigh the finished recipe, then divide the weight of the finished recipe (not including the weight of the container the food is in) by the desired number of servings. Result will be the weight of one serving.
Did you make this recipe?
Please consider Pinning it!!