
Let's Be Honest About Pizza Night...
So, I first started making this Cheesy Basil & Garlic Pizza on a random Tuesday, years ago—just messing around in the kitchen, music on, flour absolutely everywhere. I remembered the time my cousin and I almost set the oven mitt on fire (not my shining moment), but hey, nobody went hungry. This is now my go-to when I want something that feels special but won’t have me stuck in the kitchen all night. But—and this is crucial—there's nothing fancy about it. Just cheesy, fragrant, good old pizza magic. And if you accidentally sprinkle some cheese on the floor? Eh, nibble while you clean up.
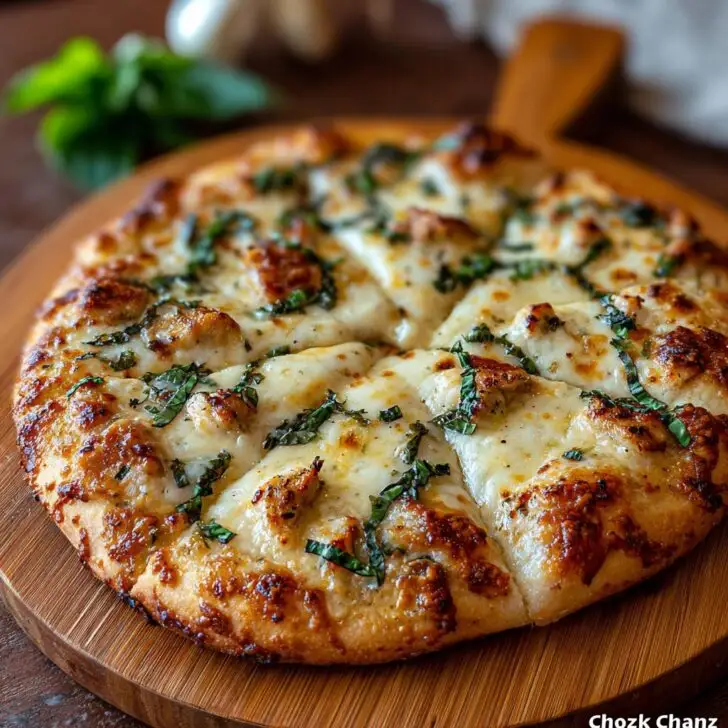
Why You'll Love This Pizza (Even If You Burnt Toast Yesterday)
I make this whenever my family starts getting that pizza craving but I can't bear another greasy cardboard delivery. Or, sometimes when I've got rogue basil taking over the windowsill (basil tends to go feral in my house). My partner legit goes wild when he smells the garlic from the next room—there's just something about that combo. Honestly, there was a time I tried a low-fat cheese version and regretted it... never again. Oh, and I genuinely love having pizza leftovers, which almost never happens, but when it does—wow, it tastes even better the next day. (Probably because I don’t have to do any work.)
Somewhat Flexible Ingredients (Substitutions Included—Thank Me Later)
- 1 ball pizza dough (about 250g or a fist-sized lump)—I usually buy mine at the bakery, but if you’re ambitious, this recipe actually works.
- 2-3 tablespoons olive oil (fancy works, but any kind will do in a pinch)
- 3 big garlic cloves, minced—confession: I sometimes buy the jarred stuff when lazy
- 1 ½ cups mozzarella, grated or torn (a proper mozzarella ball is best, but pre-shredded is fine)
- Handful of fresh basil leaves (my Nan used to scold for tearing them, but really, chop or tear—your call)
- ½ cup grated parmesan (or just use more mozzarella if it’s all you’ve got)
- 1 teaspoon dried oregano (I skip if I forget, and it's still good)
- Salt & pepper, a couple of pinches
- Optional: Cherry tomatoes, thinly sliced (occasionally I add these if we've got sad leftovers), cracked red pepper for a kick, or swap in spinach for a greener vibe
How I Actually Put It Together (With Occasional Distracted Moments)
- Preheat that oven: Blast it up to 220°C/425°F—or as high as it’ll go, frankly. If you’ve got a pizza stone, toss it in now. Honestly, a baking tray works fine too.
- Shape the dough: Flour your hands and work surface. Stretch, don’t roll—unless you just can’t get it to cooperate, in which case a rolling pin (wine bottle in my case) gets the job done. Don’t stress about perfect circles—oddly shaped pizza tastes just as good or, in my case, often better.
- Infuse the oil: Warm the olive oil in a small pan over low-ish heat. Chuck in your garlic and let it sizzle gently for a few mins (don’t let it go brown and bitter; if it smells nutty, it’s too late!). Spread this garlicky oil all over your dough—edges included.
(This is where I always spill a bit, so I just swipe it up and dab it on the crust.) - Toppings time: Scatter mozzarella and parmesan all over the oiled base. Maybe leave a border unless you crave those frizzled cheesy edges. Drop the basil—either torn or chopped. Sprinkle oregano, salt, and pepper. Sometimes I sneak in a tomato here and there.
- Bake: Pop onto your hot stone or tray, middle rack. Bake about 12-15 mins. When the cheese is bubbly and the bottom looks golden (peek underneath with a spatula, but watch your knuckles—I always forget and regret it), it’s done.
- Cool, slice & devour: Wait a few minutes unless you love burning the roof of your mouth. I never wait long enough. Slice it up—squares, wedges, or wild strips, whatever—it’s pizza, not rocket science.
Notes That Might Save Your Sanity (Trust Me)
- If the dough keeps shrinking back, let it rest another 5 minutes—dough is basically a stubborn child sometimes.
- I used to over-pile cheese, then the centre would get soggy. Restraint, as my uncle used to say, is a virtue (occasionally).
- Not all mozzarella melts the same. Supermarket pre-shredded is okay, but the fresh stuff is a million times gooier.
- Oh, and if you forget to preheat your oven fully, the bottom goes weirdly pale and limp—no bueno.
If You Want to Tinker...
- I swapped basil for arugula once; not bad, but kind of too peppery in my humble opinion.
- Tried smoked provolone instead of mozzarella—kind of a miss (maybe save that for a grilled cheese?)
- I sometimes drizzle with hot honey at the end—sounds odd but it’s addictive. If you’re into experimenting, check out this inspiration.
What If I Don’t Own Fancy Kitchen Stuff?
- Pizza stone is nice but a normal baking sheet does the job.
- No rolling pin? Use a wine or beer bottle, works a treat—just flour it first.
- If you’ve only got a toaster oven, make mini pizzas (who doesn’t love more edges?).


How I Store (But Usually Just Eat) This Pizza
It should keep in the fridge, wrapped up, for up to 3 days. I reheat slices in a skillet for crispy bottom, or just eat 'em cold standing at the fridge (no shame). Freezes okay, but honestly, in my house, it never lasts more than a day—it’s got a way of magically disappearing.
What to Serve This With? (Or On, If You’re Me)
I usually stick some mixed leaves on the side with a drizzle of balsamic. My kid wants ranch for dipping (to each their own). Friends swear by a cold lager with this, or sparkling water with a squeeze of lemon. I’ve occasionally plonked the pizza right on a chopping board and let everyone dig in barn-style on the sofa—no plates required.
Lessons Learned: Don’t Be Me
- I once thought I could skip preheating the oven... yeah, don’t do that. Soggy pizza sadness.
- Adding the garlic raw? Thought it’d be bolder. Tasted harsh. Infuse it in oil; it mellows so nicely, trust me.
- Trying to use too many toppings = disaster. Simple is better for this one.
Frequently Asked (and Sometimes Silly) Questions
- Can I make this gluten-free?
- Yep—grab your favourite gluten-free dough. I’ve tried Bob’s Red Mill mix; turns out alright (it’s a bit stickier, so flour it lots).
- What if I don’t like basil?
- Honestly, swap for parsley, spinach, or nothing—pizza’s meant for bending the rules. I sometimes skip it if I run out.
- Is it okay to prep ahead?
- Totally fine—I shape the dough and stash it covered in the fridge for a couple hours. But I don’t top it till right before baking, or else it gets gloppy.
- Can I use garlic powder instead of fresh garlic?
- Sure thing. Start with ½ teaspoon mixed into the oil—won’t have the same depth, but nobody’s judging. Sometimes I do this if the fresh garlic’s gone sprouty.
- Why won’t my dough stretch properly?
- Usually it’s too cold or tense—let it rest a bit more. Or, just roll it and don’t stress. Not worth pulling your hair out, honest.
PS—Oh! Before I forget, if you want to geek out on dough science, Kenji Lopez-Alt has some wild tips on Serious Eats.
And NO, this pizza will never look as perfect as those fancy Instagram shots. Taste over looks every time.


Ingredients
- 1 prepared pizza dough (about 12-inch round)
- ½ cup pizza sauce
- 1 ½ cups shredded mozzarella cheese
- ½ cup freshly grated Parmesan cheese
- 2 tablespoon extra virgin olive oil
- 3 cloves garlic, minced
- ¼ cup fresh basil leaves
- ¼ teaspoon crushed red pepper flakes (optional)
- Salt and black pepper to taste
Instructions
-
1Preheat the oven to 475°F (245°C) and place a pizza stone or baking sheet inside.
-
2Roll out the pizza dough on a lightly floured surface to a 12-inch round and transfer it to a piece of parchment paper.
-
3Brush the dough with olive oil, then spread the pizza sauce evenly over the surface, leaving a small border.
-
4Sprinkle minced garlic over the sauce, followed by mozzarella and Parmesan cheeses. Season with salt, black pepper, and red pepper flakes if desired.
-
5Carefully transfer the pizza (with parchment) to the preheated stone or baking sheet. Bake for 13-15 minutes, or until the crust is golden and the cheese is bubbling.
-
6Remove from oven. Top with fresh basil leaves, slice, and serve hot.
Approximate Information for One Serving
Nutrition Disclaimers
Number of total servings shown is approximate. Actual number of servings will depend on your preferred portion sizes.
Nutritional values shown are general guidelines and reflect information for 1 serving using the ingredients listed, not including any optional ingredients. Actual macros may vary slightly depending on specific brands and types of ingredients used.
To determine the weight of one serving, prepare the recipe as instructed. Weigh the finished recipe, then divide the weight of the finished recipe (not including the weight of the container the food is in) by the desired number of servings. Result will be the weight of one serving.
Did you make this recipe?
Please consider Pinning it!!