
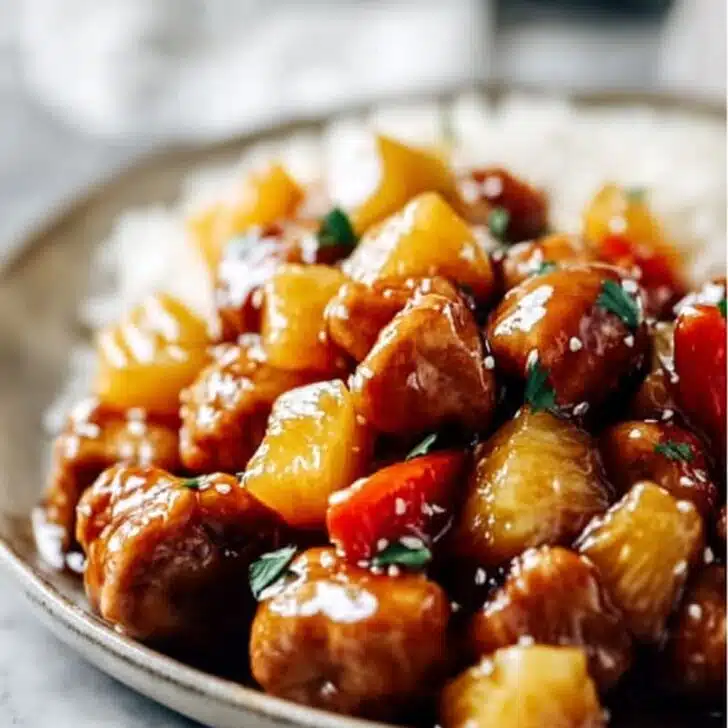
Okay, Here’s the Story (or: How I Ended Up Loving Sweet Chicken)
So, you know those days when you open the fridge, and there’s that can of pineapple rings—maybe left from a half-baked plan to make pineapple upside-down cake that never happened? Well, that’s how I sort of stumbled into this Brown Sugar Pineapple Chicken thing. Wasn’t looking for anything fancy, but I remembered my aunt Vera (the one who adds ketchup to lasagna, bless her) made something similar ages ago. I think hers was stickier, but anyway, after a few tries—plus one slightly burnt batch—I landed on this riff. And now, honestly, it’s a staple here. Even my chronically-picky oldest pretends to like the pineapple for a grown-up excuse to soak up more sauce. Typical.


Why You’ll Love this—Or, At Least, Why We Do
I drag this recipe out on weirdly cold spring nights (you know, when dinner should be salad but you want comfort). My family goes mad for this because it’s lusciously sweet but not that make-your-teeth-hurt level of sweet; the pineapple does the heavy lifting for flavor. Um, one time I tried swapping honey in, thinking I’d be healthy, but it just made things sticky in a weird way. Lesson learned. Plus, it means one less pot since the sauce just happens in the skillet (less washing, more time for a cuppa later—win!).
Grab These Ingredients (or, Make Do with What’s Knockin’ About)
- 4 chicken thighs or breasts (I have a soft spot for skin-on thighs, but swap to breast if you want leaner—just keep an eye out for dryness)
- 1 can pineapple slices with juice (chunk or tidbits also work, says my little brother, who once broke a can opener prying open a tin...)
- ⅓ cup brown sugar (light or dark, but don’t use the weird raw stuff—tried it; just couldn’t get it to dissolve right)
- 2 tablespoons soy sauce (low sodium works; once, in a panic, I used teriyaki sauce—wasn’t bad actually)
- 2 garlic cloves, minced (or a decent squeeze from a tube; no judgment, I’ve been there after a long workday)
- ½ teaspoon paprika (my gran always used smoked, but it can be regular too)
- Salt and black pepper to taste (I don’t measure, I just wing it and hope the kitchen gods smile)
- Chili flakes (optional, but, you know, if you want a little zip)
How To Make It (Some Steps Precise, Some... Not So Much)
- Pat your chicken dry, and season generously with salt, pepper, and paprika. I don’t bother measuring—just make it look like you mean it.
- Heat a good-sized skillet (one with a lid is handy, but I’ll get to that). A splash of oil, then lay in the chicken, skin side down if you went for thighs. Sizzle for about 4-5 min per side, until things are getting brownish but not quite cooked through. This is where I usually sneak a bite of pineapple (it’s right there—how can you not?).
- Drain the can of pineapple, but keep the juice—really important. Set aside pineapple.
- Once the chicken is seared, move it to a plate for a minute. Chuck garlic in the pan for about 30 seconds, til fragrant but not crispy (if you scorch it, honestly, just keep going—it’ll be fine, promise).
- Now, pour in the pineapple juice, brown sugar, and soy sauce. Stir to scrape up all those crusty, tasty bits from the pan. Let it bubble a wee bit, maybe 2-3 min. (If the sauce looks... odd? It sorts itself out by the end, cross my heart.)
- Nestle the chicken back in, scatter pineapple slices on top/around, sprinkle chili flakes if you fancy, and cover. Simmer gently for about 20 min, turning once. The chicken should get all glossy and cooked through.
- Check the sauce: If it’s too thin, I take the lid off and blast it for a couple of minutes so it thickens. If it’s too thick, I splash in a bit of water or—confession—a slug of orange juice. Works a treat.
- Give it all a final taste. Maybe add more soy? Maybe not. Let your tastebuds decide. Serve up, spooning all that saucy goodness over the chicken.


Random Notes (A.K.A. Things I Figured Out the Hard Way)
- Chicken thighs stay juicier, but breasts cook faster—set a timer if you’re skittish about overcooking, or just poke with a knife to check for doneness.
- Don’t skimp on the browning step at the start. If you skip it, the sauce ends up looking (and tasting) a smidge dull.
- Leftover pineapple pieces are amazing in the sauce, but I once tossed in fresh pineapple; it got kinda weird. Maybe canned is just magic for this one?
- If you double the sauce (and I think you should), make sure your skillet’s got high sides. Sauces have an evil way of bubbling everywhere!
If You Want to Switch It Up (Or, Stuff I Tried That... Kinda Worked)
- I did a version with boneless chicken wings. It cooked even faster—good for a weeknight, but it lacked that Sunday-dinner vibe somehow.
- Thrown in green pepper chunks at the same time as the pineapple—adds color, and, I think, a touch of freshness. But then I tried red onion slices and, eh, didn’t love it (they went weirdly mushy on me).
- Swapped brown sugar for maple syrup once (ran right out). Honestly, stick to brown sugar; maple just tasted like breakfast gone wrong!


Equipment (But Improv Is Fine, Promise)
- Large skillet with a lid (but hey, a baking dish and foil will work if you’re oven-bound—just give it extra time at a lower temp, around 180°C/350°F)
- Decent tongs or a big spoon—a spatula will do in a pinch, though mine keeps disappearing
How to Store Leftovers (Though, Good Luck Having Any Left...)
Pop leftovers into an airtight container; fridge for up to 2 days. Reheat gently (microwave is fine—just spoon over extra sauce). But let’s be honest, it barely lasts til next lunch in my crowd. I think the flavors are even better the next day, though that’s just my opinion!
How We Serve It (And a Little Family Quirk)
Honestly, bowl of plain jasmine rice and you’re sorted. Or, sometimes we go rogue and tear into crusty bread for sauce-mopping (little ones love that). My uncle insists it needs peas alongside, and sometimes I play along just for his sake—but I like it just the way it is. Once, for a birthday, I served it over coconut rice and everyone lost their minds, in a good way.
Here’s What I Learned the Hard Way—Pro Tips
- Don’t rush the browning at the beginning—I once did and the chicken looked pale and flavorless (think unloved cafeteria food, soz).
- You can let the sauce simmer a bit after you take out the chicken to reduce it further, but keep an eye—it can caramelise fast and that’s a char I don’t recommend.
- If your sauce seems too sweet, stir in just a splash of soy. On second thought, maybe lemon juice works as well, but I always go for soy first.
FAQs—Because People Are Curious (And Sometimes Skeptical!)
- Can I use chicken breast instead of thighs?
Absolutely. Just watch the timing—breasts cook quick, so maybe 15 minutes simmering? Oh, and check early so they stay juicy. - What if I don’t have canned pineapple?
You can try fresh, but maybe add a splash of apple juice for that sweet sharp kick. I did it once; tasted fine, but not quite the same classic flavor. - How sweet is this, really?
Hmm, not as over the top as you’d think. Brown sugar + soy balances out, promise. If your sweet tooth is shy, just use a little less sugar first time ’round. - Can I freeze it?
Yup. Chicken texture might shift a touch, but it was still delicious after a defrost. Just don’t freeze with the rice, sort of turns to mush (I learned the hard way...) - Is the sauce good on veggies?
I’ve poured it over steamed broccoli before—tastes fab, but kids gave me major side-eye. Their loss!
And there you have it—Brown Sugar Pineapple Chicken, exactly how we muddle through around here, with a few detours and maybe an extra pineapple ring snacked along the way. Enjoy!
Ingredients
- 4 boneless, skinless chicken breasts
- 1 cup pineapple chunks (with juice)
- ½ cup brown sugar, packed
- ¼ cup soy sauce
- 2 cloves garlic, minced
- 1 tablespoon olive oil
- ½ teaspoon black pepper
- ¼ teaspoon salt
- 1 tablespoon cornstarch (optional, for thickening)
Instructions
-
1Preheat oven to 400°F (200°C). Lightly grease a baking dish with olive oil.
-
2Arrange the chicken breasts in the prepared baking dish. Season both sides with salt and black pepper.
-
3In a bowl, mix together the pineapple chunks (with juice), brown sugar, soy sauce, and minced garlic.
-
4Pour the pineapple mixture evenly over the chicken breasts.
-
5Bake for 25-30 minutes, or until the chicken is cooked through. Optionally, remove some liquid and mix with cornstarch, then return to the pan and broil for 2-3 minutes to thicken the glaze.
-
6Serve hot with your favorite sides and spoon the pineapple sauce over the chicken.
Approximate Information for One Serving
Nutrition Disclaimers
Number of total servings shown is approximate. Actual number of servings will depend on your preferred portion sizes.
Nutritional values shown are general guidelines and reflect information for 1 serving using the ingredients listed, not including any optional ingredients. Actual macros may vary slightly depending on specific brands and types of ingredients used.
To determine the weight of one serving, prepare the recipe as instructed. Weigh the finished recipe, then divide the weight of the finished recipe (not including the weight of the container the food is in) by the desired number of servings. Result will be the weight of one serving.
Did you make this recipe?
Please consider Pinning it!!