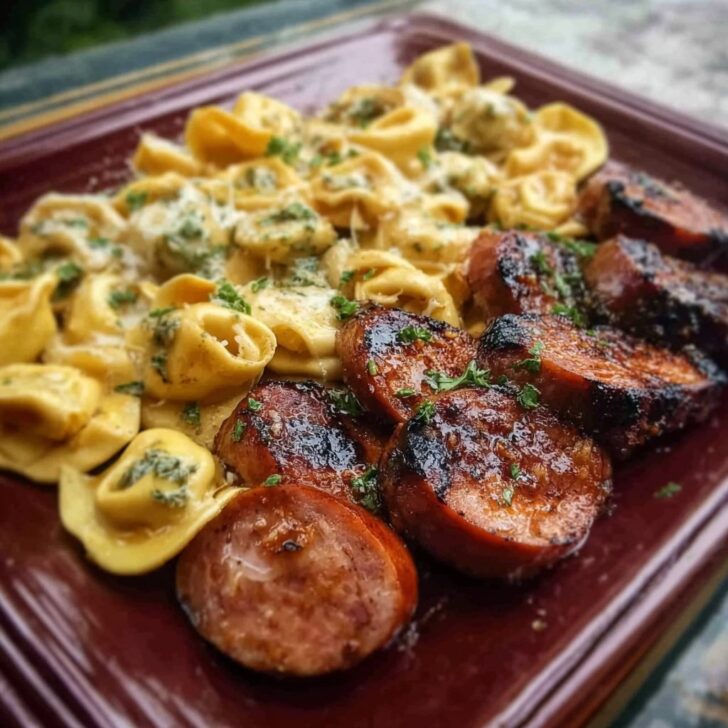

Catching Up Over Some Blackstone Grilled Kielbasa and Tortellini
If you’ve ever found yourself staring blankly at a package of kielbasa and some tortellini (usually at 5:30pm and everyone’s already asking what’s for dinner), then this grilled mashup is your new best friend. The first time I threw these together, my cousin was visiting and we’d gotten a late start grilling because, well, we got sidetracked swapping stories and snacking on pickles. (Who even eats that many pickles? Apparently us.) Before we knew it, the sun was dipping, we were starving, and Tor—yes, we called him that—said, “Just throw it all on the grill, let’s see what happens.” Sometimes, chaos works out.
Why I Keep Coming Back to This
I make this when I don’t have the mental bandwidth for a complicated meal but still want something that people will get excited about. My niece literally dances in her chair when she hears kielbasa is involved. (She’s kind of dramatic, but I’ll take it.) Plus, if we’re being honest, grilled tortellini just sounds fun—and the first time I tried this, half the tortellini stuck to the grill! Spoiler: toss them in a little olive oil first, saves you a headache.
What You'll Need (And a Few Back-Up Plans)
- 1 big ol’ package of kielbasa (any brand, but my grandma swore by Hillshire; honestly, whatever’s on sale works fine)
- 1 bag of cheese tortellini (fresh or frozen—if I’m in a real hurry, the frozen kind gets just boiled for a minute less)
- 1 red onion, sliced (or white if that's what you find hiding in the veggie drawer)
- 1-2 sweet bell peppers (yellow or orange is my jam, but green peppers if you're feeling thrifty)
- Olive oil (a good glug, maybe 2-3 tbsp; sometimes I add a splash of Italian dressing if I’m feeling spicy)
- Salt and pepper (but if you wanna go wild, garlic salt or a pinch of red pepper flakes is money)
- Grated parmesan or Asiago cheese (if you’ve got it; I once used shredded cheddar, not the same, but eh it’ll do in a pinch)
- Fresh parsley or basil for a bit of green (or don’t, no one will write you a ticket)
How This All Comes Together
- Get the grill or Blackstone hot. Aim for medium-high heat, but if yours runs hot like mine, you might want to go a smidge lower to avoid turning everything into charcoal.
- Slice the kielbasa and veggies. Diagonals look fancy but honestly, chunks are fine. Don’t overthink it.
- Cook the tortellini— but not all the way. Just a minute or two less than the package says, since it’s gonna hit the grill soon. (I forgot this step once, and yeah—crispy tortellini is not the vibe.) Drain and toss with a bit of olive oil so they behave on the griddle.
- Toss it all together. In a big bowl, mix the kielbasa, veggies, a big slug of olive oil, salt, and pepper. Sometimes I add a squeeze of lemon, sometimes I don’t. Today I did—felt fancy.
- Onto the Blackstone! Dump the bowl out onto it. Let everything sizzle, and resist the urge to fuss too much. Just toss it occasionally so you get those nice brown bits. This is usually when I sneak a taste. If you’re as impatient as me, watch your fingers around the hot edge.
- Add the tortellini near the end. Seriously, only a few minutes—just enough to get them seared. Don’t worry if they look a little weird at first, they always perk up.
- Finish with cheese and herbs. Sprinkle on the parmesan or whatever you grabbed, plus the parsley. Give it a toss, taste for seasoning. Done!
Notes from Someone Who’s Messed This Up Before
- If you leave the tortellini sitting too long, they’ll stick. Actually, I find it works better if you toss them just before serving.
- Rushed the kielbasa once. Ended up with rubbery, kind of sad sausages. Go slow, it’s worth it.
- If you use Italian dressing instead of oil, lower the salt. It sneaks up on you.
Things I’ve Tried (and a Few I’ll Never Try Again)
- Added zucchini chunks once—worked great.
- Swapped kielbasa for chicken sausage, but it’s just not the same for me. Something’s missing, you know?
- Tried grilling raw tortellini straight up. Don’t do it. They just get weirdly leathery.
Stuff You’ll Need (Or Not)
- Blackstone or any flat top griddle. But if you’re in a pinch, you can use a big cast-iron pan on the stove. It’s messier, but hey, gets the job done.
- A decent pair of tongs. Or, if you’re like me and always misplacing them, a big spatula will do, though you may chase the odd tortellini off the side.


How to Stash (If There’s Any Left...)
Just stick leftovers in an airtight container and keep in the fridge. They’ll last 2-3 days—though honestly, in my house it never lasts more than a day! It does get a bit firmer when cold, but that’s not always a bad thing. Actually, I think it tastes better the next day; the flavors all have time to mingle. For reheating, microwave’s fine, but a quick toss in the pan really perks it up.
How I Like to Serve It (But You Do You)
We usually set the whole griddle on the table and let people scoop their own (which might horrify some, but hey, it's fun). I like to pile mine in a bowl with extra cheese and a few cherry tomatoes. My uncle swears it’s only really done if you crack black pepper over the top. Who knows, maybe he's onto something.
Hard-Won Pro Tips (a.k.a. Me Saving You the Trouble)
- If you try to grill everything at once in one big pile, the veggies steam instead of char. Give them room, or do batches if you must.
- I once tried rushing the tortellini step by dumping it in cold—regretted it instantly. Lukewarm pasta is nobody’s friend.
- Actually, don’t skip the olive oil on the tortellini. Seriously, otherwise it’s stick-city. Learned that the hard way.
Blackstone Grilled Kielbasa and Tortellini Q&A
- Can I use a regular grill instead of a Blackstone?
I mean, technically yes, but the tortellini will probably fall through the grates unless you use a grill basket. Honestly, I think it's more hassle than it's worth. But if that's all you've got, just be careful! - Could I make this vegetarian?
Absolutely! Swap out the kielbasa for your fav plant-based sausage. I’d maybe double up on the veggies though, since you’ll wanna bulk it up a bit. (Oh, and don’t skip the cheese!) - Do I have to use fresh tortellini?
Nope! I use frozen all the time. Just give it a quick boil first. But, now that I think about it, the fresh kind holds together a little better on the grill. Both work though. - Where do you find decent sausage for grilling?
If I’m not doing the usual supermarket run, sometimes I order from Polana—feels special. And for the curious, Serious Eats has a good guide on sausage types, just in case you want to nerd out.
Anyway, next time you’re feeling stuck on that what’s-for-dinner question, try tossing this together on your griddle. If nothing else, it’ll get the stories rolling. And hey, if the tortellini gets a little crispy, just call it rustic. Works for me!


Ingredients
- 14 oz kielbasa sausage, sliced into ½-inch rounds
- 20 oz refrigerated cheese tortellini
- 1 tablespoon olive oil
- 1 red bell pepper, diced
- 1 small yellow onion, sliced
- 2 cups baby spinach
- 2 cloves garlic, minced
- ½ teaspoon black pepper
- ¼ cup grated Parmesan cheese
Instructions
-
1Bring a large pot of salted water to a boil. Cook cheese tortellini according to package instructions, then drain and set aside.
-
2Preheat the Blackstone griddle over medium heat. Add the olive oil, then sauté sliced kielbasa until browned, about 4-5 minutes.
-
3Add diced bell pepper and sliced onion to the griddle. Cook for 3-4 minutes until vegetables are slightly softened.
-
4Stir in the minced garlic and cook for 1 minute until fragrant. Add the cooked tortellini and toss to combine with the sausage and vegetables.
-
5Add baby spinach and black pepper. Continue cooking, stirring frequently, until spinach wilts and everything is heated through, about 2-3 minutes.
-
6Transfer to serving plates and sprinkle with grated Parmesan cheese before serving.
Approximate Information for One Serving
Nutrition Disclaimers
Number of total servings shown is approximate. Actual number of servings will depend on your preferred portion sizes.
Nutritional values shown are general guidelines and reflect information for 1 serving using the ingredients listed, not including any optional ingredients. Actual macros may vary slightly depending on specific brands and types of ingredients used.
To determine the weight of one serving, prepare the recipe as instructed. Weigh the finished recipe, then divide the weight of the finished recipe (not including the weight of the container the food is in) by the desired number of servings. Result will be the weight of one serving.
Did you make this recipe?
Please consider Pinning it!!