Let Me Tell You Why I Love Black Pepper Chicken
There are some dishes I cook purely because I crave them, and then there are the ones I make because I know if I don’t, my family might revolt. Black Pepper Chicken firmly lives in column B. The first time I made it, I was trying to impress my then-boyfriend (who is now, somehow, my husband... go figure). I accidentally added waay too much black pepper and, honestly, we coughed our way through dinner. But it sort of became our thing. These days, I try to strike a friendlier balance—except for that one time when I grabbed what I thought was black pepper and ended up tossing in allspice. Let’s just say it did not become a tradition. Anyway, this dish is a weeknight lifesaver, and if you can wield a pan and a spoon, you’re halfway there!

Why You'll Absolutely Eat This Up
I pull out this recipe when I'm short on time but still want it to look like I did a lot of work. My kids don’t always agree on dinner, but when I shout, “Who wants Black Pepper Chicken?” I suddenly have help setting the table (which never happens for broccoli night). It's peppery, but not hit-you-over-the-head spicy—unless, of course, you want to crank it up. I’ll admit, I tried making it with pre-cooked chicken once... it was a little dry but, if you’re in a pinch, it sort of works. Oh, and my one real beef (get it?) with this dish is all the slicing, but you can cheat with pre-chopped onions and bell peppers from the shop.
What You'll Need (And What You Can Sneak By With)
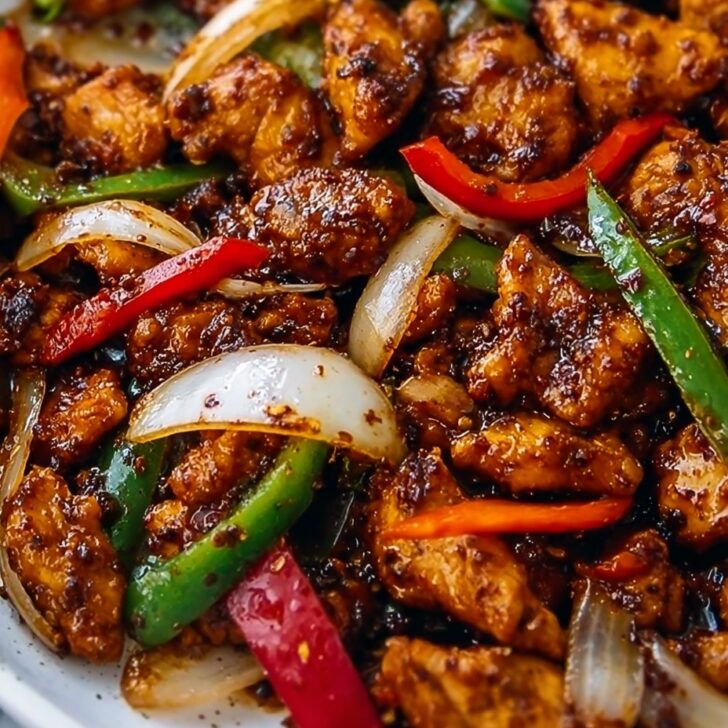
- 500g boneless chicken thighs or breasts, chopped into bite-sized bits (I usually use thighs—they’re juicier, but breasts work well too. Dad swore by the local butcher, but supermarket chicken hasn’t let me down yet.)
- 2 tablespoons freshly cracked black pepper (If you only have regular ground, no shame. Just use a smidge less and taste as you go.)
- 1 tablespoon soy sauce (Dark or light, whatever’s on hand)
- 1 tablespoon oyster sauce (Oyster sauce brings the savor, but hoisin's okay if you can't stand oysters)
- 1 teaspoon sugar (Brown sugar if you’re feeling fancy, plain works too)
- 1 teaspoon cornstarch (or potato starch, or even flour in a pinch)
- 1 medium onion, sliced thin (I leave some big pieces; they're nice and sweet after frying)
- 1 large bell pepper, sliced (Green for bitterness, red for sweetness—I just use whatever isn’t hiding at the back of the fridge)
- 2 cloves garlic, minced (or, you know, a hefty spoonful from a jar if you simply cannot be bothered)
- 1 inch fresh ginger, grated (I do sometimes skip this if I forgot to buy ginger. Don’t @ me)
- 2 tablespoons oil, for frying (sunflower, vegetable, whatever—olive’s fine, though it smokes a bit)
- 1 spring onion, to garnish (optional... I forget this about half the time anyway)
Right, Here's How You Get It Done
- First, pop your chopped chicken into a bowl and add 1 tablespoon soy sauce, 1 teaspoon cornstarch, and 1 teaspoon oil. Give it a quick toss so everything’s nicely coated. Sometimes I let it sit 10 minutes, but honestly, if I'm in a rush, I go straight to cooking.
- Heat a big pan (or a wok if you're feeling all chef-y) over medium-high heat and drizzle in another tablespoon of oil. Once it starts shimmering a bit, slide in the chicken. Don't crowd the pan; it needs some space to get a little golden around the edges. Let it cook until mostly done—about 5 to 7 minutes—and then scoop it out onto a plate. (This is when I sneak a piece, just to check for seasoning. Ok, fine, I just want a snack.)
- In the same pan, add your onions and bell pepper. Fry those guys for about 3 minutes. If it all smells sweet and good, you’re on the right track. Now toss in the garlic and ginger—give it another minute. Don't walk away here! The garlic loves to get crispy and then burnt if you blink.
- Push the veggies to the edge and toss your chicken back in. Add in your 2 tablespoons cracked black pepper, 1 tablespoon oyster sauce, and 1 teaspoon sugar. Stir well. If the pan looks dry, sprinkle in a splash of water – not too much, just enough so things mingle together without sticking. (Don’t worry if it looks a bit soupy right now—it thickens up.)
- Let it all bubble for about 2 minutes so the flavors get friendly. Taste it. Need more pepper? More sweetness? Adjust as you like. Scatter over the spring onion (if you remembered it), switch off the heat, and you’re done.

Little Notes From the Trenches
- If you use pre-ground black pepper, start lower and add more at the end—easy to add, impossible to take away! Learned that the peppery way.
- The cornstarch gives a nice glossy finish, but if you skip it, it’s still tasty (though a tad less shiny).
- I tried slicing everything with a mandolin once and ended up with "interesting" shapes, and a close shave on the fingertips. Use a knife if you can—trust me on this one.
Variations I’ve Actually Tried (Some Worked, Some Not So Much)
- I once swapped chicken for tofu because a vegetarian friend was coming. It worked well but definitely up the sauce for tofu to soak something in.
- Pork is fine instead of chicken—my brother swears by it, and he rarely cooks at all. Fish? Tried it once. Wouldn’t recommend — kind of fell apart and tasted oddly sweet.
- Throw in some snap peas or sliced carrots if you want more veg. Or try mushrooms (they soak up all the flavor).

About the Tools: Do You Really Need a Wok?
Look, if you have a wok, great. Use it! But a big frying pan does the job. I even used a saucepan once while all my pans were “occupied” (read: sitting in the sink)... it takes longer, but no harm done.
How To Store Your Black Pepper Chicken (If You Even Have Leftovers)
Shove leftovers in a lidded container and into the fridge for up to three days. I actually think it tastes even better the following day—but, honestly, in my house it never makes it past lunch the next day! Freezer works, too, though, chicken gets a bit chewier after.
How To Serve (According to My Family)
Steaming hot with plain jasmine rice—that’s the classic. Some nights we spoon it over noodles instead (kids refuse to use chopsticks, but hey, the mess is half the fun). Growing up, my mum would serve a side of stir-fried greens, but I'm usually too lazy on a weeknight.
Pro Tips (Or, Things I Learned the Hard Way)
- I once tried rushing the chicken by cranking up the heat too much and it went rubbery. Go medium-high, not power-blast.
- Don’t skip the marinating step entirely unless you like bland chicken. Even 3 minutes makes a difference—I tried skipping it once, regretted it.
- If your sauce gets too thick, add a splash of water. Too thin? Crank the heat and stir for a mo'.
FAQ (Actual Questions I've Gotten, Not Making This Up)
- Can I make this gluten-free?
- Yup, just use tamari instead of soy sauce (and check your oyster sauce—some are sneaky).
- What if I don’t have oyster sauce?
- Use hoisin instead! Or honestly, skip it and add a splash more soy, plus a pinch of sugar. Not traditional—but it works.
- Can I meal prep this?
- Definitely. It reheats surprisingly well (microwave or in a pan). The sauce thickens, but sometimes I add a spoon of water when reheating.
- Can I double the recipe?
- Sure, but use two pans or cook in batches. I tried to cram everything into one pan once—let’s just say it ended up more like soup than stir fry. Still tasty, just not the goal.
If you make this, let me know how it goes. Or even if you flub it—honestly, I think kitchen disasters are half the fun. Happy cooking!
Ingredients
- 500g boneless chicken thighs or breasts, chopped into bite-sized bits
- 2 tablespoons freshly cracked black pepper
- 1 tablespoon soy sauce
- 1 tablespoon oyster sauce
- 1 teaspoon sugar
- 1 teaspoon cornstarch
- 1 medium onion, sliced thin
- 1 large bell pepper, sliced
- 2 cloves garlic, minced
- 1 inch fresh ginger, grated
- 2 tablespoons oil, for frying
- 1 spring onion, to garnish (optional)
Instructions
-
1First, pop your chopped chicken into a bowl and add 1 tablespoon soy sauce, 1 teaspoon cornstarch, and 1 teaspoon oil. Give it a quick toss so everything’s nicely coated. Sometimes I let it sit 10 minutes, but honestly, if I'm in a rush, I go straight to cooking.
-
2Heat a big pan (or a wok if you're feeling all chef-y) over medium-high heat and drizzle in another tablespoon of oil. Once it starts shimmering a bit, slide in the chicken. Don't crowd the pan; it needs some space to get a little golden around the edges. Let it cook until mostly done—about 5 to 7 minutes—and then scoop it out onto a plate. (This is when I sneak a piece, just to check for seasoning. Ok, fine, I just want a snack.)
-
3In the same pan, add your onions and bell pepper. Fry those guys for about 3 minutes. If it all smells sweet and good, you’re on the right track. Now toss in the garlic and ginger—give it another minute. Don't walk away here! The garlic loves to get crispy and then burnt if you blink.
-
4Push the veggies to the edge and toss your chicken back in. Add in your 2 tablespoons cracked black pepper, 1 tablespoon oyster sauce, and 1 teaspoon sugar. Stir well. If the pan looks dry, sprinkle in a splash of water – not too much, just enough so things mingle together without sticking. (Don’t worry if it looks a bit soupy right now—it thickens up.)
-
5Let it all bubble for about 2 minutes so the flavors get friendly. Taste it. Need more pepper? More sweetness? Adjust as you like. Scatter over the spring onion (if you remembered it), switch off the heat, and you’re done.
Approximate Information for One Serving
Nutrition Disclaimers
Number of total servings shown is approximate. Actual number of servings will depend on your preferred portion sizes.
Nutritional values shown are general guidelines and reflect information for 1 serving using the ingredients listed, not including any optional ingredients. Actual macros may vary slightly depending on specific brands and types of ingredients used.
To determine the weight of one serving, prepare the recipe as instructed. Weigh the finished recipe, then divide the weight of the finished recipe (not including the weight of the container the food is in) by the desired number of servings. Result will be the weight of one serving.
Did you make this recipe?
Please consider Pinning it!