Let Me Tell You About Birria Tacos—For Real
If I had a dollar for every time someone begged me to make birria tacos, well, I could probably buy the really fancy dried chilies instead of the big bag at my corner shop. My first time making these, I totally botched the corn tortillas (think: taco carnage), but honestly, I’ve gotten okay at it now—once even impressed my skeptical uncle! There’s just something about that rich, spicy broth, all those melty strings of cheese, and the way the whole thing is messy in the best way. I mean, you’ll need a napkin in both hands, but that's half the fun, right?

Why You'll Probably Love This (I Sure Do)
I usually whip these up when a regular taco night just isn't enough. My family legit goes wild—the whole kitchen smells like a fiesta. And, not to sound dramatic, but even my sometimes-fussy teenager will come running down for seconds (I still don’t know where she puts it all). Honestly, the only thing that's tricky is patience. I once tried to rush the simmering and it just... wasn’t the same. Learn form my pain!
Here’s What You’ll Need (Give or Take)
- 3 lbs chuck roast, cut into large chunks (sometimes I swap in short ribs if I’m feeling fancy or if they're on sale)
- 1.5 lbs bone-in beef shank (or marrow bones—my grandmother is very firm about this, but honestly, I've used just extra chuck and it’s still good)
- 4-5 dried guajillo chilies, stems/seeds removed (I've subbed in California chilies when I ran out, not bad!)
- 2 dried ancho chilies, stems/seeds removed
- 2 dried pasilla chilies, stems/seeds removed (Don’t stress if you don’t have all three. Use what you’ve got)
- 1 white onion, peeled and halved
- 6 cloves garlic, peeled
- 3-4 bay leaves
- 1 cinnamon stick (the larger kind, not the pre-ground stuff—unless you really must)
- 6 whole cloves
- 1 tablespoon black peppercorns
- 1 tablespoon dried Mexican oregano (Italian oregano in a pinch; not the same but it’ll work)
- 1 tablespoon salt, more to taste
- 2 teaspoons ground cumin
- ¼ cup apple cider vinegar (white vinegar is OK if you don’t have it)
- 8 cups beef broth or water (I kinda wing it here, just make sure the meat is well-covered in the pot)
- 1 pack corn tortillas (I swear by the fresh ones if you can get them, but store-bought are fine)
- 2 cups shredded mozzarella or Oaxaca cheese (seriously, use Oaxaca if you want to channel a proper taquería, but melty cheese is good in general)
- Chopped white onion, cilantro, and lime wedges, to serve
How To Make Birria Tacos (in Real Life)
- Prep the chilies: First, toast all those dried chilies in a big dry skillet (medium heat) for a few seconds—just till they smell good, don’t walk away or they burn super fast. Toss them in a bowl and pour over some boiling water. Let them soak for about 20 minutes. Sometimes I get distracted here and they sit longer. That's fine.
- Set up the meat: While chilies soak, grab your biggest stockpot. Throw in the beef chunks, whatever bones you’re using, the halved onion, garlic cloves, bay leaves, cinnamon stick, cloves, peppercorns, oregano, cumin, and the salt. (No need to be too precious about the order, just get it all in there!)
- Blend the magic: Drain your chilies, then pop them in a blender with the apple cider vinegar and about a cup of your beef broth (or water if that’s what you got). Blitz until really smooth—like, keep going longer than you think, no one wants bits of chili skin in their broth.
- Simmer the works: Pour the chili blend into your pot with all the meat, then add the rest of your broth (or water) so everything’s cozied up and covered. Bring it up to a boil (just about as much excitement as you’ll get all night), then drop the heat and let it barely bubble for 3-4 hours. Yeah, I know, but this is where the flavor happens. Skim off any foam. This is where I usually sneak a little taste and maybe add more salt.
- Shred and strain: Fish out the meat onto a plate (careful, it’s probably tender enough to fall apart right now—don’t be me, fishing chunks from a splashy pot). Shred it with 2 forks. Meanwhile, strain the broth (that’s your consomé) through a sieve into a bowl or another pot. Pick out any loose spices from the meat if you like.
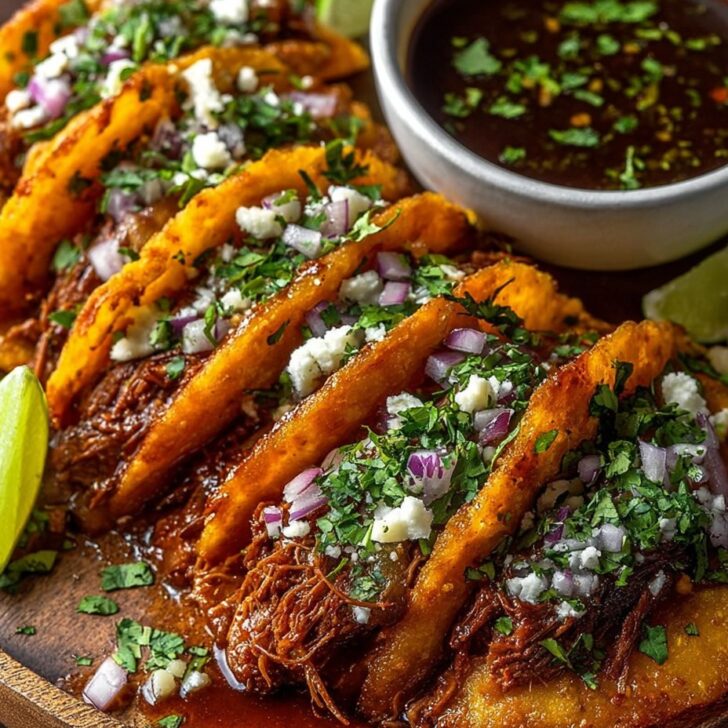
- Crisp up your tacos: Heat up a skillet or griddle. Grab your corn tortillas and dip them one by one in the consomé—just enough to coat and get that color—then slap them on the skillet. Sprinkle on the cheese, pile on some shredded beef, and fold over. Let it get crispy (flip so both sides get a bit of that golden-action). Sometimes cheese oozes out and sticks on the pan... that’s actually the best part, don’t even worry.
- Serve it up: Pile tacos on a plate and serve hot, with small bowls of consomé for dipping, and all the usuals—chopped onion, cilantro, lime. If you want to get fancy (or you just want to feel like a hero), add a little more cheese on top. My daughter sometimes puts salsa right in the consomé, chaos but delicious.


Notes From My (Occasionally Messy) Kitchen
- If you don’t have all those chili varieties, don’t sweat. I’ve made these with just guajillo and it’s still a crowd-pleaser.
- The broth gets even better overnight. If you wait, it thickens and the spices do a happy dance together.
- Seriously, don’t skip straining the consomé! Gritty broth once nearly ended a friendship. Not kidding.
- Watch your cheese—too much and it overflows, but then again, that’s fun so maybe just have napkins ready.
Birria Experiments (Some Good, One Not So Much)
- I’ve made this once with goat meat instead of beef—super traditional, but I find it a little gamey. Stick to beef for famlily dinners, probably.
- Tried making the tortillas from scratch; turns out, my rolling technique is... lacking. Store-bought is OK, folks.
- Once added a squeeze of orange juice—gave a little zing, not authentic but weirdly tasty.


No Dutch Oven? No Problem!
So, everyone acts like you NEED a heavy Dutch oven for this. I don’t have one, just a massive old soup pot. As long as it holds a gentle simmer, you could even use a slow cooker (though I'd say the stovetop is easier to taste-test as you go). Don’t let gear stop you!
Stashing Leftovers (Don't Get Your Hopes Up)
Supposedly, you can store leftover birria and consomé in the fridge for up to 3 days. Or freeze it for a couple months. But, in truth, it rarely makes it past breakfast in my place—cold birria tacos? Weirdly good.
How We Serve ‘Em at My Place
We go classic: tacos, lots of cilantro and onion, squeeze of lime, and LOADS of consomé for dunking. Sometimes, if it’s really cold out, I hand out mugs of the broth with a sprinkle of cheese as a little bonus. My cousin swears by pickled jalapeños on the side—one day I’ll remember to get those ahead of time.
Lessons I’ve Learned (Sometimes the Hard Way)
- Rushing the simmer? Big mistake. The meat WILL be tough. I did this once thinking I could shave off 45 minutes...regretted it for days.
- Always check how hot your pan is before the tortilla goes in. Smoking skillet = burned tortillas. Not tasty.
- Talking on the phone and trying to strain the broth at the same time? Disaster. Give this step your full (well, 90%) attention.
FAQ (Real Questions From Folks I Know...And One From My Neighbor)
- Can I use chicken instead of beef? Sorta, but it’ll taste totally different—not bad, but not really birria, you know?
- Can I make these ahead? Oh, for sure. Actually, I think they’re MORE flavorful the next day. Reheat gently or the meat dries out.
- Is it really spicy? Not as much as you’d think—you control it with the chilies. Use fewer for less heat, or throw in an extra if you like things nuclear.
- Can I skip the dipping? You COULD, but then you’re just missing the best bit in my opinion. Dip away!
- What if my consomé is oily? That’s kinda normal, to be honest. You can skim off some oil if it’s too much, but I leave most of it for that signature flavor.
And there you have it, my friend. I promise if you stick with it, you’ll end up with birria tacos that’ll have your people singing your praises—or at least asking for them again next weekend. As for me, I’m suddenly craving another batch. Want to come over?
Ingredients
- 3 lbs chuck roast, cut into large chunks (sometimes I swap in short ribs if I’m feeling fancy or if they're on sale)
- 1.5 lbs bone-in beef shank (or marrow bones—my grandmother is very firm about this, but honestly, I've used just extra chuck and it’s still good)
- 4-5 dried guajillo chilies, stems/seeds removed (I've subbed in California chilies when I ran out, not bad!)
- 2 dried ancho chilies, stems/seeds removed
- 2 dried pasilla chilies, stems/seeds removed (Don’t stress if you don’t have all three. Use what you’ve got)
- 1 white onion, peeled and halved
- 6 cloves garlic, peeled
- 3-4 bay leaves
- 1 cinnamon stick (the larger kind, not the pre-ground stuff—unless you really must)
- 6 whole cloves
- 1 tablespoon black peppercorns
- 1 tablespoon dried Mexican oregano (Italian oregano in a pinch; not the same but it’ll work)
- 1 tablespoon salt, more to taste
- 2 teaspoons ground cumin
- ¼ cup apple cider vinegar (white vinegar is OK if you don’t have it)
- 8 cups beef broth or water (I kinda wing it here, just make sure the meat is well-covered in the pot)
- 1 pack corn tortillas (I swear by the fresh ones if you can get them, but store-bought are fine)
- 2 cups shredded mozzarella or Oaxaca cheese (seriously, use Oaxaca if you want to channel a proper taquería, but melty cheese is good in general)
- Chopped white onion, cilantro, and lime wedges, to serve
Instructions
-
1Prep the chilies: First, toast all those dried chilies in a big dry skillet (medium heat) for a few seconds—just till they smell good, don’t walk away or they burn super fast. Toss them in a bowl and pour over some boiling water. Let them soak for about 20 minutes. Sometimes I get distracted here and they sit longer. That's fine.
-
2Set up the meat: While chilies soak, grab your biggest stockpot. Throw in the beef chunks, whatever bones you’re using, the halved onion, garlic cloves, bay leaves, cinnamon stick, cloves, peppercorns, oregano, cumin, and the salt. (No need to be too precious about the order, just get it all in there!)
-
3Blend the magic: Drain your chilies, then pop them in a blender with the apple cider vinegar and about a cup of your beef broth (or water if that’s what you got). Blitz until really smooth—like, keep going longer than you think, no one wants bits of chili skin in their broth.
-
4Simmer the works: Pour the chili blend into your pot with all the meat, then add the rest of your broth (or water) so everything’s cozied up and covered. Bring it up to a boil (just about as much excitement as you’ll get all night), then drop the heat and let it barely bubble for 3-4 hours. Yeah, I know, but this is where the flavor happens. Skim off any foam. This is where I usually sneak a little taste and maybe add more salt.
-
5Shred and strain: Fish out the meat onto a plate (careful, it’s probably tender enough to fall apart right now—don’t be me, fishing chunks from a splashy pot). Shred it with 2 forks. Meanwhile, strain the broth (that’s your consomé) through a sieve into a bowl or another pot. Pick out any loose spices from the meat if you like.
-
6Crisp up your tacos: Heat up a skillet or griddle. Grab your corn tortillas and dip them one by one in the consomé—just enough to coat and get that color—then slap them on the skillet. Sprinkle on the cheese, pile on some shredded beef, and fold over. Let it get crispy (flip so both sides get a bit of that golden-action). Sometimes cheese oozes out and sticks on the pan... that’s actually the best part, don’t even worry.
-
7Serve it up: Pile tacos on a plate and serve hot, with small bowls of consomé for dipping, and all the usuals—chopped onion, cilantro, lime. If you want to get fancy (or you just want to feel like a hero), add a little more cheese on top. My daughter sometimes puts salsa right in the consomé, chaos but delicious.
Approximate Information for One Serving
Nutrition Disclaimers
Number of total servings shown is approximate. Actual number of servings will depend on your preferred portion sizes.
Nutritional values shown are general guidelines and reflect information for 1 serving using the ingredients listed, not including any optional ingredients. Actual macros may vary slightly depending on specific brands and types of ingredients used.
To determine the weight of one serving, prepare the recipe as instructed. Weigh the finished recipe, then divide the weight of the finished recipe (not including the weight of the container the food is in) by the desired number of servings. Result will be the weight of one serving.
Did you make this recipe?
Please consider Pinning it!