
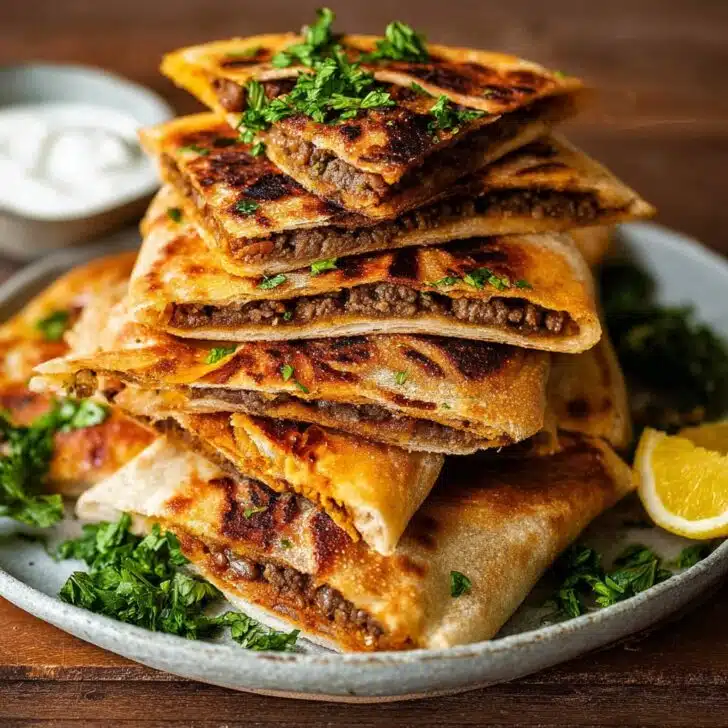
Let’s talk arayes. Because honestly, if you haven’t tried Lebanese meat-stuffed crispy pita yet... Well, are you even living? The first time I made arayes, I burnt them just a tad (okay, more than a tad), but even then—oh wow, the crunchy outside and juicy inside makes it worth every smoky misstep. I first had these at my cousin Zeina’s; her kitchen was half chaos, half cumin-scented heaven and everyone fought over the crispiest pieces. There’s just something irresistible about them—like potato chips, but you know, with actual sustenance. (And fewer crumbs. Mostly.)
Why You’ll Actually Want to Make These
I don’t bust out arayes for just any dinner, but my family goes nuts when I do—mostly because it involves minimal dishes and maximum flavor. I like whipping these up when everyone’s lurking around the kitchen: you end up with a tray of crispy pitas, but usually someone nabs a piece before we’ve even set the table. I used to stress about getting the meat exactly even or using the fanciest pine nuts; now, if I’ve got ground beef and pitas, we’re golden. (One time I made do with hamburger buns, but please, just… don't.)
What You’ll Need (and Some Honest Swaps)
- Pita bread (The thinner, the better, but I’ve used supermarket ones when my Lebanese grocer was closed. My grandma swears by the slightly stale ones – toastier, I guess?)
- Ground beef or lamb (Or a mix! I sometimes go half-half when I feel wild. Turkey works in a pinch but it’s drier, just warning ya).
- Onion – finely chopped. (I’ll confess, I’ve used frozen pre-chopped onion after a long day; no one noticed.)
- Tomato – deseeded and diced tiny (If you really hate tomatoes, just leave it out. It’s not *essential*, though I kinda miss the juiciness.)
- Parsley, chopped (Cilantro if you’re feeling rebellious, but it’s not traditional and my aunt might scold you.)
- Pine nuts (I usually skip these ‘cause, well, they cost an arm and a leg, but if you’ve got them: toss in a handful.)
- Spices: About 1 teaspoon cinnamon, 1 teaspoon allspice, ½ teaspoon black pepper, and a decent pinch or two of salt. (Some folks add a dash of paprika or chili flakes – you do you.)
- Olive oil (Any will do, but extra-virgin makes a difference. Or so the Internet tells me.)
How I Actually Make Arayes (No Perfection Here)
- Mix up the meat filling: In a big bowl, chuck in your beef or lamb, onion, tomato, parsley, pine nuts (if you’re feeling fancy), and all those lovely spices. Now dig in with your hands. (Yes, it’s cold; yes, it’s the only way—forks just don’t cut it). Sometimes I eyeball the spices, which is how I ended up once with cinnamon arayes. Not the worst, just a bit odd.
- Split and stuff the pita: Slice your pita breads in half (or into quarters for mini size). Open as best you can without poking holes everywhere—don’t sweat it if they rip a bit. Spread a thin-but-generous layer of meat filling inside each pocket, kind of like you’re buttering toast but more enthusiastically.
- Oil ‘em up: Brush both sides with olive oil - you want these to get crispy, not chewy (this is where I sometimes get impatient and pour it on. Don’t—it soaks right through and turns them to mush. Been there.)
- Cook ‘em crispy: You can grill, bake, or pan-fry. I usually bake at 220°C (425°F) for about 12–15 minutes, flipping halfway. Pan-frying is faster but messier (and sometimes I get distracted, so… smoky kitchen). The goal: golden and crunchy pita, meat fully cooked.
- Rest & devour: Let ‘em cool for a minute or two—this is the part where I always burn my tongue, no matter how old I get. Serve up while still warm and crispy.
Notes From My (Occasionally Chaotic) Kitchen
- If your pita is super fresh and fluffy, try microwaving it for a few seconds to make it more pliable before stuffing—learned that the hard way, tore half a pack once.
- Less is more with the filling! Too much meat and the middle stays raw while the pita burns. (Ask me how I know…)
- Sometimes I sprinkle just a bit of sumac in the meat mix. Not traditional, but it makes ‘em tangy.
Variations I’ve Tried (Some Better Than Others…)
So, I’ve played around with these a lot. Once I added grated carrot for sneaky veggies (don’t—made them weirdly sweet and soggy). On the flipside, swapping out parsley for mint was actually awesome, especially in summer. Swapping beef for ground chicken? It works, just up the olive oil and spices or it tastes kinda plain. Oh, and cheddar arayes? Cheese everywhere. Fun in theory, mess in actuality.
But What If You Don’t Have…
- A grill or oven: You can totally pan-sear these on medium heat! Just squish them a bit so they crisp up evenly—cast iron works wonders but honestly, any frying pan will do. I’ve even used my toaster oven in a pinch. Yeah, you read that right.


Storing Leftovers (Not That You’ll Have Any)
Technically you can keep cooked arayes in the fridge for up to 2 days in a container, and re-toast ‘em in the oven to get that crunch. But honestly, in my house they vanish faster than you can say "where’d the rest go?" If you do have restraint: recook them directly from the fridge for about 7 minutes at 200°C/400°F—still good, not as crunchy. I think these actually taste better the next day, but that’s probably just me trying to justify eating leftovers for breakfast.
How I Actually Serve Arayes
I plop them down with a big bowl of plain yogurt (or labneh if I’m feeling proper), plus tomatoes and cucumber on the side. My youngest insists on ketchup. Go figure. Sometimes we add a scatter of pickles or lemon wedges, maybe if we’re feeling fancy a bit of hummus. Check out this homemade pita chips guide from Maureen Abood for an awesome extra crunch.
Real-Life Pro Tips (Learned the Hard Way)
- Don’t rush the oven step—seriously, I once tried to finish them under the broiler to speed things up and ended up with charcoal arayes. Not my proudest moment.
- If you’re hand-mixing the meat and drop a spice jar into the bowl, just roll with it. Happens to the best of us.
- Use wax paper on your baking tray for easier cleanup. Or skip it and spend ages scrubbing. Your call.
FAQ – It’s Not Fancy, Just Honest Answers
- Can I freeze arayes before cooking?
Yeah, totally! Lay them on a tray, freeze, then chuck in a freezer bag. Bake straight form frozen, just add 5 mins or so. Easy. - Do I really need all those spices?
Actually, you can get away with just salt, pepper, and cinnamon; everything else is a bonus. But more flavor never hurts! - Are arayes supposed to be super crispy?
Oh absolutely. The crunch is half the fun. If yours end up floppy, bake ‘em longer. - What’s a good sauce?
Plain yogurt is classic, but I’ve dunked them in garlic sauce like this one from Serious Eats—ugly but delicious. - Can I make these vegetarian?
I haven’t nailed a veggie version yet, but a friend said mushrooms and walnuts work. I’ll report back if it’s not a disaster!
And, before I forget—one time the neighbor’s cat tried to steal an uncooked arayes off the bench. So, uh, guard your tray if you’ve got pets around. Can’t make this stuff up.


Ingredients
- 4 medium pita breads, halved
- 400g ground beef or lamb
- 1 small onion, finely chopped
- 2 cloves garlic, minced
- 1 medium tomato, finely chopped
- 2 tablespoons chopped fresh parsley
- 1 teaspoon ground cumin
- ½ teaspoon ground cinnamon
- Salt and pepper to taste
- 2 tablespoons olive oil for brushing
Instructions
-
1Preheat your oven to 200°C (400°F) or heat a grill pan over medium heat.
-
2In a large bowl, combine the ground beef or lamb, chopped onion, garlic, tomato, parsley, ground cumin, ground cinnamon, salt, and pepper. Mix until well combined.
-
3Carefully open each pita bread half to form a pocket. Fill each pocket with the meat mixture, spreading it evenly inside.
-
4Brush both sides of the stuffed pita halves with olive oil.
-
5Arrange the stuffed pitas on a baking sheet or grill pan. Cook for 7–8 minutes per side, or until the pitas are golden and crispy and the meat is cooked through.
-
6Serve warm, optionally with lemon wedges or a side of yogurt.
Approximate Information for One Serving
Nutrition Disclaimers
Number of total servings shown is approximate. Actual number of servings will depend on your preferred portion sizes.
Nutritional values shown are general guidelines and reflect information for 1 serving using the ingredients listed, not including any optional ingredients. Actual macros may vary slightly depending on specific brands and types of ingredients used.
To determine the weight of one serving, prepare the recipe as instructed. Weigh the finished recipe, then divide the weight of the finished recipe (not including the weight of the container the food is in) by the desired number of servings. Result will be the weight of one serving.
Did you make this recipe?
Please consider Pinning it!!