
Let’s Talk About Air Fryer Primavera Roasted Vegetables
You ever have one of those weeks when your fridge looks like a rainbow exploded—half a zucchini here, three sad carrots there, maybe a bell pepper threatening to go soft? That’s honestly how this Air Fryer Primavera Roasted Vegetables thing started for me. I needed to clear out my crisper, didn’t want to heat the whole oven for a handful of veggies, and voilà—hello, air fryer! The first time I made this, I actually forgot to add salt (rookie mistake), but the colors made up for it, at least until the first bite. Lesson learned. Oh, and if you’ve ever tried to sneak extra veggies into dinner for picky eaters, this is your secret weapon; my nephew thinks the air fryer makes everything taste like fries (he isn’t totally wrong!).
Why I Keep Making This (and Why You’ll Probably Love It)
I make this when I’m feeling a bit lazy, or honest, a lot lazy. It’s just so easy. Plus, my family goes a bit wild for it—something about that slightly crispy edge and all the bright colors. Sometimes I’ll just stand at the counter and eat half the tray before it ever gets to the table (don’t judge). And when I’m out of olive oil, I’ll just use whatever oil I have hanging around. I’ve even tossed in a handful of frozen peas at the last minute when I was short on fresh stuff—no one noticed, well, until they found a pea rolling on the floor. Oh, and if you’re not a fan of precise chopping, good news: rustic chunks totally work here.
What You’ll Need (Substitutions Welcome!)
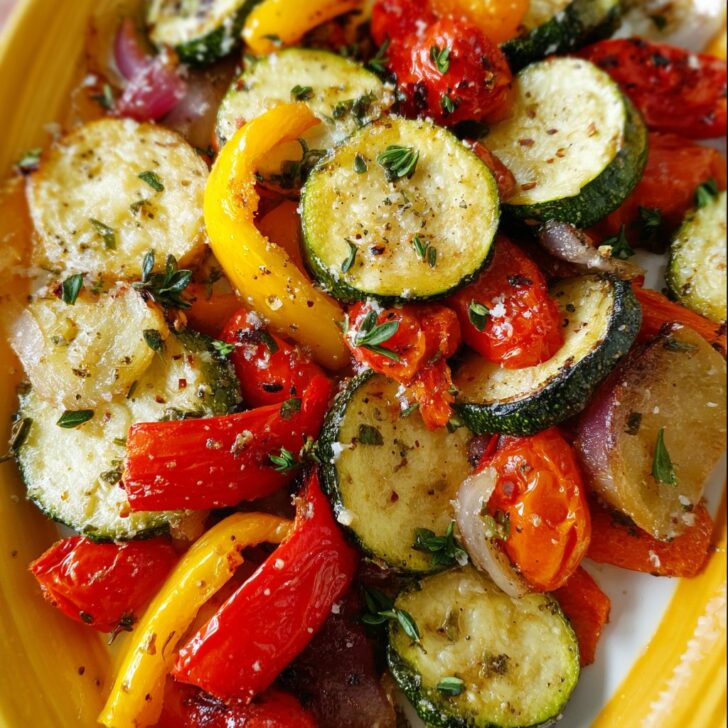
- 1 small zucchini, chopped (or just use a yellow squash—honestly, I can’t always tell the difference once it’s roasted)
- 1 bell pepper, any color, sliced (red is prettiest, but green is what I usually have)
- 1 cup cherry tomatoes, halved (I’ve used grape tomatoes, or even big tomatoes cut in chunks. All fine)
- 1 small red onion, wedges (yellow or white works too. My grandmother insisted on red, but she also insisted you peel carrots with a paring knife exclusively...)
- 1 handful snap peas or green beans, trimmed
- 2 carrots, thinly sliced (I sometimes sub in parsnip if I’m feeling fancy)
- 2-3 tablespoon olive oil (I’ve done it with avocado oil, even a splash of canola. Works.)
- 1 teaspoon dried Italian herbs (or just toss in some oregano and basil—fresh or dried, no rules here)
- Salt and pepper, to taste (heavy on the pepper if you’re as reckless as I am)
- Optional: a squeeze of lemon, some grated Parmesan, or a sprinkle of chili flakes
Here’s How I Do It (More or Less)
- Dump all your chopped veggies in a big bowl. I usually add the tomatoes last—something about squishing them too much makes me weirdly sad.
- Drizzle with olive oil, then sprinkle in your herbs, salt, and pepper. Use your hands to toss it all together; yes, your hands. Feels right. (This is also when you can sneak a taste—just don’t eat raw onion. Trust me.)
- Preheat your air fryer to 390°F (200°C) for a few minutes. Honestly, sometimes I forget this step and it’s fine, but if you remember, it’s better.
- Spread the veggies in the air fryer basket. Don’t overcrowd—better to do two batches than a sad, soggy pile. Learned the hard way.
- Cook for about 8–10 minutes, give the basket a shake halfway through. Some pieces get a little browner, which I like, but if you want everything perfectly even, you could stir with tongs. I never do.
- When they’re looking golden and a little crisp at the edges, they’re done! Squeeze a bit of lemon over the top or sprinkle some Parmesan if you like.
Notes from A Not-So-Perfect Cook
- Too much oil makes things soggy—not the good kind of soggy either. I used to glug it on, but now I go lighter.
- Don’t stress about chopping everything the same size. Actually, I think the uneven bits get tastier (or maybe I’m just lazy).
- If you forget to shake the basket, it’s not the end of the world. Some pieces just get a little extra toasty—no complaints here.
Variations I’ve Tried (and One I Wouldn’t Repeat)
- Added mushrooms once—turned out great, just cook them separately as they get watery.
- Brussels sprouts: surprisingly good, but quarter them first or they stay tough.
- Once tried sweet potatoes—honestly, not my best idea. They need a different timing; ended up half-burnt, half-raw. Maybe if you cut them tiny?
- Sometimes I finish with a drizzle of balsamic glaze (like this one), which is SO good.
What If I Don’t Have an Air Fryer? (It Happens)
No air fryer? No worries. Just roast everything on a baking sheet at 425°F (220°C) for about 18–20 minutes, flipping once. It’s not quite the same, but it’s still tasty. (I’ve even done this in my ancient toaster oven. Worked, though the tray was tiny!)


How This Keeps (But Honestly, It Never Lasts)
In theory, these air fryer primavera roasted vegetables keep in the fridge for 2–3 days, sealed up tight. In practice? They’re usually gone by the next day in my house (if you have leftovers, cold veggies in a wrap are pretty great). If you want to warm them up, a quick blast in the air fryer is best, or just pop them in a hot pan for a minute or two. Microwave works, but you’ll lose the crispy bits.
How I Serve It (Unnecessarily Fancy or Just On the Side)
I love these alongside grilled chicken or with a pile of fluffy rice. Sometimes I just heap them onto toast and call it lunch. My cousin dips them in ranch (no accounting for taste). If you want to go full primavera, toss them with cooked pasta and a splash more olive oil—so good. Here’s a pasta primavera recipe I like for inspiration: Simply Recipes Pasta Primavera.
Things I’ve Learned (Or, Don’t Make My Mistakes)
- I once crammed the basket so full, nothing browned—just a limp, steamed mess. Now I always do two batches for max crisp.
- Don’t skip the preheat if your air fryer is temperamental—mine once spat out cold veggies and crushed my dinner mood.
- If you put the tomatoes in too early, they’ll get mushy. Save them for the last 3–4 minutes if you want them just blistered.
FAQ: Because Yes, People Have Actually Asked Me These
- Q: Can I use frozen veggies?
Sure, but they’ll be a bit softer—still good, just different. I’d dry them off first. Or don’t, if you like things extra juicy! - Q: What about adding potatoes?
You can, but they need to go in first since they take longer (like 5–7 minutes before everything else), otherwise you get crunchy raw potato. Ask me how I know. - Q: Is olive oil a must?
Not at all. I’ve used canola, sunflower, even a smidge of butter once. Each gives a slightly different result. - Q: Can I do this without any oil?
You can, but they don’t brown as nicely and can get chewy—maybe spritz with a little water or broth? Worth a shot. - Q: What air fryer do you use?
I’m still working with my old Philips model; it’s a trooper but any basket-style one should work. Just don’t overstuff!
So that’s my not-so-fancy, definitely real-life approach to air fryer primavera roasted vegetables. If you try it, let me know what you toss in—maybe you’ll crack the sweet potato code that’s always eluded me.
Ingredients
- 1 cup broccoli florets
- 1 cup zucchini, sliced
- 1 cup red bell pepper, chopped
- 1 cup yellow squash, sliced
- ½ cup cherry tomatoes, halved
- 2 tablespoons olive oil
- 1 teaspoon Italian seasoning
- ½ teaspoon garlic powder
- Salt and black pepper to taste
Instructions
-
1Preheat the air fryer to 375°F (190°C) for 3 minutes.
-
2In a large bowl, combine broccoli, zucchini, red bell pepper, yellow squash, and cherry tomatoes.
-
3Drizzle the vegetables with olive oil, then sprinkle with Italian seasoning, garlic powder, salt, and black pepper. Toss to coat evenly.
-
4Arrange the seasoned vegetables in a single layer in the air fryer basket.
-
5Air fry for 12-15 minutes, shaking the basket halfway through, until vegetables are tender and lightly browned.
-
6Serve immediately as a side dish or over cooked pasta or grains.
Approximate Information for One Serving
Nutrition Disclaimers
Number of total servings shown is approximate. Actual number of servings will depend on your preferred portion sizes.
Nutritional values shown are general guidelines and reflect information for 1 serving using the ingredients listed, not including any optional ingredients. Actual macros may vary slightly depending on specific brands and types of ingredients used.
To determine the weight of one serving, prepare the recipe as instructed. Weigh the finished recipe, then divide the weight of the finished recipe (not including the weight of the container the food is in) by the desired number of servings. Result will be the weight of one serving.
Did you make this recipe?
Please consider Pinning it!!