Alright, so let's talk about these chicken legs
You know those days when you stare at raw chicken, wondering if you can muster up the energy to cook, let alone clean up afterward? That was me last Tuesday. My youngest declared “I want drumsticks!” and, well, who argues with a five-year-old craving chicken legs? So the old air fryer came out, and honestly—game changer. (Side note: if you don’t have an air fryer, you probably think I’m overselling, but it’s genuinely life-saving on messy, busy days. Plus, I get to avoid greasy splatters. Win!)

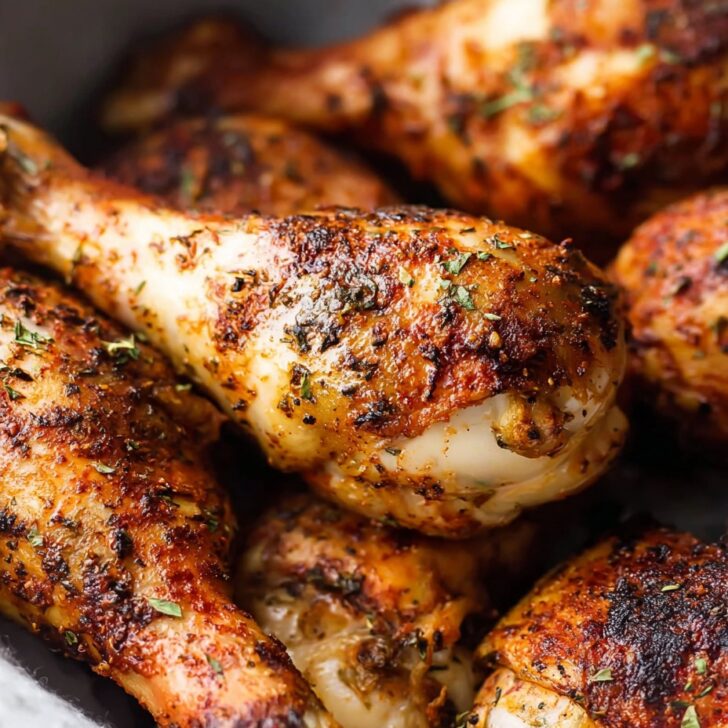
I used to avoid drumsticks because I’d always undercook or char them in the oven - not a great look. But now… let’s just say these air fryer chicken legs have become a midweek staple, especially when the weather makes firing up the oven feel like getting a suntan indoors. Oh, and the first time I got that crazy-good crispy skin? I did a little happy dance, not even sorry.
Why I Make These So Much
I make this when I need dinner in a snap (and don’t want to scrub pans afterward). My family goes crazy for these because they stay juicy inside but crisp up outside without tons of oil—all thanks to the air fryer. Actually, my sister-in-law was skeptical until she tried and then she texted me for the recipe, so take that as proof!
Full disclosure: getting spices to stick can be fiddly — one time I tried marinating for hours but honestly, it didn't make enough difference to be worth planning ahead (unless that's your thing; go wild). And if you're like me and occasionally forget to defrost, this method even works with chicken that's *nearly* thawed. I probably shouldn’t admit that, but, hey, real life.
What You'll Need (With My Distracted Substitution Notes)
- 6 chicken legs (drumsticks), skin-on (I’ve used skinless, but it’s just not the same. Boneless? Never again!)
- 2 tablespoons olive oil (or, if I’m feeling fancy or ran out, avocado oil works too. My grandma swore by vegetable oil...never noticed much difference myself)
- 1 teaspoon smoked paprika (sweet paprika in a pinch, sometimes mix the two for fun)
- 1 teaspoon garlic powder (I eyeball this, but this is my safe amount. Sometimes granulated garlic if that’s what’s left in the jar)
- 1 teaspoon onion powder (optional, but I like it. Leave it out if you want, no hard feelings)
- ½ teaspoon salt (I tend to go light, you can always add later)
- ½ teaspoon black pepper (cracked fresh or grab the shaker, we’re not judging)
- ½ teaspoon dried oregano (sometimes swap for Italian seasoning if that’s all I find in the spice jungle)
- ¼ teaspoon chili powder (totally skippable if you’re a spice wimp or feeding littles)
How I Actually Cook Air Fryer Chicken Legs
- Pat the chicken legs super dry with paper towels. (Honestly, this step always feels a bit tedious, but don’t skip it—the skin crisps up much better this way!)
- Throw chicken legs in a big bowl. Pour the olive oil on top and toss to coat. Usually, I use my hands. Yes, it’s messy, but much faster (plus you get to feel all chef-y).
- In a smaller bowl, mix together the smoked paprika, garlic powder, onion powder, salt, pepper, oregano, and chili powder. Sometimes I just sprinkle straight onto the chicken—saves dishes, doesn’t hurt. Sprinkle the spices over the chicken, then toss or rub it all until each piece is coated (this is where I sometimes sneak a taste if no one’s watching. Not the chicken, just the rub, relax!).
- Arrange the chicken legs in your air fryer basket in a single layer. Don’t crowd them—trust me, I once tried to fit too many and half turned out steamed, not crispy.
- Air fry at 380°F (about 193°C) for 12 minutes, then flip each leg over. (I just use tongs, or sometimes a fork if they're buried.)
- Cook for another 10-12 minutes until the skin’s beautifully crisp and the internal temperature hits at least 165°F—though honestly, I prefer it closer to 180°F for really tender bites. If you don’t have a thermometer, peek to make sure the juices run clear. And don’t freak out if it looks a bit weird at this stage; once it rests a bit, the crispiness really wakes up.

Random Notes I Wish Someone Told Me
- Letting the chicken rest for 5 minutes after air frying makes a surprising difference (I used to skip this...and regretted it)
- If the skin's not as crispy as you'd like, pop them back in for a few more minutes, but keep an eye out
- The spice mix falls off less if you really rub it into the chicken rather than just tossing; messy but effective
Stuff I've Tried (Variations Galore!)
- Sometimes I swap smoked paprika for Cajun seasoning on a whim—totally changes the vibe, and actually, my friend Jen prefers it that way
- Lemon pepper instead of chili powder: so zesty, but I once used too much and it was, uh, aggressive
- I tried marinating overnight in yogurt—good for tenderness, but the coating kept sticking to the fryer basket. Probably wouldn't do that one again unless I line with foil

Do You Really Need Special Gear?
Obviously you need an air fryer (or borrow your neighbor's? Kidding—mostly). Honestly, any basket style works. I’ve even used my ancient toaster oven style air fryer and it's fine. Don’t have tongs? Use two forks (or just get creative—I once used a slotted spoon. It worked, sort of.)
Storing the Leftovers (Assuming There Are Any)
Store leftovers in an airtight container in the fridge for up to 3 days. But—honestly, in my house the chicken vanishes before breakfast. If you want to reheat, toss them back in the air fryer for about 4 minutes to get that crispy edge back. Don’t bother with the microwave unless you like soggy skin, which I definitely don’t.
What We Eat These With (Personal Faves)
I love these with a pile of carrot sticks, ranch, and sometimes just plain old white bread to mop up the juices—nothing fancy. My brother insists on mashed potatoes and corn. Somewhere in the mix, someone’s always sneaking in hot sauce. For a picnic, these are even good cold. Seriously.
If I Could Go Back, Here’s What I’d Tell Myself (Pro Tips!)
- Don’t rush preheating the air fryer—one time I skipped it and the first batch went weirdly rubbery. Now, I let it run for 3 minutes first (actually, it makes a world of difference)
- Give the basket a little shake halfway if you’re feeling lazy about flipping—gets the job done!
- Check the thickness of the legs, because fat ones need more time. Once I pulled them out too early, and let’s just say, nobody wants pink chicken
Real-Life FAQ (Yes, You Actually Asked These)
- Can I use frozen chicken legs?
- Tough one. You can, but you’ll need to add about 8 extra minutes and check them a couple times since they're easy to undercook. I prefer thawed, honestly, for even cooking.
- Do I need to oil the air fryer basket?
- I don’t always, but if yours tends to stick, a little spritz of spray oil (nothing too wild) helps a ton—just don’t drown it!
- How do I know the chicken's done without a thermometer?
- I do a small knife cut near the bone and if the juices run clear, you’re golden. If not, back in it goes. No shame in being extra safe.
- Can I double this recipe?
- You can, but do it in batches. Crowding = sad, soggy chicken. Trust me, I’ve tried.
- Is it okay to skip some spices?
- For sure. These are just my go-to’s—sometimes I run out and the world keeps turning. Use what you’ve got.
- Can I make this with thighs?
- Yup, just check the cook time: sometimes thighs take a few extra minutes depending on their thickness. Pretty forgiving, though!
Oh, and if you’re wondering what to do while they cook: I usually clean up or, honestly, snack on the carrot sticks. One time, I started a movie and then forgot to flip, but the chicken lived so don’t stress if you miss the halfway mark. Happy cooking!
Ingredients
- 6 chicken legs (drumsticks), skin-on
- 2 tablespoons olive oil
- 1 teaspoon smoked paprika
- 1 teaspoon garlic powder
- 1 teaspoon onion powder
- ½ teaspoon salt
- ½ teaspoon black pepper
- ½ teaspoon dried oregano
- ¼ teaspoon chili powder
Instructions
-
1Pat the chicken legs super dry with paper towels. (Honestly, this step always feels a bit tedious, but don’t skip it—the skin crisps up much better this way!)
-
2Throw chicken legs in a big bowl. Pour the olive oil on top and toss to coat. Usually, I use my hands. Yes, it’s messy, but much faster (plus you get to feel all chef-y).
-
3In a smaller bowl, mix together the smoked paprika, garlic powder, onion powder, salt, pepper, oregano, and chili powder. Sometimes I just sprinkle straight onto the chicken—saves dishes, doesn’t hurt. Sprinkle the spices over the chicken, then toss or rub it all until each piece is coated (this is where I sometimes sneak a taste if no one’s watching. Not the chicken, just the rub, relax!).
-
4Arrange the chicken legs in your air fryer basket in a single layer. Don’t crowd them—trust me, I once tried to fit too many and half turned out steamed, not crispy.
-
5Air fry at 380°F (about 193°C) for 12 minutes, then flip each leg over. (I just use tongs, or sometimes a fork if they're buried.)
-
6Cook for another 10-12 minutes until the skin’s beautifully crisp and the internal temperature hits at least 165°F—though honestly, I prefer it closer to 180°F for really tender bites. If you don’t have a thermometer, peek to make sure the juices run clear. And don’t freak out if it looks a bit weird at this stage; once it rests a bit, the crispiness really wakes up.
Approximate Information for One Serving
Nutrition Disclaimers
Number of total servings shown is approximate. Actual number of servings will depend on your preferred portion sizes.
Nutritional values shown are general guidelines and reflect information for 1 serving using the ingredients listed, not including any optional ingredients. Actual macros may vary slightly depending on specific brands and types of ingredients used.
To determine the weight of one serving, prepare the recipe as instructed. Weigh the finished recipe, then divide the weight of the finished recipe (not including the weight of the container the food is in) by the desired number of servings. Result will be the weight of one serving.
Did you make this recipe?
Please consider Pinning it!