
The Coziest Casserole I Know (and My Hashbrown Tangent)
You know, there are those recipes that just feel like home the second you start browning the beef—this cheesy hamburger hashbrown casserole absolutely does that for me. I think the first time I made it, I was still convinced shredded hashbrowns came only in tiny frozen bricks, and wouldn’t you know it, that’s exactly what I used (spoiler: they work fine!). A friend once tried to convince me to use freshly grated potatoes, but honestly, who has the time? Anyway, the smell of this dish baking instantly takes me back to lazy Sunday evenings when my sister and I would try to sneak extra cheese on top without Mom catching us. She always did.


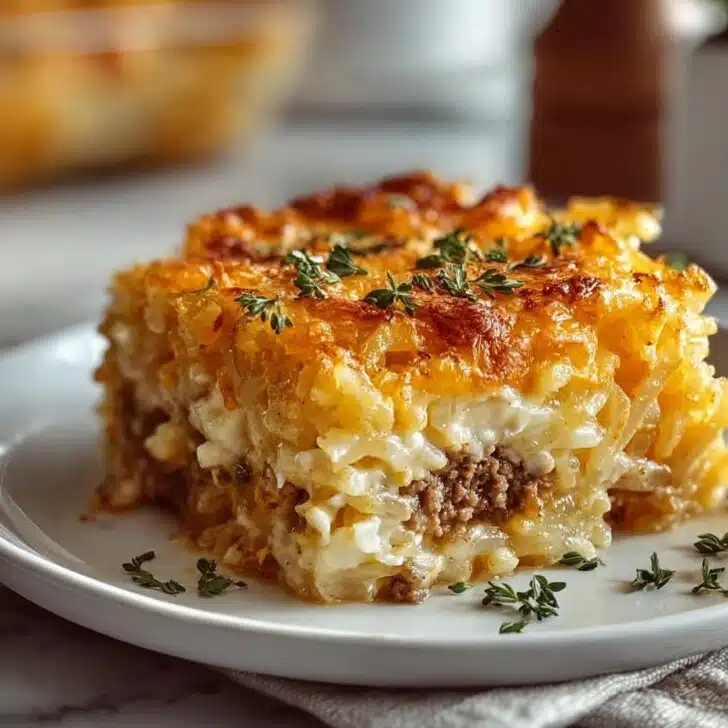
Oh, and if you’re a big fan of cheese-pulls and crispy potato edges, pull up a chair. I practically guarantee you’ll come back for seconds—unless someone (naming no names, Tim) swoops in first.
Why You'll Love This (And Why My Family Won't Let Me Make Anything Else)
- I make this when everyone’s grumpy and a pizza delivery just won’t cut it—it’s actually faster than it looks.
- My family goes absolutely bonkers for it, especially when you get that crispy-cheesy corner bite (I’ve nearly started a fork war over that piece).
- I like that it’s total comfort food, but actually, not too fussy to toss together even after work—I mean, it’s a one-pan wonder in my book.
- When I tried to sneak in the low-fat cheese once... let’s just say I now have to buy extra-sharp cheddar or risk mutiny.
- It’s also one of those dishes that secretly taste even better the next day (if it lasts that long—which, honestly, isn’t often).
What You'll Need (And What I Substitute in a Pinch)
- 1 pound (450g) lean ground beef (sometimes I use ground turkey if it’s on sale, tastes almost as good!)
- 1 medium yellow onion, diced (I’ve used red onion—nobody complained)
- 2 cloves garlic, minced (lazy days: garlic powder, a generous shake)
- 1 can (10.5 oz) condensed cream of mushroom soup (my grandmother swore by Brand X, but honestly, any creamy canned soup does the trick)
- ½ cup sour cream (greek yogurt works great, too—plus a little healthy, maybe?)
- 2 cups shredded cheddar cheese (sharp is my fave but, use mild if little ones are picky)
- 1 package (about 20 oz/600g) frozen hash browns, thawed (those square ones or the shredded—either works, don’t stress about it)
- ¼ cup milk (plus a splash more if your mixture seems dry—no exact science)
- ½ teaspoon kosher salt (or a generous pinch, to taste)
- ½ teaspoon black pepper
- ½ teaspoon smoked paprika (optional, for a hint of fancy-smoky flavor)
- ¼ cup chopped green onions (optional, but I like the color)
Here's How I Make It (Step by Stubborn Step)
- Preheat your oven to 375°F (190°C). Spray a 9x13-inch Casserole dish with cooking spray or give it a rub with oil—just don’t forget or clean-up’s a pain.
- In a big skillet, toss in the ground beef and diced onion. Cook over medium heat until beef is browned, and onions are soft (about 5–7 minutes). Break up the meat as you go—unless you like surprise meatballs in your casserole, which, hey, you do you.
- Add in the minced garlic and cook for another minute until fragrant. This is where I usually sneak a taste, just to check seasoning—you never know.
- Drain off extra fat. I sometimes skip this if the meat's really lean (but don’t tell my doctor).
- Stir in the condensed soup, sour cream, milk, salt, pepper, and smoked paprika. Mix it up until everything melds together. Don’t worry if it looks a bit weird—trust the process, it comes together in the oven.
- Now, fold in the thawed hashbrowns. Try to get them all coated; no naked hashbrowns allowed.
- Mix in about half of the cheese (I eyeball it—maybe a cup or a big handful). Save the rest for topping—non-negotiable in my house.
- Pour the mixture into your prepared casserole dish. Spread it out, but don’t stress about smoothing it perfectly. Scatter the rest of the cheese plus the chopped green onions (if using) over the top.
- Bake for 40–45 minutes, or until bubbly at the edges and the top is golden brown and irresistible. If you want super crispy edges, let it go another five or so minutes, just watch it doesn’t go too far (but I’ve rescued overly crispy, too).
- Let it rest for 10 minutes so everything sets up nicely. (Seriously, don’t skip this! I once caved and served it piping hot—soggy disaster. Lesson learned.)
- Scoop, serve, and enjoy. Or stand over the stove with a fork, which I’ve definitely never done, nope.


Notes I Learned the Hard Way
- Don’t use frozen-solid hashbrowns—they mess up the consistency and the middle stays cold (ask me how I know...)
- I think it tastes even better the next day, but, let’s be honest, there’s rarely leftovers.
- If your casserole seems dry going into the oven, add a splash more milk—you can always add, can’t really take it out.
Variations I've Actually Tried (and One Flop)
- Mexican twist: swap cheddar for pepper jack, add a handful of chopped jalapeños, and a sprinkle of taco seasoning—very popular with the spice fiends in my bunch.
- Vegetarian: skip the beef, throw in drained black beans and some sautéed peppers. Actually, I find it works better if you add corn, too, for a little sweetness.
- Turkey sausage instead of ground beef. Pretty solid.
- I did try it once with sweet potato hashbrowns; the texture was just odd and the sweetness kind of clashed. Not my greatest idea, but hey—experiments are fun.


Equipment (But Don't Freak Out if You Don't Have Everything)
- 9x13-inch casserole dish (in a real pinch, two loaf pans work, but watch the bake time)
- Large skillet for browning the meat (or any frying pan that can handle it without stuff escaping over the sides)
- Mixing spoon or spatula (I once used a potato masher. It worked!)
How to Store It (If It Lasts Until Lunch)
Cooled leftovers can be kept in an airtight container in the fridge for up to 3 days. Reheat in the microwave or the oven—microwave gets it hot fast, but oven brings some of the crispies back. Though honestly, in my house it never makes it past day one. If you’re real ambitious, you could even freeze portions, but I can’t say I’ve managed to have leftovers that long!
How I Serve It (And Who Fights for Seconds)
I love to toss on a few extra chopped green onions and a grind of fresh pepper before serving. Growing up, we always had it with a side of simple green salad (or whatever leafy greens Mom forced onto the plate). But a fried egg on top? That’s my current Sunday morning obsession. Weird, maybe, but it works.
Pro Tips From Someone Who's Made All the Mistakes
- Don’t rush letting it rest after baking, unless you actually like mushy casserole puddles.
- No hashbrowns? I once used leftover roasted potatoes, just chopped them up small and tossed them in. Worked in a pinch!
- Buy pre-shredded cheese if you want life to be easy, though my sister insists on ‘the full block and grate’ routine. Personally, I like having fingerprints.
Questions I've Actually Been Asked
- Can I make this ahead? Absolutely—assemble it, cover, and stash in the fridge overnight. Add 10 minutes to the bake time if cold.
- Is there a non-dairy way? Swap the sour cream for your favorite non-dairy, and use vegan cheese. The flavor’s different, but still hearty!
- Can I toss in veggies? Sure thing. Bell peppers, peas, corn—all welcome. Just don’t overload it, or the whole thing might turn soggy (experience talking).
- Does it freeze well? Yes and no... it does, but the texture of the potatoes may get a bit soft. Still edible, though!
- Do I have to use cream of mushroom? Nope. Cream of chicken works just as well. I actually like to mix in a bit of both if I have open cans lying about (waste not, want not).
And oh, did I mention how the cat goes crazy for those little bits of ground beef that escape onto the counter? That’s a story for another time...
Ingredients
- 1 pound (450g) lean ground beef (sometimes I use ground turkey if it’s on sale, tastes almost as good!)
- 1 medium yellow onion, diced (I’ve used red onion—nobody complained)
- 2 cloves garlic, minced (lazy days: garlic powder, a generous shake)
- 1 can (10.5 oz) condensed cream of mushroom soup (my grandmother swore by Brand X, but honestly, any creamy canned soup does the trick)
- ½ cup sour cream (greek yogurt works great, too—plus a little healthy, maybe?)
- 2 cups shredded cheddar cheese (sharp is my fave but, use mild if little ones are picky)
- 1 package (about 20 oz/600g) frozen hash browns, thawed (those square ones or the shredded—either works, don’t stress about it)
- ¼ cup milk (plus a splash more if your mixture seems dry—no exact science)
- ½ teaspoon kosher salt (or a generous pinch, to taste)
- ½ teaspoon black pepper
- ½ teaspoon smoked paprika (optional, for a hint of fancy-smoky flavor)
- ¼ cup chopped green onions (optional, but I like the color)
Instructions
-
1Preheat your oven to 375°F (190°C). Spray a 9x13-inch casserole dish with cooking spray or give it a rub with oil—just don’t forget or clean-up’s a pain.
-
2In a big skillet, toss in the ground beef and diced onion. Cook over medium heat until beef is browned, and onions are soft (about 5–7 minutes). Break up the meat as you go—unless you like surprise meatballs in your casserole, which, hey, you do you.
-
3Add in the minced garlic and cook for another minute until fragrant. This is where I usually sneak a taste, just to check seasoning—you never know.
-
4Drain off extra fat. I sometimes skip this if the meat's really lean (but don’t tell my doctor).
-
5Stir in the condensed soup, sour cream, milk, salt, pepper, and smoked paprika. Mix it up until everything melds together. Don’t worry if it looks a bit weird—trust the process, it comes together in the oven.
-
6Now, fold in the thawed hashbrowns. Try to get them all coated; no naked hashbrowns allowed.
-
7Mix in about half of the cheese (I eyeball it—maybe a cup or a big handful). Save the rest for topping—non-negotiable in my house.
-
8Pour the mixture into your prepared casserole dish. Spread it out, but don’t stress about smoothing it perfectly. Scatter the rest of the cheese plus the chopped green onions (if using) over the top.
-
9Bake for 40–45 minutes, or until bubbly at the edges and the top is golden brown and irresistible. If you want super crispy edges, let it go another five or so minutes, just watch it doesn’t go too far (but I’ve rescued overly crispy, too).
-
10Let it rest for 10 minutes so everything sets up nicely. (Seriously, don’t skip this! I once caved and served it piping hot—soggy disaster. Lesson learned.)
-
11Scoop, serve, and enjoy. Or stand over the stove with a fork, which I’ve definitely never done, nope.
Approximate Information for One Serving
Nutrition Disclaimers
Number of total servings shown is approximate. Actual number of servings will depend on your preferred portion sizes.
Nutritional values shown are general guidelines and reflect information for 1 serving using the ingredients listed, not including any optional ingredients. Actual macros may vary slightly depending on specific brands and types of ingredients used.
To determine the weight of one serving, prepare the recipe as instructed. Weigh the finished recipe, then divide the weight of the finished recipe (not including the weight of the container the food is in) by the desired number of servings. Result will be the weight of one serving.
Did you make this recipe?
Please consider Pinning it!