
Let Me Tell You About These Little Gems
Alright, so you know those days when you want something sweet but the idea of turning on the oven feels about as appealing as cleaning out the garage? That was me last Wednesday. My cousin Katie was coming over—she's got a sweet tooth the size of Texas—and I needed something impressive but, honestly, I just couldn't be fussed. Enter: 10 Minute Tiramisu Balls. These beauties are my go-to. The first time I made them was after a marathon rerun of old British baking shows. (I got inspired, then realized my kitchen is more chaos than those TV sets.) Anyway, they've become the "oh, just whip something up" treat in our family. I've even made them at midnight—no shame!
Why I Keep Coming Back to This Recipe
I make these whenever I want to feel like a dessert genius with zero effort. My family goes a bit wild for them; I think it's the coffee kick (my mum actually hides a few for herself). They taste fancy, but don't require any of that "wait for it to bake and cool" nonsense. And if you've ever tried to slice tiramisu neatly at a party, you'll know why rolling it into balls is genius (no more sad, lumpy squares!). Plus, if you're like me and always forget to buy an ingredient or two, these are super forgiving. I once made them with instant coffee because I ran out of espresso—still good, though my brother claims otherwise.
What You'll Need (And What I Sometimes Swap)
- 200g ladyfinger biscuits (savoiardi) – My grandma insists on that fancy Italian brand, but honestly, the generic store stuff works fine (I’ve even used leftover pound cake in a pinch; not quite the same, but not bad)
- 250g mascarpone – If I’m out, I’ll mix half cream cheese with a bit of cream. Don’t tell any Italians.
- 2-3 tablespoon strong espresso – But instant coffee is totally passable if you’re desperate (I won’t judge).
- 2 tablespoon cocoa powder (plus more for dusting)
- 3 tablespoon icing sugar – Or a bit more, if you like it sweeter. I sometimes use brown sugar for a bit of depth.
- 1 teaspoon vanilla extract – Optional, but I think it makes a difference.
- A handful of dark chocolate chips (optional) – Not traditional, but they add a nice crunch (my niece insists).
How I Actually Make Them (Step by Step…ish)
- Bash up the ladyfingers. Seriously, just toss them in a zip bag and smack them with a rolling pin (very therapeutic after a long day). You're aiming for crumbs, but a few chunky bits are okay.
- In a bowl, mix mascarpone, coffee, icing sugar, vanilla, and cocoa powder. I use a spoon, but have been known to go in with clean hands when I get impatient. It looks a bit gloopy—don’t panic, that’s normal.
- Tip in the ladyfinger crumbs and stir. It should come together into a kind of sticky, scoopable dough. This is where I usually sneak a taste—quality control, right?
- If you’re adding chocolate chips, fold them in now. Or leave them out. Up to you.
- Scoop out walnut-sized bits and roll into balls. Your hands will get messy. If you’re fancy, use a cookie scoop, but I almost never bother. Don’t stress if they’re not perfectly round.
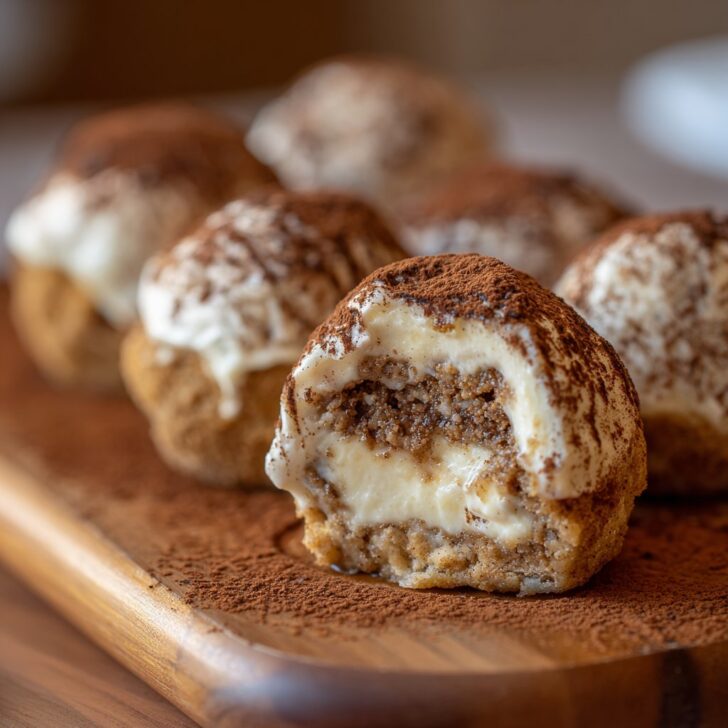
- Roll each ball in cocoa powder until nicely coated. I do this on a dinner plate; less mess than a bowl (trust me, I’ve tried).
- Chill in the fridge for at least 30 minutes. Or eat one straight away if you can’t wait (I always do—no regrets).
Things I Wish I'd Known Sooner
- Don’t go too heavy on the coffee, or the mixture ends up too runny (ask me how I know).
- If things get too sticky, add a few more biscuit crumbs, or just stick everything in the fridge for a bit—it firms right up.
- Actually, I find that making a double batch is never a bad idea. These things vanish.
Variations I’ve Tried (and a Flop)
- Mini chocolate chips or finely chopped hazelnuts inside? Yes, please.
- Swapping the coffee for orange juice gives a completely different vibe—my kids loved it, but I thought it tasted like breakfast cereal (not bad, just not what I wanted).
- I once rolled them in shredded coconut instead of cocoa. Looked pretty, but the taste—meh. Stick with cocoa if you ask me.
The Gear I Use (And What If You Don’t Have It?)
You’ll want a rolling pin or something heavy to smash the biscuits. No rolling pin? The bottom of a wine bottle is what I use if I can’t find mine. Mixing bowl, spoon, maybe a cookie scoop if you’re all about uniformity, but honestly, just use your hands. Oh, and a plate for rolling in cocoa. That’s it.


Storing (But Will You Even Need To?)
Supposedly, you can keep these in an airtight container in the fridge for 3 days. But honestly, in my house, they’re gone by the next morning. If you do have leftovers, I think they taste even better after a night in the fridge—the flavors mesh more. Freezing isn’t great; they go a bit weird in texture.
How I Serve Them
If I’m feeling fancy, I pile them into a pretty bowl and dust a little extra cocoa right before serving. Sometimes I stick a toothpick in each for easy grabbing (my uncle calls them “grown-up cake pops”). With coffee or a little glass of sweet wine is perfection. But mostly we eat them straight off the plate, standing in the kitchen, chatting away.
Lessons I’ve Learned (Sometimes the Hard Way)
- I once tried to rush the chilling step and ended up with sticky hands and squished balls. Just wait the half hour—it’s worth it.
- Don’t overdo the coffee, or everything turns to mush. Start with less, add more as needed.
Questions I Actually Get (Some Are Funny!)
- "Can I make these without coffee?" – Yep! Use milk or even orange juice (see above), though you’ll miss out on that tiramisu vibe.
- "Do I really need mascarpone?" – Well, it’s traditional, but cream cheese with a splash of cream works if you’re in a pinch. I’ve done it, and nobody called the food police.
- "Can you freeze them?" – I tried, but they got a bit icy and weird. Best just keep them in the fridge and eat them soonish. Or just invite more people over!
- "Is it safe for kids?" – There’s a bit of coffee, but nothing wild. If you’re worried, use decaf or swap for milk.
- "What if I don’t have ladyfingers?" – Graham crackers, digestive biscuits, or pound cake sort of work. The flavor’s different, but it’ll do in a bind.
- "Where do you get your cocoa powder from?" – I use whatever’s on sale, but I do love the good stuff from the local Italian deli (here’s a great roundup if you want to geek out about cocoa).
- "Any good mascarpone brands?" – I like Galbani, but honestly, find what’s affordable. For mascarpone hacks, this post is helpful (I tried it once when the store was out).
And, totally unrelated, but has anyone else noticed that tiramisu balls look a little like truffles? My neighbor thought I’d gone all fancy on her and was almost disappointed when I said it was just me and my rolling pin. Anyway, give these a try—I think you’ll be hooked.


Ingredients
- 1 cup ladyfinger biscuits, finely crushed
- ½ cup mascarpone cheese
- 2 tablespoons instant coffee, dissolved in 2 tablespoons hot water
- 2 tablespoons powdered sugar
- ½ teaspoon vanilla extract
- 1 tablespoon cocoa powder, plus extra for dusting
- 2 tablespoons dark chocolate chips, finely chopped
- Pinch of salt
Instructions
-
1In a large bowl, combine the crushed ladyfinger biscuits, powdered sugar, cocoa powder, and a pinch of salt.
-
2Add the mascarpone cheese, dissolved instant coffee, and vanilla extract to the dry ingredients. Mix until a soft dough forms.
-
3Fold in the finely chopped dark chocolate chips until evenly distributed.
-
4Scoop out small portions of the mixture and roll into balls using your hands.
-
5Dust each tiramisu ball with extra cocoa powder. Serve immediately or refrigerate for 10 minutes to firm up.
Approximate Information for One Serving
Nutrition Disclaimers
Number of total servings shown is approximate. Actual number of servings will depend on your preferred portion sizes.
Nutritional values shown are general guidelines and reflect information for 1 serving using the ingredients listed, not including any optional ingredients. Actual macros may vary slightly depending on specific brands and types of ingredients used.
To determine the weight of one serving, prepare the recipe as instructed. Weigh the finished recipe, then divide the weight of the finished recipe (not including the weight of the container the food is in) by the desired number of servings. Result will be the weight of one serving.
Did you make this recipe?
Please consider Pinning it!!